Not much is known about the Arkansas Traveler quilt pattern. It is a fairly old pattern, most likely dated by quilt historians through its name. “Arkansas Traveler” was a popular folk song and skit whose origin has been traced back to the middle of the nineteenth century. It is usually credited to Colonel Sanford “Sandy” Faulkner, a Little Rock plantation owner who claimed the tale was inspired by a real conversation with an Arkansas backwoodsman. The Arkansas Traveler quilt pattern is actually more than one pattern — one is a spool-like design, the other is a four-pointed star made of diamonds. The patterns have also been called Secret Drawer, Travel Star, Spools, and Cowboy Star.
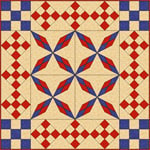
Quilt design by Tina Davis
Start the Arkansas Traveler project
- Open EQ7 or EQ6.
- Start a new project and name it Benni-Arkansas.
Setting the Drawing Board Setup
- Click WORKTABLE > Work on Block.
- Click BLOCK > New Block > EasyDraw.
- Click VIEW > click Precision Bar (if it is not checked).
- On the Precision Bar, set the following:
Block Width and Block Height: 12.00
Snaps Horizontal and Snaps Vertical: 24 - Graph paper > Number of Divisions > Horizontal & Vertical: 6
- Snapping Options: Make sure the first 2 (Snap to Grid, Snap to Nodes) are clicked. Snap to Line should not be clicked.
- Click VIEW > click Block Rulers (if it is not checked).
Drawing the Arkansas Traveler
- Click on the Line
 Tool.
Tool. - We’ll start by drawing a ‘ V ‘ with the Line tool in the bottom-left corner. Start 8″ down and 2″ in. Click and hold down with the Line tool as you drag a line to the bottom-left corner of the block.

- Next, start 10″ down and 4″ in. Click again with the Line tool and draw a line to the bottom-left corner of the block.
- Now draw a line from each tip of a ‘ V ‘ to the center. You will have a diamond in the lower-left corner now.
- Still using the Line tool, you are going to draw an ‘ X ‘ inside the diamond. But first, we’ll create nodes on the diamond. Click the Shape
 tool.Each line of the ‘ X ‘ will conveniently start where the diamond is intersected by the graph paper, and go to the opposite side where that part of the diamond is intersected.
 - Left-click one of the lines you drew to select it. Right-click on it and choose Edit.

- In the Edit Line box, click Half. A node gets added in the center of the line.

- Click each of the other lines and then click Half. All 4 lines of the diamond should now have center nodes.
- Click the Line tool.
- Draw a line from the opposites sides to make an “X”.

- On your keyboard, press CTRL and A at the same time *OR* choose EDIT – Select all from the main menu bar. This will select all, and make your drawing appear darker because it is now highlighted.
- In many programs, you can use these keyboard shortcuts. For reference, here are a few you’ll be using:
- CTRL+A = select all
- CTRL+C = copy (copies the selected item to the clipboard)
- CTRL+V = paste (pastes last item copied from the clipboard)
- Note: These are also accessible from the EDIT menu bar at the top of your screen.
- Now you want to copy this diamond and paste another one into your drawing. Press CTRL+C, then CTRL+V. You will now see another diamond appear on your block.
- The pasted diamond is now the one that is selected. With your left mouse button, click and hold over the pasted diamond. Still holding down the left mouse button, drag this diamond to the upper-right corner Make sure one point rests exactly in the center and the other point exactly in the corner. Release the left mouse button and let it snap into place.
- Press CTRL+A, and now you have everything selected.
- Press CTRL+C, then CTRL+V again. This will paste a copy of the two opposite diamonds onto your block.
- The pasted diamonds are now selected. From the main menu bar at the top, choose BLOCK – Rotate. Set it to: 90 Degrees. And click OK.
- The pasted diamonds are still selected, but are now on the right angle for you to place them. With your left mouse button, click and hold over the pasted diamonds. Still holding down the left mouse button, drag this group to the upper-left corner. Make sure one point rests exactly in one corner and the other point exactly in the other corner. Release the left mouse button and let them snap into place.
- Click outside the block outline, to deselect the grouped diamonds.
Coloring the Arkansas Traveler Block
- Now you’re ready to color. Click on the Color Tab at the bottom of your screen.
- You should see all the lines to the Arkansas Traveler block, but no graph paper. If any of your lines to theArkansas Traveler block are missing as in the picture below, then it means they were not connected.

If this happens:- Switch back to the EasyDraw Tab
- Redraw the line that is missing
- Use the Zoom In
 Tool to check the nodes at which the lines connect
 - Make sure you only see one node and not two side by side
- Use the Shape
 Tool to adjust any lines that are not connected
 - Switch back to the Color Tab to make sure you have the full Arkansas Traveler
- Use the Paintbrush
 Tool to color the parts of the Arkansas Traveler and the background the way you wish.

- When you are happy with the colors you’ve chosen, click on the Add to Sketchbook
 button.
Drawing an Alternate Block
- Click on BLOCK > New Block > EasyDraw.
- On the Precision bar, click on Graph Paper Cells so it is no longer pressed in, and you not see graph paper on your block.

- Click on the little red square in the lower-left corner of the Grid Tool. The Grid Setup window
 will appear.
 - Set the Columns and Rows to 3.
- Start in the top-left corner of the new block with the Grid Tool.
- Click and hold with your left mouse button, as you move your cursor to the opposite corner in the lower-right part of your block. Release the mouse button, and a 9-patch block will appear on your screen.
- Click on the Color Tab.
- Use the Paintbrush Tool to color the 9-patch the way you wish. You need two colorings of the block.

- When you are happy with the colors you’ve chosen, click on the Add to Sketchbook button. Color over the patches with a different color and click on Add to Sketchbook again.
Setting up the Quilt
- Click on WORKTABLE > Work on Quilt.
- Click on QUILT > New Quilt > Horizontal.
- Click on the Layout Tab at the bottom-left corner of your screen.
- Set the Number of blocks: Horizontal & Vertical: 2
- Set the finished size of block to be 12 x 12.
- Set the finished size of sashing to be 0 x 0.
- Click the Borders tab.
- Make your first border this way:
Style: Tile On Point Corners
Number of Blocks in the border: 3 - Click the Add button to make another border.
- Make your second border this way:
Style: Long Horizontal
Size: .25
Designing the Quilt
- Click on the Layer 1 tab.
- Click on the Set Block
 Tool. The Sketchbook Blocks palette will appear at the side of your quilt.
 - Click the Arkansas Traveler block.
- Set the Arkansas Traveler block into each block of the quilt, as shown.
- Click on 9-patch block in the Sketchbook Blocks palette.
- Click on the right-facing arrow buttons just beneath the picture to scroll through the colorings.
- Click in each of the four corners of the border to set this coloring.
- Scroll with the arrows in the Sketchbook Blocks palette again to see the next coloring of your 9-patch block.
- Click in each of the On-point squares in the border to set this second coloring.

Coloring the Border
- Click on the Paintbrush tool and color the borders the way you wish. *OR* try using the Eyedropper
 tool. This tool will “pick up” a color or fabric in your quilt. Click once with the Eyedropper tool over the fabric you want, this will make it the selected or “focused” fabric. Then Click on the Paintbrush tool and color with the fabric you just “picked up.”
 - Keep coloring the quilt and stop when you are happy with the coloring.

- Click the Add to Sketchbook button.
- Click the View Sketchbook
 button > QUILTS section > Notecard button.
 - In the top Name field, type: “My Arkansas Traveler quilt“.
- Your Arkansas Traveler quilt is now complete, and saved on the hard drive.
- Close the Sketchbook.
Print the blocks (optional)
- To print templates for the blocks click the Select
 tool. Click on the block on the quilt. Click FILE > Print > Templates. Click “Use size from quilt” for the size. Click Print.
Here’s what Tina’s second variation looks like.
Here are some other examples:
 |
 |
 |
 |