

The Seven Sisters quilt pattern, like so many others, was most likely designed from an observation of nature. The Seven Sisters, or Pleiades, is a fairly loose grouping of stars in the constellation Taurus. Although seven stars can be seen with the naked eye, binoculars or telescopes reveal it actually consists of several hundred more. The quilt pattern itself, as single six pointed star surrounded by six identical stars, has been seen as early as 1845. It became popular again during the Depression era, when hand-piecing difficult and challenging patterns was popular. It is also known as Seven Stars, Evening Star, and Seven Stars in a Cluster. An interesting phenomenon of the Seven Sisters star cluster is though they appear to be close together, they are, in fact, quite far apart.
Quilt design by Tina Davis
Download the Seven Sisters project
This block is a tricky one to draw, so we’ll start by downloading the Seven Sisters project with the block drawn for you. Download the project, if you haven’t already, by clicking on the underlined words below. Choose the Save option.
- Suggested Saving Location for EQ7: My Documents > My EQ7> PJ7 or for EQ6: My Documents > My EQ6 > PJ6
Open the Seven Sisters Project
- Open EQ7 or EQ6.
- Click FILE > Open (if you don’t see the Project Helper dialog).
- Click the Open an Existing Project tab of the Project Helper.
- Find “Benni-Seven” in the Existing Projects list > Click OK.
- The Sketchbook opens. The Quilts tab shows “No items to display.” Click the Blocks section, displaying a Star block. One of the names this block is known by is Seven Sisters.
- Click Close to put the Sketchbook away.
Make a quilt layout
- Click Work on Quilt
 button (in EQ7) or
  (in EQ6), or on the main menu bar, click WORKTABLE > Work on Quilt.
 - Click QUILT > New Quilt > Variable Point. (You could also use On-Point, but we want to show you how Variable Point differs from On-Point. Read on…)
- Click the Layout tab.
- Set the number of horizontal and vertical blocks to 1
- Make the size for the width and height: 8.00.
Notice that Variable Point can have a different width and height, making a tall skinny diamond or short fat diamond. On-Point diamonds are always squares on-point.
- Make the sashing width: 1.00
- Click the Borders tab.
- Make your border this way:
Style: Mitered
Size: 1.00 for all sides.
Set the Seven Sisters block into the quilt
- Click the Layer 1 tab.
- Click the Set Block
 tool.
tool. - Click on the green colored Seven Sisters block to select it. (Click the forward arrow beneath the block, if necessary, to display the block in a coloring.)

- Click on the center of your quilt. The Seven Sisters block will pop into your quilt.
Set, resize and locate motif blocks in Layer 2
- Click the Layer 2 tab.
- Click the Set Block tool.
- Click the Motifs tab on the Blocks palette.
- Select the Daisy for placing in the quilt.

- To set the block, hold down your keyboard SHIFT key. Point toward the center of your quilt, click and drag diagonally with the mouse. A box forms as you drag. Release the mouse button and the block will pop onto your quilt. Don’t worry about size yet.
•Note: If the selected block does not pop into the box you dragged, the box was too small. Drag a larger box and it should work this time. - Click VIEW on the main menu bar.
- Look for Graph Pad. Be sure there is a check beside Graph Pad. If it is not checked, click on Graph Pad, to check it. The Graph Pad is the small bar that appears at the top of the screen, just below the main menu bar.

- Click the Adjust
 tool (on the right-hand toolbar). This tool is used for Layer 2, to do all resizing and moving of blocks.
 - Click on the Daisy in your quilt. It becomes selected.
- Look at the numbers in the center of the Graph Pad. These show the block size.
")
- Make the Daisy block 2.00 x 2.00.
- Look at the numbers at the left of the Graph Pad. These show the block location.

- Make the numbers: 7.00 x 7.00. Your Daisy block will move to the bottom-right corner of your quilt.
Set, resize and locate the remaining motif blocks
- Click the Set Block tool. Select the Daisy to place in the quilt again.
- Hold down your keyboard SHIFT key. Point toward the center of your quilt, click and drag diagonally with the mouse. Repeat this two more times to set the last two Daisy blocks in the other corners. Again, don’t worry about placement or size.
- Click the Adjust tool
- Click on the first Daisy block you drew in the bottom right hand corner. It becomes selected.
- Hold down your keyboard SHIFT key as you click on the three other Daisy blocks. All will become selected.
- Click the Same Size button
 (in EQ7) or
  (in EQ6) on the Graph Pad. All the Daisy blocks will now be: 2.00 x 2.00.
 - Click away from the blocks, to deselect them.
- To reposition each of the blocks: Click on a Daisy block. It becomes selected. Then click the location (left) arrows on the Graph Pad. Here are the location numbers for each Daisy:
- 0.00 x 0.00
- 0.00 x 7.00
- 7.00 x 0.00
- 7.00 x 7.00
You should now have a Daisy in each corner of your quilt.

Rotate each of the Daisy blocks
- Click the Rotate Block
 tool.
tool. - Position your cursor over a Daisy. Click on this Daisy until the stem is as close to the corner as you can get it.
Note: There will be a very tiny space between the end of the stem and the corner because of the way the Daisy is drawn.
Coloring the quilt’s background, borders, and sashes
- Click the Layer 1 tab.
- Click the Paintbrush
 tool. There are no fabrics in your Sketchbook.
 - Click LIBRARIES > Fabric Library and add several fabrics to your Sketchbook.
- Color the border, sashes, and triangles behind the daisies as you would like.
- If you like a color used in the Seven Sisters block, you can use the Eyedropper
 tool to “pick up” these colors into the color palette. To do this click on the Eyedropper tool. Position it over the color you like and click. Next, click on the Paintbrush tool. You can now color with the color you just “picked up”.
Note: To “pick up” colors from the Daisy you will need to click on the Layer 2 tab > Eyedropper
tool > Layer 1 tab > color with Paintbrush tool.
Choosing Quilting Stencils from the Block Library
- Click the Layer 3 tab.
- Click LIBRARIES > Block Library > 07 Quilting Stencils > Boxes. Find Boxed Diagonals 1 (the first block) and click Add to Sketchbook.
- Close the Library.
Adding Quilting Stencils in Layer 3
- Now to place a stencil on your quilt, click on Set Block tool.
- Click the Stencils tab on the Blocks palette
- Click on Boxed Diagonals 1.
- Hold down your keyboard SHIFT key and drag the mouse to set the Boxed Diagonals 1 block. Don’t worry about size yet.
- Click the Adjust tool
- Click on the stencil in your quilt. It will become highlighted. Make the size (middle set of numbers): 11.00 x 11.00
- To move the stencil to the correct position, click on the arrows to the right of the first set of numbers, until the position is: -1.00 x -1.00.

Note: This is what a quilting stencil would look like if it were placed over the entire quilt. But now to spice it up, let’s do something new. Read on…
Placing Blocks as Quilting Stencils in Layer 3
- Change the stencil size to 9.00 x 9.00.
- Change the location to 0.00 x 0.00.
- Click on the Set Block tool.
- Click the Motifs tab.
- Click on the Daisy block.
- Hold down your keyboard SHIFT key and drag the mouse to set the Daisy block over the top section of the Mitered border. Don’t worry about size yet.
Note: Layer 3 is used for Quilting Stencils. Notice how the Daisy appears as line drawing and not a coloring of an applique. You have just used a block from the Block Library as a stencil, you know what that means? You can use all the blocks in the Block Library as quilting stencils, and not just blocks. Imagine the possibilities.
- Click on the Adjust tool.
- Click on the Daisy in your border, so it becomes highlighted.
- Make the size 3.00 x 1.00 and position it at 0.00 x -1.00 by clicking on the arrow buttons to the right of the numbers. This Daisy now takes up a third of the top of the border.
- We want 3 Daisies across, so click on the Set Block tool.
- Now drag out 2 more Daisies in the top of the border, as well as 3 Daisies on each of the remaining sides. Don’t worry about size yet.
Note: If the box appears as you drag, but no Daisy pops up, have no fear; you aren’t dragging the boxes large enough.
Rotating and Resizing Stencil Blocks in the Border
- Click on the Rotate Block tool.
- Position your cursor over a Daisy and click it until the stem is facing the center of the quilt.
- Repeat this for each Daisy in the border.
- Click on the Adjust tool.
- Click on the first Daisy we placed on the left side of the top border.
- Hold down your keyboard SHIFT key as you click on the other two Daisy stencils in that section and the three other Daisy blocks in the bottom section of the border. All the stencils in the top row and the bottom row will become selected. (Indicated by yellow dots.)

- Click the Same Size (in EQ7) or (in EQ6) button on the Graph Pad. These Daisy blocks will now be: 3.00 x 1.00. Click away from the Daisies to deselect them.
Note: The key to using the Size Buttons or Align Buttons on the Graph Pad is to always select the one that is the correct size or aligned correctly first. Then use the SHIFT key to select the other ones afterwards. Otherwise, you will mess up the size or alignment of the one that you corrected.
- Now click on the top Daisy in the left border section.
Make it:
size 1.00 x 3.00
location -1.00 x 0.00 by using the arrow buttons. - Hold down your keyboard SHIFT key as you click on the other two Daisy stencils in that section and the three other Daisy blocks in the right section of the border. All the stencils in the left column and the right column will become selected. (Indicated by yellow dots.)

- Click the Same Size (in EQ7) or (in EQ6) button on the Graph Pad. These Daisy blocks will now be: 1.00 x 3.00. Click away from the Daisies to deselect them.
Locating Stencil Blocks in the Border
- We will now move the Daisies to where they need to go. In the top section, the Daisies should be at:
- 0.00 x -1.00 (A)
- 3.00 x -1.00 (C)
- 6.00 x -1.00 (E)

- To move them there click on the Daisy and change it’s location by using the arrow buttons to the right of the numbers or by double clicking on the numbers so they turn blue and typing in the new number on your keyboard
- Change the Daisy locations in the left column border in the same manner as in Step 79 to:
- -1.00 x 0.00 (G)
- -1.00 x 3.00 (I)
- -1.00 x 6.00 (K)
- Now for the trick to save yourself the time of moving the Daisies in the other two sides of the border… Take a look at the picture above:
- Click on Daisy “A”, hold down the SHIFT key, and click on Daisy “B”. Then click on the Align Left
 (in EQ7) or
  (in EQ6) button. Click away from the selected Daisies, to deselect them. Repeat this for C & D, and E & F.
 - Now for the pair G & H, do the exact same thing, but use the Align Tops
 (in EQ7) or
  (in EQ6) button instead. Repeat this for the pairs I & J, K & L.
- Click on Daisy “A”, hold down the SHIFT key, and click on Daisy “B”. Then click on the Align Left
- Next, the Daisies BDF, and HJL may not be lined up with respect to each other so here’s how to fix that: Click on Daisy “B”, and make its location: 0.00 x 9.00
- Hold down your SHIFT key, and click on Daisies “D” and “F”, so all three are highlighted, and click on theAlign Tops (in EQ7) or (in EQ6) button.
- Now click on Daisy “H”, and make its location: 9.00 x 0.00.
- Hold down your SHIFT key, click on Daisies “J” and “L”, so all three are highlighted, and click on the Align Left (in EQ7) or (in EQ6) button.
Change the Color of the stencils
- Click on the Spray Thread
 tool on the right hand side. (If you don’t see the Spray Thread tool, click and hold on the Set Thread tool to display the flyout box. Click on the Spray Thread tool.) There are no threads in the palette.
 - Click LIBRARIES > Thread Library and add some threads to your Sketchbook.
- Choose a thread color from the palette.
- Click on each of the Daisies and the stencil in the center of the quilt. This will change their color.
- Click the Add to Sketchbook
 button.
 - Click the Save
 button.
 - Your Seven Sisters quilt is now complete, and saved on the hard drive.
Print the blocks (optional)
- To print templates for the blocks, be on Layer 1; for the appliqué daisies on Layer 2; and for the stencils onLayer 3. Click the Layer tab of the layer you want, and then click the Select
 tool. Click on the item you want the template for on the quilt.
 - Click FILE > Print > Templates. Click the Size from quilt box. Click Print.
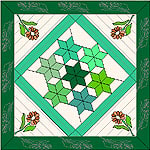
 Seven Sisters, designed by Tina Davis. Tina played with applique motifs and a variation on the Seven Sisters block in this quilt.
Some other examples…
 |
 |
 |
 |


