

Mariner’s Compass is an old English pattern that can be traced back as far as the 1700s. The design, taken from the wind roses found on ships’ compasses and sea charts, was a favorite of nineteenth-century quilt makers living on the Eastern Seaboard. With its bold mixture of curves and narrow, radiating points, always in multiples of eight, it requires many hours of patient piecing and is often attempted only by advanced quilters. Other names include, Sunburst, Rising Sun, and Chips & Whetstones. It is to be noted that a compass is not only meant to point the way to our destination, but its function is also to show us the way home.
Quilt design by Tina Davis
Download the Mariner’s Compass project
This block is a tricky one to draw, so we’ll start by downloading the Mariner’s Compass project with the block drawn for you. Download the project, if you haven’t already, by clicking on the underlined words below. Choose the Save option.
- Suggested Saving Location for EQ7: My Documents > My EQ7> PJ7
or for EQ6: My Documents > My EQ6 > PJ6
Open the Mariner’s Compass Project
- Open EQ7 or EQ6.
- Click the Open an Existing Project tab (it appears immediately).
- Find “Benni_Mariner” in the Existing Projects list > Click OK.
- The Sketchbook opens. The Quilts section shows “No quilts.” Click the Blocks section, displaying a Star block. One of the names this block is known by is Mariner’s Compass.
- Click Close to put the Sketchbook away.
Make a quilt layout
- Click Work on Quilt
 button (in EQ7) or
  (in EQ6) on the main menu bar click WORKTABLE > Work on Quilt.
 - Click QUILT > New Quilt > Custom Set. A Custom Set layout is just our name for a quilt containing blocks of different sizes.
- Click the Layout tab.
- Make the Center Rectangle size for Horizontal and Vertical: 16.50
- Click the Borders tab.
- Make your first border this way:
Style: Mitered
Size: 1.00 - Click the Add button to add a border.
- Make your second border this way:
Style: Mitered
Size: 2.00 - Click the Add button to add a border.
- Make your third border this way:
Style: Points Out
Size: 3.00
Blocks in Border: 1 - Click the Add button to add a border.
- Make your fourth border this way:
Style: Mitered
Size: .25
Set the Mariner’s Compass block into the quilt
- Click the Layer 1 tab.
- Click the Set
 tool. Click to select your Mariner’s Compass block.

- Since this is a Custom Set quilt, blocks don’t automatically set with a click, because they can be set any size in this quilt style. To set the block, hold down your keyboard SHIFT key. Point toward the center of your quilt, click and drag diagonally with the mouse. A box forms as you drag. Release the mouse button and the block will pop into your quilt. Don’t worry about size yet.
•Note: If the selected block does not pop into the box you dragged, the box was too small. Drag a larger box and it should work this time.
Set, resize and locate a block in Custom Set
- Click VIEW on the main menu bar.
- Look for Graph Pad. Be sure there is a check beside Graph Pad. If it is not checked, click on Graph Pad, to check it. The Graph Pad is the small bar that appears at the top of the screen, just below the main menu bar.

- Click the Adjust
 tool (on the right-hand toolbar). This tool is used for Custom Set, to do all resizing and moving of blocks.
 - Click the block on your quilt. It becomes selected. The Graph Pad fills with numbers. These show the block size.
- Click the arrows beside these size numbers to make your block size: 10.50 x 10.50.
- Look at the numbers at the left of the Graph Pad. These show the block location.
- Note: Your quilt center is 16.50 x 16.50. After much calculation we figure the exact center of the this quilt center, for your 10.50 x 10.50 block is: 3.00 x 3.00.

- Click the arrows beside these location numbers to make the numbers: 3.00 x 3.00. Your Mariner’s Compassblock will move to be centered in your quilt.
Set, resize and locate the Schooner blocks
- Click the Set tool. Click on the second block in your Sketchbook palette: Schooner.

- Point at the quilt – anywhere – and holding down the shift key, drag the mouse to set a Schooner block. Repeat this three more times to set four Schooner blocks. Again, don’t worry about placement or size.
- Click the Adjust tool.
- Click on one Schooner block. It becomes selected
- Click the size numbers (center) to make the Schooner block: 3.00 x 3.00.
- Hold down your keyboard SHIFT key as you click on the three other Schooner blocks. All will become selected.
- Click the Same Size
 button on the Graph Pad. All the Schooner blocks will now be: 3.00 x 3.00.
 - Click away from the blocks, to deselect them.
- To reposition each of the blocks: Click on a Schooner block. It becomes selected. Then click the location (left) arrows on the Graph Pad. Here are the location numbers for each Schooner block:•
- 0.00 x 0.00
- 0.00 x 13.50
- 13.50 x 0.00
- 13.50 x 13.50
- You should now have a Schooner block in each corner of your quilt.

Set, resize and locate the other boat blocks
- Click the Set tool. Click on the third block in your Sketchbook palette: Sailboat III.

- Point at the quilt – anywhere – and drag the mouse to set a Sailboat III block.Set one of each of the remaining sailboat blocks in the same way. Again, don’t worry about placement or size.Sailboat
 Bathtub Boat
 Boat
Boat

- Click the Adjust tool.
- Click on the Sailboat III block. It becomes selected.
- Click the size numbers (center) to make the Sailboat III block: 3.00 x 3.00.

- Hold down your keyboard SHIFT key as you click on the three other boat blocks that you just set. All will become selected.
- Click the Same Size button on the Graph Pad. All the boat blocks will now be: 3.00 x 3.00.
- Click away from the blocks, to deselect them.
- Next, reposition each of the sailboat blocks (but don’t move those boats you moved to the corner) To move a block, click on any boat (it doesn’t matter which boat goes where), then type one of the location numbers below into the location number boxes on the Graph Pad (the numbers on the left):•
- 4.50 x 0.00
- 9.00 x 0.00
- 4.50 x 13.50
- 9.00 x 13.50
- You should now have boats along the top and bottom edge of your quilt center.

Set, resize and locate the Lighthouse block - Click the Set tool. Click on the Lighthouse block.

- Point at the quilt – at any empty space – and drag the mouse to set two Lighthouse blocks.
- Click the Adjust tool.
- Click on one Lighthouse block. It becomes selected.
- Click the size numbers (center) to make the Lighthouse block: 3.00 x 6.00. This makes it a tall rectangular lighthouse.
- Hold down your keyboard SHIFT key as you click on the other Lighthouse block.
- Click the Same Size button on the Graph Pad. Both Lighthouse blocks will now be: 3.00 x 6.00.
- Click away from the blocks, to deselect them.
- Next, reposition each Lighthouse. Here are the position numbers:•
- 0.00 x 5.25
- 13.50 x 5.25

- The quilt center is nearly done. Next we’ll set plain strips between the blocks.
Set, resize and locate the lattice strips
- Click the Set tool. Click on the Plain block. This will become the sashing in the quilt.

- Point at the quilt – at the space between any blocks – Hold down your keyboard SHIFT key and drag the mouse to set the Plain block between all of the other blocks. You’ll be setting ten – 4 horizontal and 6 vertical. You won’t get them perfectly placed. So we’ll resize and move them.
- Click the Adjust tool.
- Click on one vertical sash. It becomes selected.
- Click the size numbers (center) to make the vertical sash block: 1.50 x 3.00.
- Hold down your keyboard SHIFT key as you click on the other five vertical sashes.
- Click the Same Size on the Graph Pad. All six vertical sash blocks will now be: 1.50 x 3.00.
- Click away from the sashes, to deselect them.
- Next, reposition each vertical sash in the top row. Here are the position numbers:
3.00 x 0.00
7.50 x 0.00
12.00 x 0.00 - Next, reposition each vertical sash in the bottom row. Here are position numbers:
3.00 x 13.50
7.50 x 13.50
12.00 x 13.50 - Now for the horizontal sashes. Click on one horizontal sash.
- Click the size numbers (center) to make the horizontal sash block: 3.00 x 2.25.
- Hold down your keyboard SHIFT key as you click on the other three horizontal sashes.
- Click the Same Size button on the Graph Pad. All four vertical sash blocks will now be: 3.00 x 2.25.
- Click away from the sashes, to deselect them.
- Now reposition the horizontal sashes on the quilt’s left side. Here are the position numbers:
0.00 x 3.00
0.00 x 11.25 - Next, reposition the horizontal sashes on the quilt’s right side. Here are position numbers:
13.50 x 3.00
13.50 x 11.25
- Your quilt center is done.
Color the border
- Click the Paintbrush
 tool.
tool. - Color the blocks and border corners as you would like. You may want to zoom in when you color the outside border, since it’s so narrow.
- When you’re happy with your coloring, click the Add to Sketchbook
 button.
 - Click the Save
 button. Your Mariner’s Compass quilt is now complete, and saved on the hard drive.
Print the blocks (optional)
- To print templates for the blocks, be on Layer 1. Click the Select
 tool. Click on a block on the quilt. Click FILE – Print – Templates. Click the Size from quilt box. Click Print.

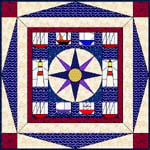
Here’s what Tina’s second variation looks like. Tina played with borders and blocks in this completely different compass variation.
Some other examples…
 |
 |
 |
 |


