

Dove in the Window is an intricate star pattern made of primarily diamond shapes that give it a sharp, exacting look. Probably of east coast origin, the early nineteenth-century pattern in one of its many forms presents a picture suggestive of birds resting beak to beak. The design is said to have derived its name from the days when everyone had barns with dovecotes — round holes cut in the gable and a tiny platform beneath — all for the accommodation of pet pigeons. Each square can contain as many as fifty-six pieces, making it a time-consuming pattern not suggested for the impatient quilter. Some other names for the pattern are: Flying Star, Four Doves, Bluebirds for Happiness, Bird of Paradise, Mother’s Choice, Flying Fish, Crow’s Foot and Crossroads.
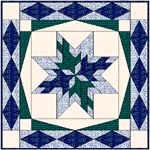
Quilt design by Tina Davis
Download the Dove in the Window project
This block is a tricky one to draw, so we’ll start by downloading the Dove project with the block drawn for you. Download the project, if you haven’t already, by clicking on the underlined words below. Choose the Save option.
- Suggested Saving Location for EQ7: My Documents > My EQ7> PJ7
or for EQ6: My Documents > My EQ6 > PJ6
Open the Dove in the Window Project
- Open EQ7 or EQ6.
- Click the Open an Existing Project tab (it appears immediately).
OR
On the FILE > Open. - Find “Benni-Dove” in the Existing Projects list > Click OK.
- The Sketchbook opens. The Quilts tab shows “No quilts.” Click the Blocks tab, displaying a Star block. One of the names this block is known by is Dove in the Window.
Make a quilt layout
- Click WORKTABLE > Work on Quilt.
- Click QUILT > New Quilt > Horizontal.
- Click the Layout tab at the bottom-left corner of your screen.
- Set the number of blocks horizontal and vertical to be 1.
- Set the finished size of block to be 15 x 15.
- Set the finished size of sashing to be 0 x 0.
- Click the Borders tab.
- Make your first border this way:
Style: Points Out
Size: 2.00
Blocks in Border: 1 - Click the Add button to make another border.
- Make your second border this way:
Style: Diamonds
Size: 3.00
Blocks in Border: 3
Set the block into the quilt
- Click the Layer 1 tab.
- Click the Set Block
 tool.
tool. - Click the Dove in the Window block, to select it.
- Click on the center of your quilt. The Dove in the Window block will pop into your quilt.
Get fabrics from the library
- Click LIBRARIES > Fabric Library.
- Click the Search button > By Notecard > type in “sky”> search button. Choose a few of those fabrics as well as any others from the Library by clicking the Add to Sketchbook button.
- To see your fabrics again click the Paintbrush
 tool. Scroll to see all the fabrics in the Fabrics palette.
Color the quilt
- Click to select a fabric in the Fabrics palette.
- Hold down your keyboard CTRL key and click in the border to color all the same sections at one time.
- Choose another color, and click to color another part of the border.
- Keep choosing colors from the palette and coloring the quilt center and border.
- Here’s a coloring trick: Once you have the quilt sections colored, you can change any color all over your quilt to another color by using the Swap
 tool. Click the Swap tool, pick a fabric in the palette and click a color on your quilt to replace it with the color you’ve selected. Keep clicking on colors and try them out in your quilt.
 - Stop when you are happy with the coloring.
- Click the Add to Sketchbook
 button.
 - Click the View Sketchbook
 button > Quilts button > Notecard button.
 - In the top Name field, type: “Benni-Harper 5″.
- Your project is now complete, and saved on the hard drive.
- Close the Sketchbook.
Try an on-point variation
- To choose a new quilt layout style, click QUILT >New Quilt > On-point. Your first quilt will disappear and an on-point layout will be on your screen. Don’t worry your first quilt is not gone forever, because we saved it in the Sketchbook.
- Click the Layout tab.
- Set the number of blocks horizontal and vertical to be 2.
- Set the finished size of block to be 12 x 12.
- Set the finished size of sashing to be 0 x 0.
- Click the Borders tab.
- Make your first border this way:
Style: Points Out
Size: 2.0
Blocks in border: 3 - Click the Add button to make another border.
- Make your second border this way:
Style: Mitered
Size: .5
It will resemble binding.
Set blocks into the quilt
- Click the Layer 1 tab.
- Click the Set tool. Click to select your Dove in the Window block.
- Click on the center block of your quilt. The Dove in the Window block will pop into this block in your quilt.
- Hold down the CTRL key on your keyboard and click the top full block in your quilt. All blocks except the setting triangles will fill.
Color the on-point quilt
- Click the Paintbrush tool. Color the blocks and border any way you’d like.
- Stop when you are happy with the coloring.
- Click the Add to Sketchbook button.
- Click the View Sketchbook > Quilts tab.
- Click a right-facing colorway arrow to get to Quilt 2 of 2
- Click the Notecard button.
- In the top Name field, type: “My On-Point Dove in the Window quilt“.
- Your Dove in the Window variation is now complete, and saved on the hard drive.
Print the blocks (optional)
- To print templates for the block, be on Layer 1. Click the Select
 tool. Click on a block on the quilt. Click FILE > Print > Templates > choose “use size from quilt” > click the Print button.
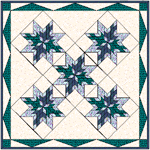 Here’s what Tina’s second variation looks like.
Some other examples…
 |
 |


