

Like many old quilt patterns, Goose in the Pond was probably inspired by nature, giving us a hint at the playful and creative imaginations of early quilt designers. Seen as far back as the early 1800s and made from a combination of tiny squares, triangles and strip blocks, it emulates the ripples created by a goose swimming across a body of water. Any colors and fabric may be chosen for this pattern, as Goose in the Pond, like a beloved folktale, lends itself well to individual interpretation. Thought to have originated in Massachusetts, it is also known throughout different parts of the country as Toad in the Puddle, Young Man’s Fancy, Mexican Block, Patchwork Fantasy, Bachelor’s Puzzle, Unique Nine Patch and Scrap Bag.
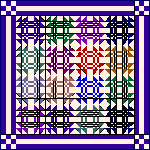
Quilt design by Tina Davis
Start the Goose in the Pond project
- Open EQ7 or EQ6.
- Start a new project and name it Benni Harper 4.
Search for blocks in the Library
- Click LIBRARIES > Block Library > Click on the Search button > choose by Notecard > make sure the first checkbox (Search the Name field) is checked > Type “Goose”.
Find Goose in the Pond (the fourth block) and click Add to Sketchbook.

- Go to 1 Classic Pieced > Nine Patch. Find Nine Patch (the first block) and click Add to Sketchbook.

- Go to 9 Border Blocks > Striped. Find Stripe Border 2 (the third block) and click Add to Sketchbook.

Make a quilt layout
- Click WORKTABLE > Work on Quilt.
- Click QUILT > New Quilt > Horizontal.
- Click the Layout tab.
- Set the number of blocks horizontal and vertical to be 4.
- Set the finished size of block to be 12.
- Set the sashing to 0.
- Click the Borders tab.
- Make your first border this way:
Style: Corner Blocks
Size: 6.00 - Click the Add button to add another border.
- Make your second border this way:
Style: Mitered
Size: 0.25
Set the blocks into the quilt
- Click the Layer 1 tab.
- Click the Set Block
 tool, then click your Goose in the Pond block to select it.
 - Hold down the CTRL key on your keyboard as you click on any block in your quilt. All blocks in your layout will fill.
- Click on the Nine Patch block in the Sketchbook blocks palette.
- Hold down the CTRL key on your keyboard as you click on the border corner block in your quilt. The border corners will fill.
- Click on the Stripe 2 block in the Sketchbook blocks palette.
- Hold down the CTRL key as you click on any long border space. The borders will fill. The stripes will be going the wrong way on the sides and will look odd.
- Click the Rotate
 tool .
 - Click on one of the side borders, to rotate the block. The stripe will now extend down the border.
- Rotate the other border, to complete the design.
Color the blocks
- Click the Spraycan
 tool. Color the blocks and border anyway you’d like. Hold down the ALT or CTRLkey as you use the Spraycan tool and watch what happens to the other similar blocks in the quilt.
 - When you’re happy with your coloring, click the Add to Sketchbook
 button.
 - Click the View Sketchbook
 button > Quilts button > Notecard button.
 - In the top Name field, type: “My Goose in the Pond quilt”.
- Your Goose in the Pond project is now complete, and saved on the hard drive.
Print the blocks (optional)
- To print templates for the block, be on Layer 1. Click the Select
 tool. Click on a block on the quilt. Click FILE – Print – Templates. Click the Size from quilt box. Click Print.
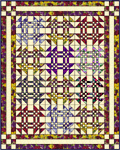 Here’s a different Goose in the Pond, designed by Tina Davis. Tina made her setting 3 x 4, and played with some Designer Fabrics that give her quilt almost a hand-dyed look.
to be continued with another Benni Harper mystery quilt


