


Variations of the Kansas Troubles quilt pattern have been traced back to the early 1800s, and it was officially recognized by the Ladies Art Company in the latter part of the nineteenth century. An agitating pattern consisting of small and large triangles resembling bear claws, Kansas Troubles evokes the image of rapidly spinning windmill blades or the twirling center of a tornado. The pattern, all sharp points and angles, will not produce a calming effect no matter what color fabric is used. In all, Kansas Troubles has over twenty-five variations. Some of the more popular ones are called Indian Trails, Climbing Rose, Bear’s Paw, Little Lost Ship, Rocky Road to Kansas, Slave Chain and Endless Tears.
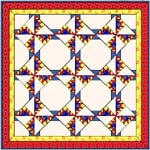
Quilt design by Tina Davis
Start the Kansas Troubles project
- Open EQ7 or EQ6.
- Start a new project and name it Benni Harper 3.
Search for blocks in the Library
- Go to 1 Classic Pieced > Drunkard’s Path. Find Falling Timbers (the sixth block) and click Add to Sketchbook.
- Click LIBRARIES > Block Library > Click on the Search button > choose by Notecard > make sure the first checkbox (Search the Name field) is checked > Type “Kansas”.
- Hover with your cursor over the first block to see the name. It is “Arkansas Traveler.” Notice how “kansas” is actually a part of the word Arkansas.
- Hover over the next block. This is the Kansas Troubles block we want. Click Add to Sketchbook.
- Go to 2 Contemporary Pieced > Good Alternate Blocks. Find 9-patch Snowball and click Add to Sketchbook. Find 4-patch Snowball and click Add to Sketchbook. Find Cross X and click Add to Sketchbook.
- Close the library.
Make a quilt layout
- Click WORKTABLE > Work on Quilt.
- Click QUILT > New Quilt > On Point.
- Click the Layout tab.
- Set the number of blocks horizontal and vertical to be 3.
- Set the finished size of block to be 12.
- Set the sashing to 0.
- Click the Borders tab.
- Make your first border this way:
Style: Mitered
Size: 2.00 - Click the Add button to add another border.
- Make your second border this way:
Style: Mitered
Size: 3.00 - Click the Add button to make another border.
- Make your third border this way:
Style: Mitered
Size: 0.50
Experiment with block layouts
- Click the Layer 1 tab.
- Click the Set Block
 tool, then click your Kansas Troubles block to select it.Note: Because you are working with an On-Point quilt the CTRL key will apply the action to every other block Within other layouts the ALT key would apply action to every other block.
 - Hold down the CTRL key on your keyboard as you click on the top-left block in your quilt. Every other block in your layout will fill.
- Click on another block in the Sketchbook blocks palette.
- Hold down the CTRL key on your keyboard as you click on any blank block in your quilt. The alternate spaces will fill. Notice how the two designs blend together. Rather than seeing two individual blocks repeated, your eye mixes the designs, making a secondary design emerge.

- Click on another block in the Sketchbook blocks palette.
- Hold down the CTRL key as you click on the alternate block space in your quilt.
- Repeat the last two steps, trying out each of the alternate blocks. When you decide which overall design you prefer, leave that quilt on the screen.

Color the blocks
- Click the Paintbrush
 tool. Hold down the CTRL key as you click in one block. Notice how all the similar blocks color at the same time.
 - Keep holding down the CTRL key as you color all the blocks.
- Stop coloring when you like the quilt in front of you.

- Click the Add to Sketchbook
 button.
 - Click the View Sketchbook
 button > Quilts button > Notecard button.
 - In the top Name field, type: “My Kansas Troubles quilt”.
- Your Kansas Troubles project is now complete, and saved on the hard drive.
Print the blocks (optional)
- To print templates for the block, be on Layer 1. Click the Select
 tool. Click on a block on the quilt. Click FILE > Print > Templates. Click the Size from quilt box. Click Print.
 - If you print templates for the half and quarter-triangle setting blocks around the quilt’s edge, you’ll get templates for the whole block. To get templates for only the half or quarter triangle setting blocks, try the following trick.
Trick for Printing Setting Blocks (optional)
- Click the View Sketchbook button.
- Click the Blocks tab.
- Click the block that you use around the edge of your quilt.
- Click the Edit button. The block will appear down on the Block worktable.
- Draw a diagonal line from corner to corner across your block.

- Click the Add to Sketchbook button.
- Click File > Print > Templates. Type 12.00 x 12.00 for size. Click Print. You’ll get templates for the half-square setting blocks.
- Draw a second diagonal line going the other way across your block.
- Click the Add to Sketchbook button.
- Click File > Print > Templates. Type 12.00 x 12.00 for size. Click Print. This will print your quarter-square setting blocks.
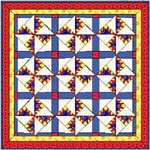 |
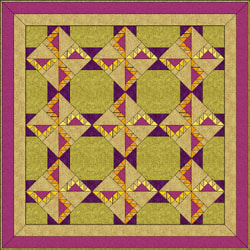
Here’s another version of Kansas Troubles, designed by Tina Davis. See what interesting versions you can make, using different alternate blocks. to be continued with another Benni Harper mystery quilt |
 |
 |
 |
 |


