

This is one version of the Irish Chain, a pattern with many design variations. The origin of the Irish Chain quilt pattern is unknown, but it is very old. The color arrangement of the fabric pieces creates the “chain” effect. The single chain in made with two contrasting colors or prints, but can also be expanded to make a double, triple, or quadruple chain. The color combinations become more varied and the pattern more complex as chains are added. The chain can go on and on, making a quilt as large as desired. It is only stopped with the quilter decides to end it.
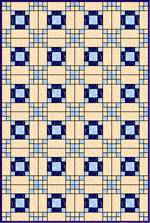
Quilt design by Tina Davis
Start the Irish Chain project
- Open EQ7 or EQ6.
- Start a new project and name it Benni Harper 2.
Get ready to draw
- Click WORKTABLE > Work on Block.
- Click BLOCK > New Block > EasyDraw Block. A blank block appears, with the EasyDraw tools.
The reason EasyDraw got its name is because it lets you create patches by simply drawing lines (rather than drawing complete patches, as in PatchDraw). This makes it easy for you to draw a nine-patch with four tic-tac-toe lines rather than needing to draw nine squares and fit them together.
But in order for EQ to create patches from the lines you draw, you need to start and stop your line so all segments of the drawing connect to one another at “Snap points.” When EQ finds these points where segments touch or intersect each other it can define a patch. But EQ can’t define a patch unless it can find these points.
When you choose a finer grid (more snap points) not all of the dots are drawn because it makes the drawing board too cluttered.
 |
The easiest way to draw a block is counting the squares and setting everything to that number. Count the number of times the small patch would fit across the block. If you get 8, then set everything to 8. |
- Make sure VIEW > Precision Bar has a check next to it.
In the Precision Bar, make your settings:
Snap to Grid Points to 8 x 8
Block Size to 8 x 8 (you do this only to change the ruler markings, to aid you in drawing. The block can still be any size when you print it.)
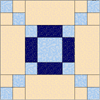
- With the Line
 tool selected, draw 4 lines to divide your block up into an Uneven 4-Patch, as shown. Start your lines at the 2″ and 6″ ruler points.

- Now draw two lines across each small square, making each a 4-Patch, as shown. Start your lines at the 1″ and 7″ ruler points.
- Finally, draw two lines to divide the large center square into an Uneven 4-Patch, as shown. Start your lines at the 3″ and 5″ ruler points.

Color the block
- Click the Color tab.
- Color the block however you’d like, but to get the chain effect in your quilt, color all the squares the same color, as shown.
- Click Add to Sketchbook
 button.
Make a quilt layout
- Click WORKTABLE >Work on Quilt.
- Click QUILT > New Quilt > Horizontal.
- Click the Layout tab.
- Set the number of blocks to be: 4 Horizontal, and 6 Vertical
- Set the finished size of the block to be 12. (It doesn’t matter that we set block size for 8 when we drew the block. That was to help draw.)
- Set the finished size of the sashing to be 0.
- Click the Borders tab.
- Make the border style this way:
Style: Mitered
Size .50
It will look like a binding.
Fill the layout with blocks
- Click the Layer 1 tab.
- Click the Set Block
 tool. Click the block you drew to select it.
 - Click a right-facing arrow beneath the block
 to display your colored block. Hold down the CTRL key on your keyboard as you click on any blank block in your quilt. Your quilt will now fill, and you can see the chain effect made by the chain of squares.
 - Click the Paintbrush
 tool. Color your quilt border (binding) however you would like. If you want to zoom in on it, click the Zoom in
  tool, then drag the cursor to form a zoom in box on the border. To zoom back out, click the Zoom out
  tool.
tool.
- Click the Add to Sketchbook button.
- Click the View Sketchbook
 button > Quilts section > Notecard button.
 - In the top Name field, type: “My Irish Chain quilt“. Click the X to close the Notecard.
- Close the Sketchbook.
- Your Irish Chain project is now complete, and saved on the hard drive.
Print the blocks (optional)
- Click the Select
 tool. Click on a block on the quilt. Click FILE > Print > Templates > choose “Use size from quilt” > click the Print button.
Here’s how Tina Davis‘ quilt looks. How does your quilt look?
to be continued with another Benni Harper mystery quilt
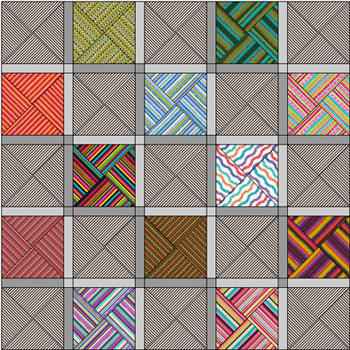
Here are some examples of other colorings for the quilt:
 |
 |
 |
 |


