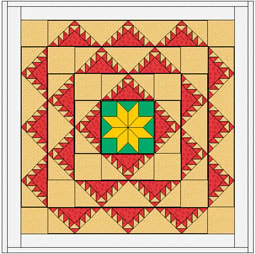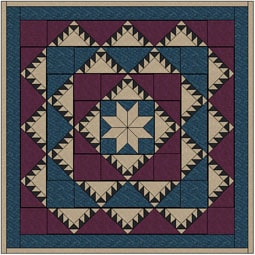
Quilt designs by Andrea Bishop
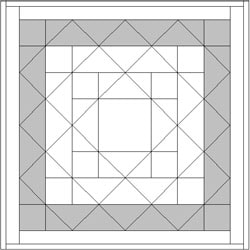
Many quilts draw their inspiration from spiritual sources. Found as far back in quilting history as the 1840s, the Delectable Mountains pattern has a long tradition of being connected to John Bunyan’s allegory Pilgrim’s Progress. In the story, the Delectable Mountains were filled with beautiful gardens, orchards, vineyards, and fountains of water. From the mountains’ heights, the searching pilgrims could see the gates of the Celestial City. The pattern is often made with bias set squares turned to form a triangular design that is suggestive of mountain peaks. It is considered one of the most identifiable American quilt patterns. Similar in design to Kansas Troubles and Indian Trail, variations of it have been called World’s Fair and Solomon’s Temple.
Start the Delectable Mountains project
- Open EQ7 or EQ6.
- Start a new project and name it Benni-Mountains.
Getting the LeMoyne Star Block from the Library
- Click LIBRARIES > Block Library >01 Classic Pieced >Eight-Pointed Stars. Find LeMoyne Star (the first block) and click Add to Sketchbook.
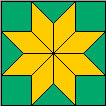
- Click Close to put the library away.
Setting up the Quilt
- At the top of your screen, click WORKTABLE > Work on Quilt.
- Click QUILT > New Quilt > Horizontal.
- At the bottom of your screen, click the Layout tab.
- Set the Number of blocks: Horizontal & Vertical: 1
- Set the Size of blocks: Width & Height: 10.00
- Set the Sashing: Width & Height: 0
- Click the Borders Tab.
- Make your first border this way:
- Style: Points Out
- Size: 5.00
- Blocks in the Border: 1
- Be sure Clone the selected border is checked.
- Click the Add button to make another border.
- The only change is: Blocks in the Border: 2
- Click the Add button to make another border. (Be sure Clone the selected border is still checked.)
- Make your third border: Blocks in the Border: 3
- Click the Add button to add a 4th border.
- Make your fourth border this way:
- Style: Long Vertical
- Size: 2.500
- Click the Add button to add a 5th border.
- Make your fifth border this way:
- Style: Long Vertical
- Size: 1.00
- Your quilt center and borders are set up, so click the Layer 1 tab.
Drawing the Block
- At the top of your screen, click WORKTABLE > Work on Block.
- Click BLOCK > New Block > EasyDraw Block.
- On the Precision bar, change the block height and width to 5.00
- Change the Horizontal and Vertical Snap Points to: 25
- Click to press down the Graph Paper Cells button. Make Horizontal and Vertical: 5
- For snapping options:
- Click the Line
 tool.
tool. - Draw a diagonal line from the top-left of your block to the bottom-right.
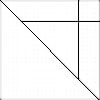
- Start 1″ down and 1″ right from the top-left corner (on the diagonal line) and draw a horizontal line across to the right edge of the block.
- Starting at the 4″ mark on the ruler, draw a vertical line down from the top of the block and stopping on the diagonal line. Your block should match this now:
- “Box Out” the top border area by drawing short vertical lines from the top edge of the block and stopping at the horizontal line you drew. (So draw a line from the top of the block at 1″ and stop 1″ down. Then draw a line from the top of the block at 2″ and stop 1″ down. Draw one more at 3″ and stop 1″ down.)
- “Box Out” the right border area by drawing short horizontal lines from the right edge of the block and stopping at the vertical line you drew. (So draw a horizontal line from the right edge of the block at 2″ down and stop at the vertical line you drew. Then draw a horizontal line from the right edge of the block at 3″ and stop at the vertical line you drew. Draw one more at 4″ and stop at the line again.) Your block should match this now:
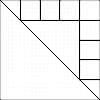
- Then finish off by drawing a diagonal line in each box to match the image below. (The one in the top-right corner is in the same direction as the large diagonal line. The others are perpendicular. Each box gets a diagonal line.)
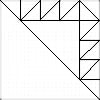
- Click the Add to Sketchbook
 button to save the block.
 - Go to the Color tab at the bottom of your screen and color the block in two colors… accenting the mountain:
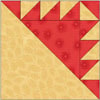
- Click the Add to Sketchbook
 button to save the coloring.
 - Click the View Sketchbook
 button and click the BLOCKS section > Notecard button.
 - In the top Name field, type: “Delectable Moutains”. Click the X at the top-right to close the notecard.
Setting the Block
- Click WORKTABLE > Work on Quilt.
- Click the Set Block
 tool.
tool. - Click on the LeMoyne Star block in the palette to select it. Click it in the center square of the quilt.
- Click on the Delectable Moutains block in the palette to select it.
- Point your cursor to an empty triangle space in the first border, right next to the center of the block.
- Hold down your keyboard CTRL key and click to set it in every triangle.
- Repeat (CTRL+click) for the other triangles in the other borders. Your quilt should look something like this now:
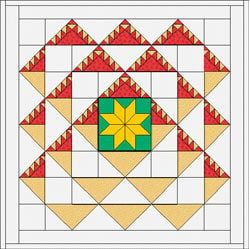
- Click the Rotate
 tool on your toolbar.
 - Hold down the ALT key on your keyboard as you click once on a triangle in the outer right border. (ALT makes all 3 in that border rotate together.) Repeat for the middle and inner triangle borders on the right.
- Hold down the ALT key as you click twice on a triangle in the bottom border. Repeat for the other two borders at the bottom.
- ALT+click 3 times on the left borders.
- (The top ones are okay as they are.) Your quilt should look like this now:
Color the Quilt and Blocks
- Click the Paintbrush
 tool
tool - Choose a color from the palette and CTRL+click it in the various spaces on the quilt.
- Keep going coloring the quilt until you’re happy with it.
- Your blocks and borders are colored. Good job!
Save the quilt
- Click the Add to Sketchbook
 button.
 - Click the View Sketchbook
 button and click the QUILTS section > Notecard button.
 - In the top Name field, type: “My Delectable Mountains quilt”.
- Your Delectable Mountain project is now complete, and saved on the hard drive.
- Close the Sketchbook.
Print the blocks (optional)
- To print a rotary cutting chart for the blocks click the Select
 tool. Click on the block on the quilt.
 - Click FILE – Print – Rotary Cutting. Click the Use size from quilt box. Click Print.

