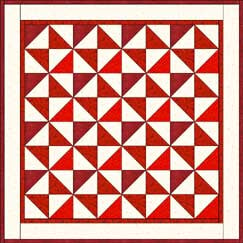
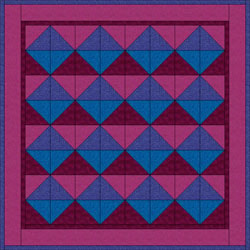
Broken Dishes is a simple pattern consisting of triangles arranged in a four-patch square. The squares are turned at different angles to create the broken dishes effect. It is a popular pattern with examples dating back to the 1790s and is one of the most common, earliest recorded designs in quilt history. Though a charming name that could have been inspired by many things including household accidents or even shattered dishes along the rough and rugged trail West, like many quilt patterns, it cannot be traced directly to any one original source. Most pattern histories come to us through folklore, old magazine articles, and sometimes diary or journal entries. It is a wonderful pattern to utilize colorful scraps of leftover fabric, but can also be quite striking and modern-looking if made using only two colors. Other names for this pattern are Old Tippecanoe, Bow Ties, Hour Glass, Whirling Blade, and Yankee Puzzle.
Start the Broken Dishes project
- Open EQ7 or EQ6.
- Start a new project and name it Benni-Dishes.
Getting the Block from the Library
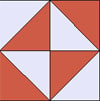
- Click LIBRARIES > Block Library > Click on the Search button > by Notecard (make sure the first checkbox is checked) > Type “Broken Dishes”. Click Search. Find Broken Dishes (the first block) and click Add to Sketchbook.
- Click Close to put the library away.
Setting up the Quilt
- At the top of your screen, click WORKTABLE > Work on Quilt.
- Click QUILT > New Quilt > Horizontal.
- At the bottom of your screen, click the Layout tab.
- Set the Number of blocks: Horizontal & Vertical: 4
- Set the Size of blocks: Width & Height: 12
- Set the Sashing: Width & Height: 0
- Click the Borders Tab.
- Make your first border this way: Style: Long Vertical, Size: 1.00
- Be sure there is a check next to All and also Clone the selected border.
- Click the Add button twice. You should have 3 – 1″ Long Vertical borders now.
- Click the middle border to select it. Change the width to: 4

- Your quilt center and borders are set up, so click the Layer 1 tab.
Setting the Block
- Click the Set Block
 tool.
tool. - Click on the Broken Dishes block in the palette to select it.
- Point your cursor to an empty block space in the quilt.
- Hold down your keyboard CTRL key and click to set the block in every space.
Color the Quilt and Blocks
- Click the Swap All Colors
 tool.
tool. - Find a light muslin or white fabric in the palette and click on it to select it.
- Position your cursor over the red in the blocks and click. The red will be replaced with the muslin.
- Click on the middle border with the Swap tool and the same muslin/white. All three borders will change at the same time, but don’t worry. They did this because they all had the same color. We’ll color the inner- and outermost borders after a few other steps.

- Click the Paintbrush
 tool.
tool. - Find a very dark red in the palette and click on it to select it.
- Hold down your keyboard CTRL key and click on the triangle in the upper-left corner of a block. All the blocks will change at the same time because you are using the CTRL key.
- CTRL + click this same fabric with the Paintbrush
 tool into the outermost border.

- Find a light red in the palette and click on it to select it.
- Hold down your keyboard CTRL key and click on the triangle in the botom-right corner of a block. All the blocks will change at the same time because you are using the CTRL key.
- Find a medium red in the palette and click on it to select it.
- Hold down your keyboard CTRL key and click on the two white triangles in the center of a block which form a bow-tie.
- CTRL + click this same fabric with the Paintbrush
 tool into the innermost border.

- Your blocks and borders are colored. Good job!
Save the quilt
- Click the Add to Sketchbook
 button.
 - Click the View Sketchbook
 button and click the QUILTS tab > Notecard button.
 - In the top Name field, type: “My Broken Dishes quilt”.
- Your Broken Dishes project is now complete, and saved on the hard drive.
- Close the Sketchbook.
This lesson shows you the difference between using the Swap All Colors ![]() tool and the Paintbrush
tool and the Paintbrush ![]() tool + CTRL.
tool + CTRL.
Swap All Colors
tool = colors all patches of one color to the new color all over the whole quilt.
Paintbrushtool + CTRL = colors the same patch in all matching blocks, no matter what the original color.
Make sure you learn the difference by spending some time experimenting with both tools, just playing. To undo, use EDIT > Undo.For more information on the Color tools see:
EQ6 User Manual: pages 200 – 201
EQ7 User Manual: pages 128 – 131
Print the blocks (optional)
- To print a rotary cutting chart for the blocks click the Select
 tool. Click on the block on the quilt.
 - Click FILE – Print – Rotary Cutting. Click the Size from quilt box. Click Print.
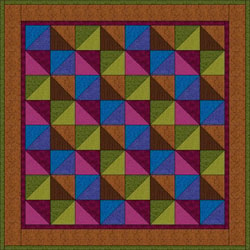
 Here’s what another variation could look like if you used the Spraycan tool (without the CTRL key) and just chose light, medium, and dark values of different fabrics.
Here are some more examples:
 |
 |
 |
 |

