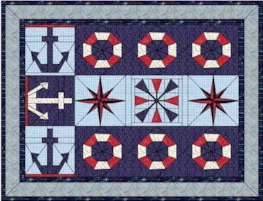
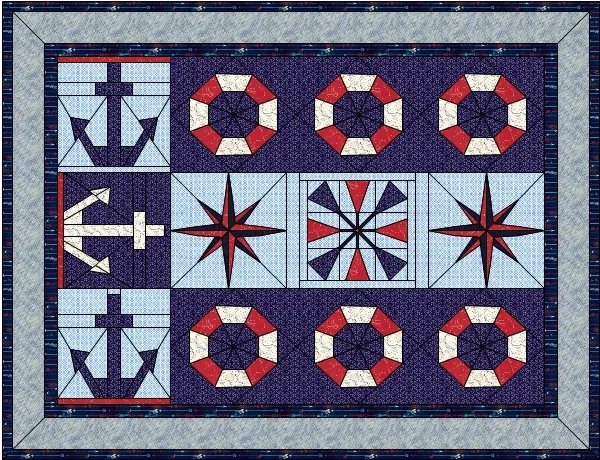
Welcome to Design & Discover! You can follow along with a lesson and submit your version of the quilt right on the blog with a link up. If you have a blog, make sure to add your site too. Let’s visit each others’ blogs and all get to know each other!
Before getting started, keep in mind any of the images can be viewed larger by clicking on them.
Also, you don’t have to make the quilts exactly as shown, have fun and make it your own!
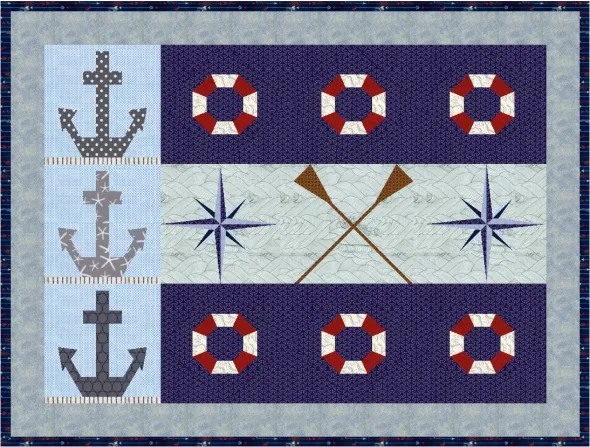
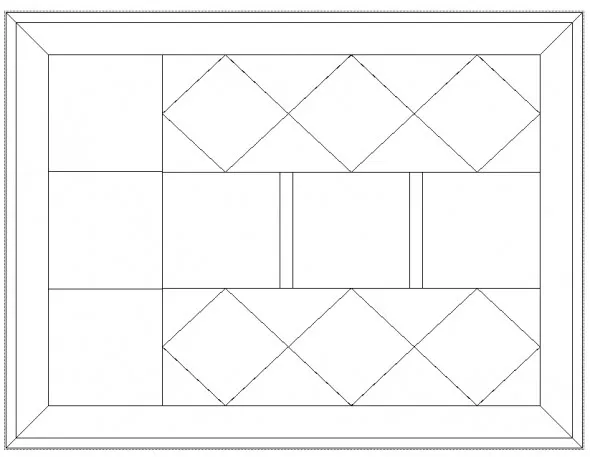
This month we will be doing some drawing and using borders to create a non-standard layout to make this quilt! (Or your version of it!)
(You can download the project HERE.)
First let’s draw the blocks!
We’ll be using EasyDraw. The most important thing about drawing EasyDraw blocks is that all segments must be connected to the outside edge of the block or to one another.
If you have trouble with lines disappearing, be sure to zoom in and make sure all your lines are connected.
Another common problem people have is not setting their snaps correctly.
Here is some more information about drawing.
Ok, so first let’s draw the Life Preserver block!
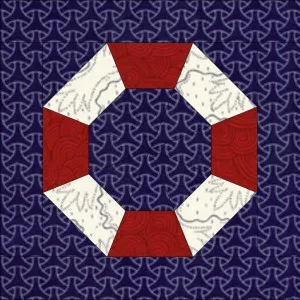
Sometimes it’s easier to edit an existing block then to draw one from scratch and that is what I did here.
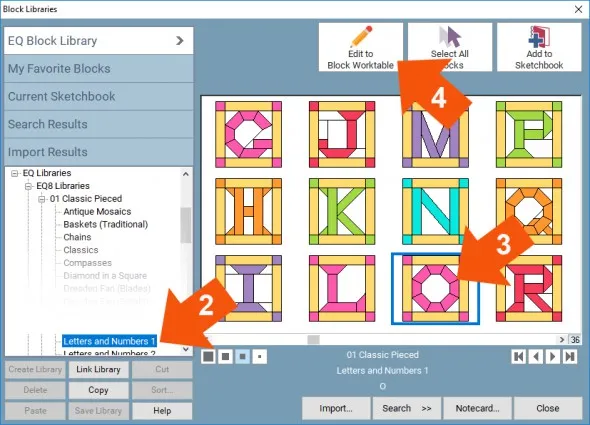
1. Click Libraries > Block Library
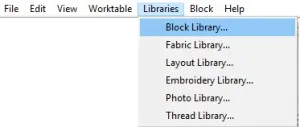
2. Click EQ Libraries > EQ8 Libraries > 01 Classic Pieced > Letters and Numbers 1
3. Click on the O block
4. Click Edit to Block Worktable
If I was going to sew this I wouldn’t want to sew it the way the O is originally drawn, so I added some more lines in the center.
5. Click the Line tool and draw the lines as shown.

If you are having trouble with your lines going where you want, make sure to check your Snapping Options.
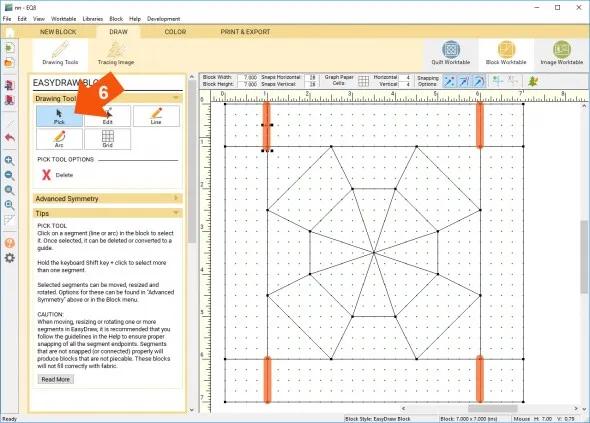
6. Click on the Pick tool, then click on a line as shown in orange below.
7. Click Delete or press the Delete key on your keyboard.
8. Repeat for the other 3 corners.
Your block should now look like this.
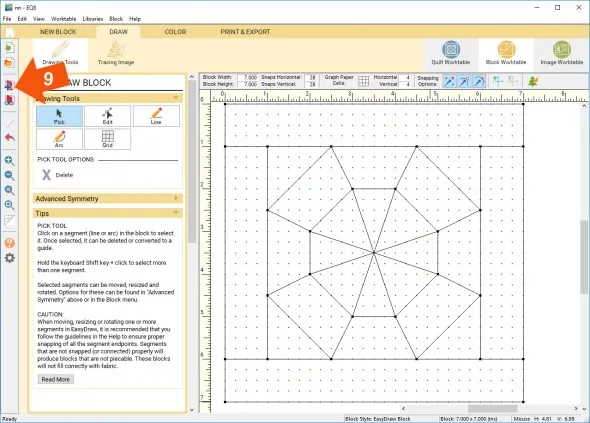
9. Click Add to Project Sketchbook.
If you haven’t named your project yet, EQ8 will prompt you to do so. (To be saved your item needs to be in the Sketchbook AND your project needs to be named. Here is more information.)
Our first block is done! Let’s move onto the anchor.
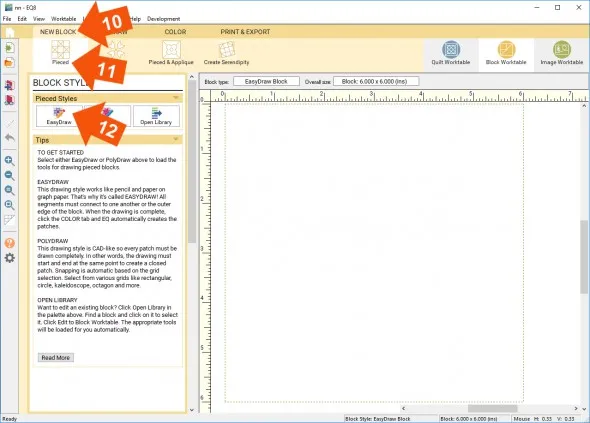
10. Click New Block
11. Click Pieced
12. Click EasyDraw
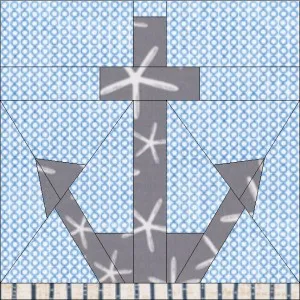
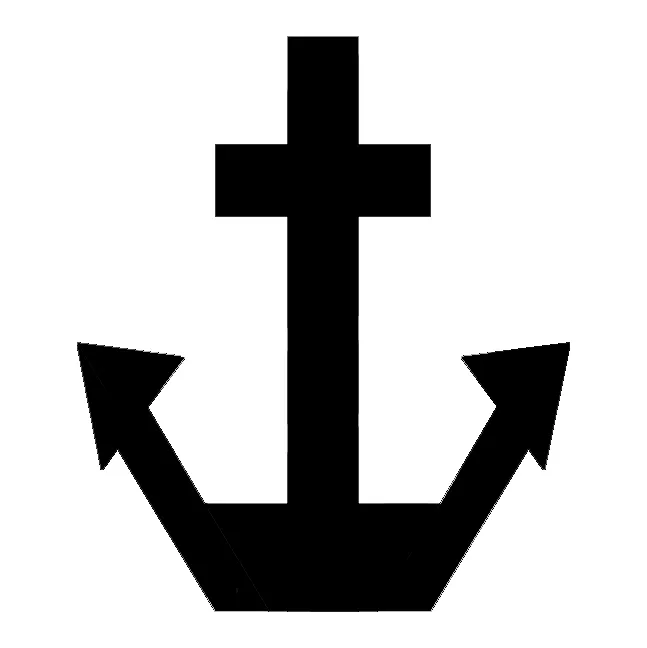
We are going to draw an anchor by tracing one. Here is the image I used to trace.
13. To save this image click on it to make it larger, then right click and choose Save Image As.
14. Name it Anchor and save it to your desktop.
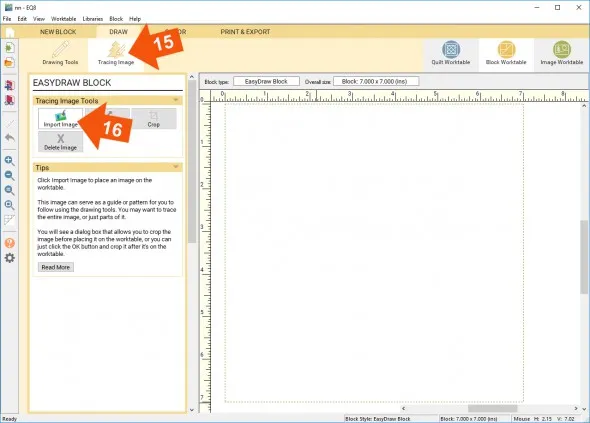
15. Click Tracing Image
16. Click Import Image
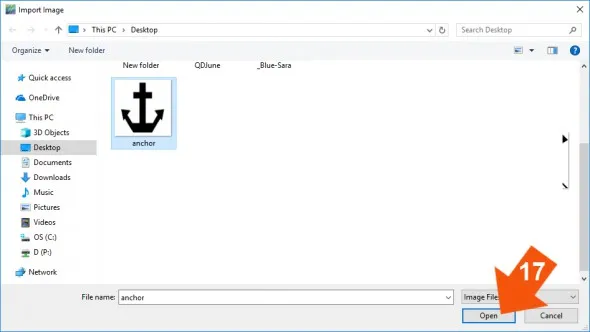
17. Click on the Anchor image and click Open.
18. EQ8 will ask you if you want to crop the image – Click OK
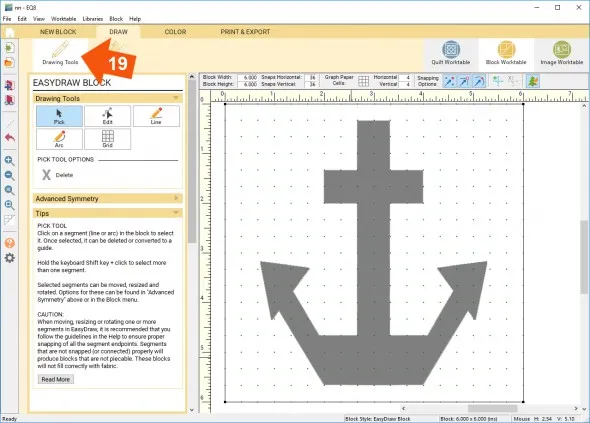
19. Click Drawing Tools
20. Set your block Height and Width to 6 x 6
21. Set your Horizontal and Vertical Snaps to 36 x 36
22. Make sure all your Snaps are on
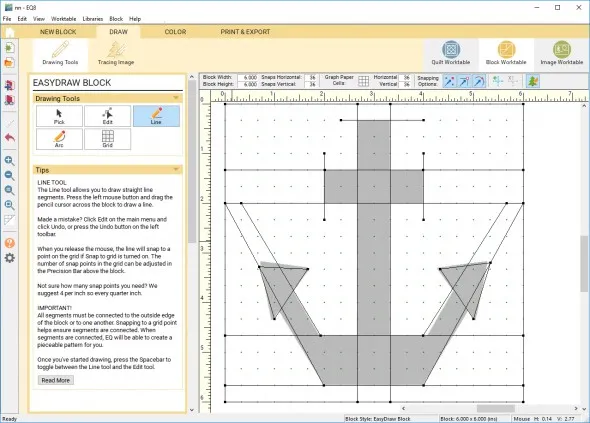
23. Draw the lines as shown. They don’t have to match the drawing exactly. It’s more important that they snap to the grid. Also don’t worry if your lines are longer than they need to be. When you save your block or if you switch to the Color tab the extra bits of lines will not save.
Now you can go through and delete some of the extra lines.
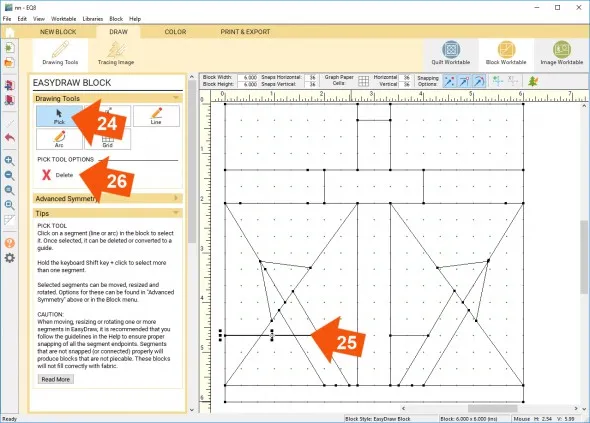
24. Click the Pick tool
25. Click the line you want to delete
26. Click Delete.
27. Click Add to Project Sketchbook ![]()
Now we can draw the oars.
Here is the image I used to trace.
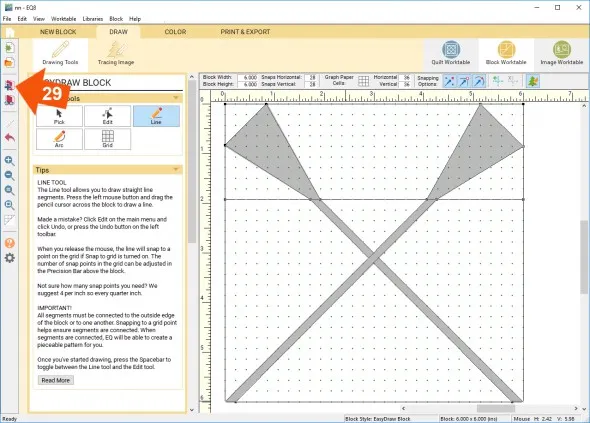
28. Repeat the same process as above, except change your snap settings to 28 x 28.
Don’t forget you can download the project if you don’t want to draw all the blocks!
29. Click Add to Project Sketchbook ![]() when you are done.
when you are done.
30. Click New Block
31. Click Pieced
32. Click EasyDraw
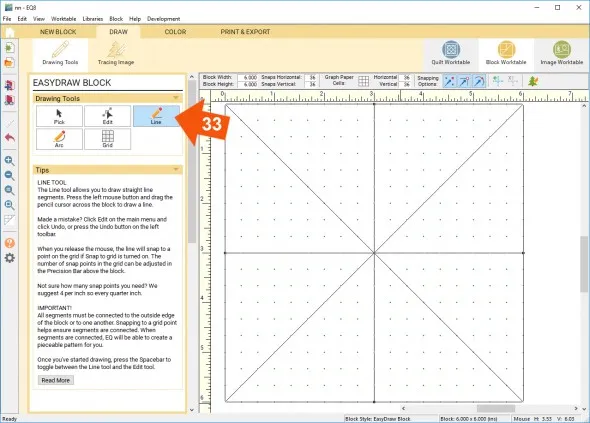
33. Click the Line tool
34. Draw the lines as shown
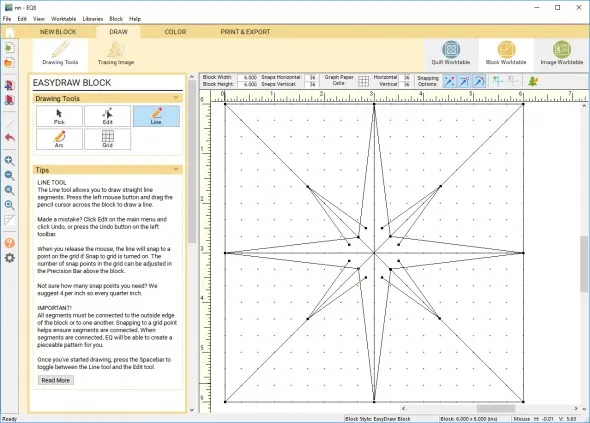
35. Draw the star block following the image below. Sometimes it helps to draw the lines past where you want it to end so you can hit the next snap point. Again, when you click the Color Tab and click back to the Drawing tab the extra bit of the line will disappear.
36. Click Add to Project Sketchbook ![]() when you are done.
when you are done.
Now let’s start the quilt layout.
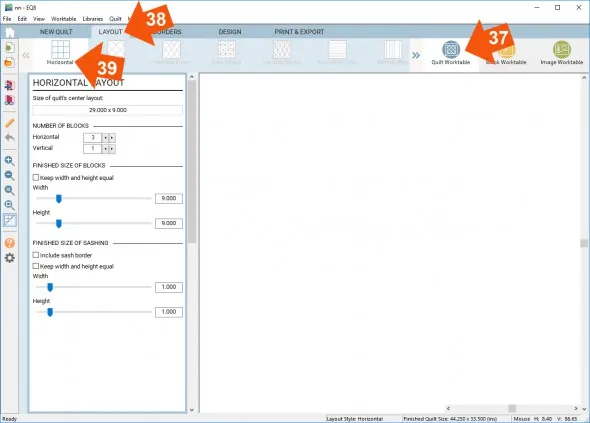
37. Click Quilt Worktable
38. Click Layout
39. Click Horizontal
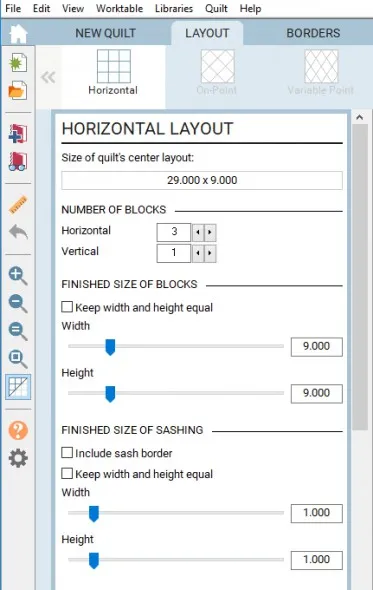
40. Enter the following information:
Number of Blocks
Horizontal: 3
Vertical: 1
Finished Size of Blocks
Width:9
Height: 9
Finished Size of Sashing
Width: 1
Height: 1
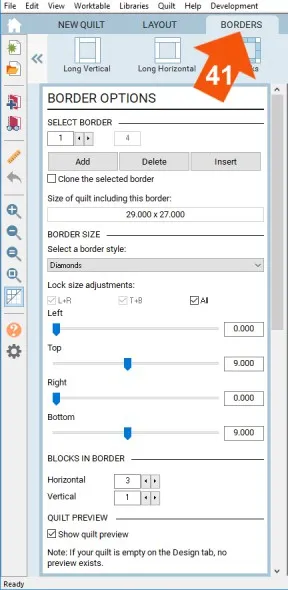
41.Click the Borders tab
Enter the following information:
Select a Border Style
Diamonds
Border Size
Top and Bottom: 9
Right and Left: 0
Blocks in Border
Horizontal: 3
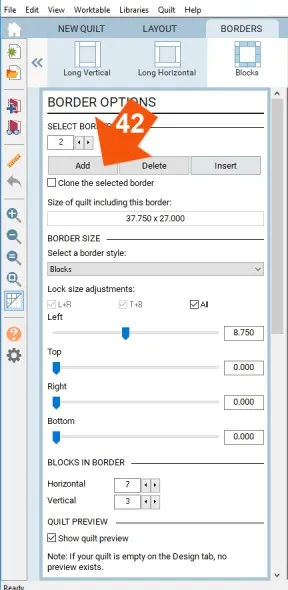
42. Click Add
43. Enter the following information:
Select a Border Style
Blocks
Border Size
Left: 8.75
Top, Bottom and Right : 0
Blocks in Border
Vertical: 3
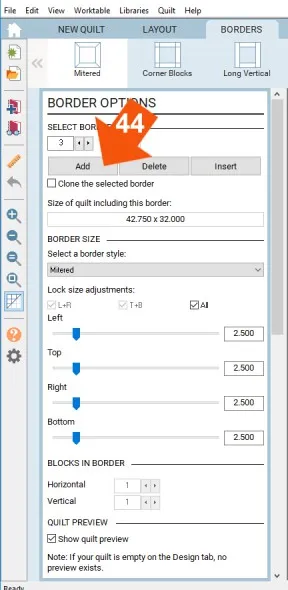
44. Click Add
45. Enter the following information:
Border Style
Mitered
Border Size
All Sides: 2.5
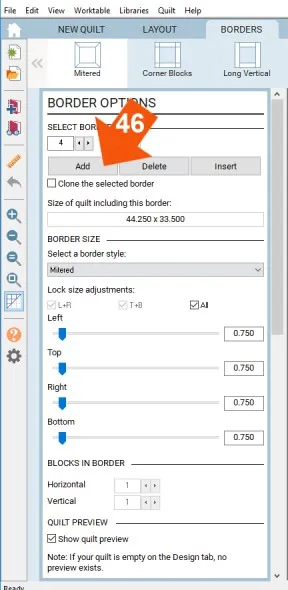
46. Click Add
47. Enter the following information:
Border Style
Mitered
Border Size
All Sides: .75
Your quilt should now look like this.
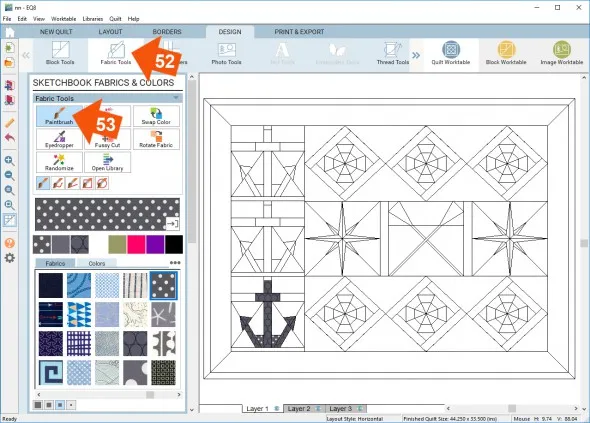
48. Click the Design tab
49. Click Block Tools
50. Click the Set Block tool
51. Click on the block and in the corresponding place on the quilt to set the blocks.
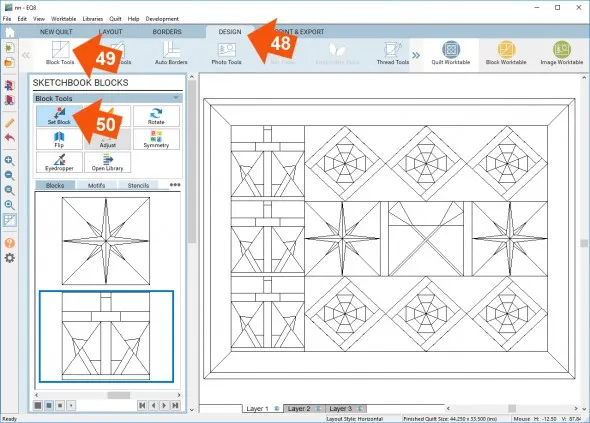
52. Click Fabrics Tools
53. Click the Paintbrush and start choosing fabrics for your quilt!
54. Click Add to Project Sketchbook ![]() when you are done.
when you are done.
55. Experiment with other blocks in the layout. Feel free to edit the layout too! Have fun!
If you would like to post any of your quilts below, click the Print & Export tab. You can also click the Hide/show quilt patch lines tool, if you prefer your quilt without lines.
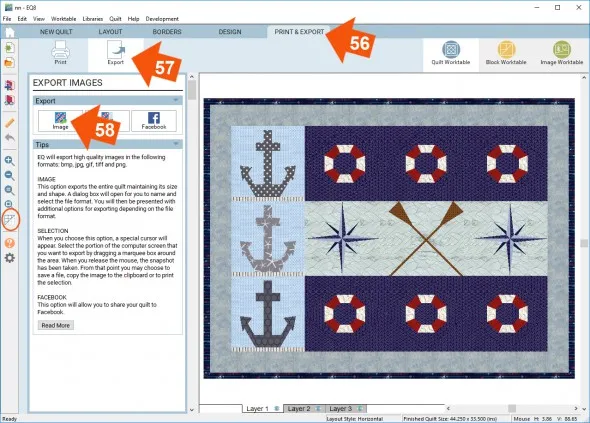
56. Click the Print & Export tab
57. Click Export
58. Click Image
59. Name your file and click Save (in Documents\My EQ8\Images)
To post your image click to comment on this post. Fill in your info and then click Browse. Go to: Documents\My EQ8\Images
I can’t wait to see your quilts! I hope you enjoyed the lesson!
If you have questions about the lesson feel free to post them below.
If you have questions about something else EQ related, please contact techsupport@electricquilt.com.


