For this EQ Mini Friday Fun, we are going to take a deep dive into the first step of designing a quilt, choosing your layout style. The layout style is how your quilt blocks will be laid out in your design. This is the first decision you will make as you venture into the creative process. If you think that quilts are only made of blocks in horizontal grids, it is time to rethink your design process and open up to all of the available design possibilities. Let’s take a closer look at all of the layout styles included with EQ Mini.
When you get to the main HOME page of EQ Mini software, you will see four colored tabs going across the page.
The first tab is Start New Quilt. It is the first one with a Star and Blue color. This is the tab where you will choose your layout.
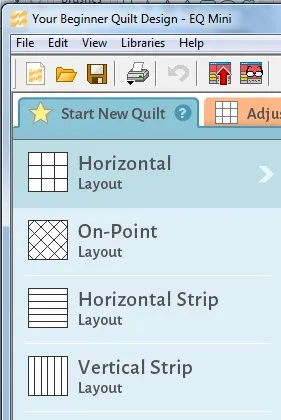
EQ Mini provides you with four available layout styles:
- Horizontal
- On Point
- Horizontal Strip
- Vertical Strip
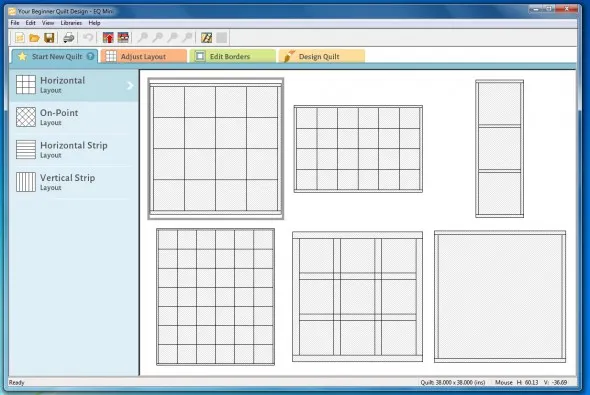 The first layout style is Horizontal.
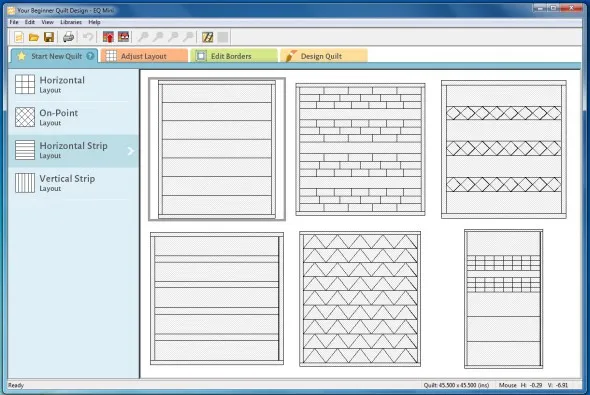
The horizontal layout is what you may think of as a traditional grid style layout for blocks. Blocks are arranged in horizontal and vertical rows and columns. Blocks can be either square or rectangular. With this layout you can add sashings, corner blocks and a sash border if you like. There are six different starter horizontal layouts that you can pick from. You can see a layout with sashing, one that might be great for a table runner,and even an example with a large center medallion. Choose the one that is closest to the style of what you are planning to make. If it is not quite right, you will be able to adjust the layout in the next step.
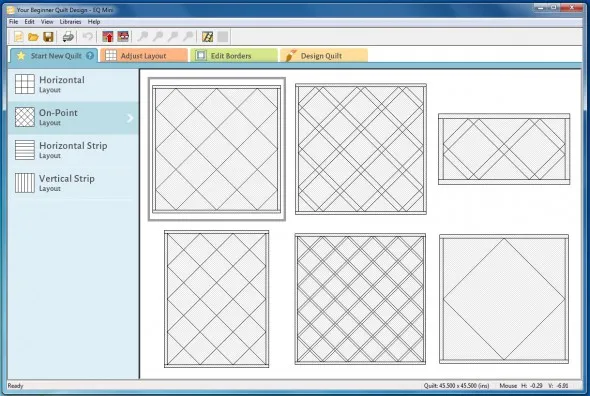
The second layout style is On-Point.
On-point layouts contain blocks that rest on their corner points. On-point blocks are always square with the same width and height but they are tipped 45 degrees to appear as diamonds. The layout palette for an on-point quilt is just like horizontal, except there is only one slider bar for adjusting the size of the square blocks. Here again you can add sashings for a different look. There are six starter on-point layouts to get you started and you can easily adjust them to your specific design.
The third layout style is Horizontal Strip.
Horizontal Strip layouts are made up of long horizontal pieced or unpieced “strips.” You can also try dropping blocks into the strips for creative designs with the strip space. There are six starter horizontal strip layouts including plain strips, a bargello effect, and even a chevron pattern. Again, you can easily adjust, change and play with the designs to make them your own.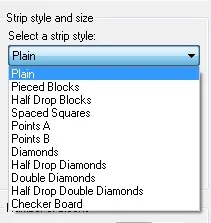
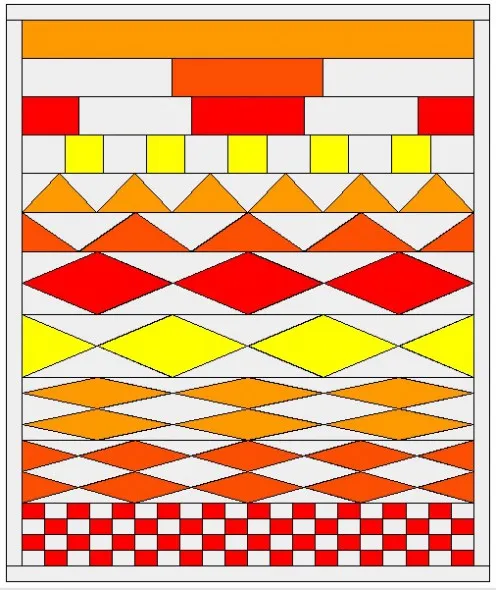
The Horizontal strip layout also has various strip styles that you can choose from to add interest to your design from diamonds to spaced squares. Each strip above provides an example of these choices:
- Plain – one long piece
- Pieced blocks – strip is divided into rectangular blocks
- Half drop blocks – strip is divided into blocks but starts and ends with a half block
- Spaced squares – strip is divided into equally spaced square blocks
- Points A – strip is divided into triangles with the triangle base on top (left on vertical strips)
- Points B – strip is divided into triangles with the triangle base on the bottom (right on vertical strips)
- Diamonds – strip is divided into diamonds
- Half Drop Diamonds – strip is divided into diamonds but starts and ends with a half diamond
- Double Diamonds – strip is divided into two rows of diamonds
- Half Drop Double Diamonds – strip is divided into two row of diamonds but starts and ends with half diamonds
- Checkerboard – strip is divided into a checkerboard pattern
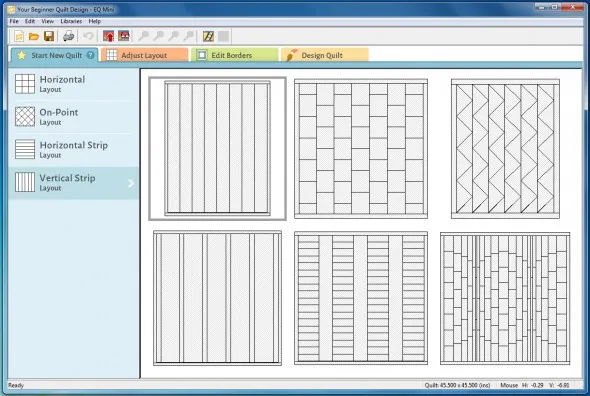
The last layout style is Vertical Strip.
Vertical Strip layouts are made up of long vertical pieced or unpieced “strips.”
The Vertical strip layout also provides six starter layouts to try including sashing and pieced strips. You can add or use the same strip styles as detailed in the horizontal strip layout.
Four layout designs in EQ Mini, endless possibilities to create your perfect quilt!
EQ Mini Quilt Design software is the perfect beginner tool to quickly create beautiful and amazing quilts. The secret is in the easy to learn, step by step design process. By following the colored tabs, you can easily create your quilt designs. Here are the four steps:
Step 1 – Choose your layout style.
Step 2 – Update your layout with number of blocks, size of blocks and whether you want sashing.
Step 3 – Edit Borders with number of borders, size of border, and border style
Step 4 – Design the quilt by dragging and dropping blocks, rotating blocks, try adding different colors or fabrics to the quilt.
EQ Mini is designed with a workflow just for BEGINNERS. This quilt design software allows you to create stunning, gorgeous quilts quickly in an easy to learn, step by step process. You can design a quilt, add fabrics or colors, and print out the image, free fabric calculations and even templates, foundation piecing or rotary cutting information.
Please share your ideas, questions and feedback in the comments. Thanks!
Lori J. Miller lives in Troy, Michigan, where she designs, stitches and sews quilts and quilty things. She loves experimenting with fun colors and designs to make playful and clever products for the modern stitcher. Sewing since age 11, Lori has deep roots in sewing and quilting traditions that add a unique dimension to her designs. She loves designing using Electric Quilt 7, Electric Quilt Mini and EQ Stitch. You can follow her quilting adventures on her blog at lorimillerdesigns.com or on instagram @lorimillerdesigns




03-10-2017
3:01 pm
I have the full eq for apple computer, and can’t figure out how to use it! I live in SC. And we don’t even have a quilting guild! I have learned to make my fist quilt from a block of the month on Craftsy. The only Robles was Icould not find out how to make the double size into a queen size that was why I got the EQ7 because the teacher ( Kim Elmo) was saying that if we had done that quilt then we shoiuld be able to use the EQ7 . I hope they paid her well for selling rhe program!
03-13-2017
11:29 am
Roberta, I am so excited that you have been inspired to take up quilting. If you have not gone to the EQ website, there are a lot of great tutorials and information that can help you learn EQ7. Here are some hints to make a double quilt into a queen size, depending on the size of your block, you can just add rows to the sides and the bottom. Or if you have EQ7, you could also resize the blocks to be larger say change a 6″ block into a 12″ block to get a larger size. The program shows the overall size of the quilt so you can see when you get to the size you need for your bed. Don’t hesitate to check in with the support desk at EQ, they always point me in the right direction.
03-12-2017
4:52 pm
I use EQ7. I’m a beginner but have made some simple quilts. I love the lessons. They have given me the courage to try some more things. The instructions are so helpful. Thoroughly enjoy the learning process.
03-13-2017
11:31 am
Geri, Thank you so much. EQ Mini is a great place to start and I think to see the designs made up just makes them come to life. There are so many possibilities just with this mini version of the program, I wish you much success and am so glad you are making beautiful things.