So, I’ve always wanted to draw a tessellation. They are so cool the way they interlock and look like animals sometimes. I never thought I was creative enough to figure it out and draw it. Then I had an “Aha!” moment.
I’m still not anywhere close to M.C. Escher artwork, but, I’ve figured out something fun in EQ6 I thought I’d share.
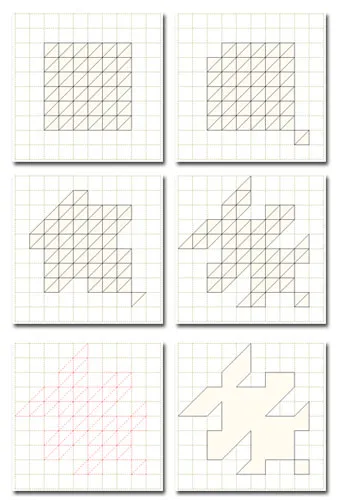
A tessellation is easy if you start with a square and what you subtract from one side you add to the other.

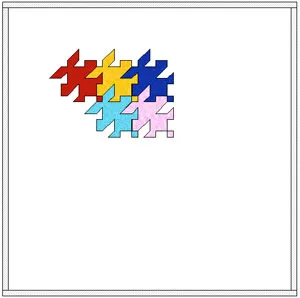
This is a silly way to do it, but start a new PatchDraw Block. On the Pieced tab, fill the block with half-square triangles. (My block is 10×10 and I kept only 6×6 in the center.) With the Pick tool, move a triangle from one side of the block to the other. Keep going until you’ve moved as much as you want. Stop if you think you’ve lost your place. Then save the block, convert it to guides, and draw with the PolyLine tool around the outside to create one patch. Save the block again and set it to size on a custom set quilt (my blocks are 10×10 and the positions of the patches actually ended up being at inch marks.)

I’m hoping I will find an animal in there some day, for now I’ll just be content that I finally drew one and the pieces interlock.

Happy EQ-ing!
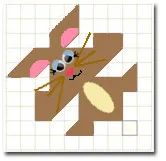
UPDATE: Sarah @ EQ and I both found a bunny in the original design. I’m so happy that I made an animal that interlocks. Wooohooo. Here’s the picture:


06-17-2008
11:56 am
That is awesome. I can’t wait to get started trying it. Donna
06-17-2008
12:12 pm
very cool! have you figured out how to sew that block yet???LOL
06-17-2008
1:18 pm
If you turn it upside down on point, I think it looks like a spaceman!
06-17-2008
2:00 pm
The first (blue) example is more my speed as far as sewing goes, not the ninja-rabbit looking thing at the bottom.
If anyone has ever sewn tessellations before, I’d love to hear about your technique. Do you use templates with seam allowance? Do you use invisible thread?
06-18-2008
6:51 am
Clever idea and lesson. Andrea! It’s a great way to use Pieced PatchDraw to create a pieced motif (no block outline) for setting blocks jigsaw puzzle style in Custom Set.
If you were Ruth McDowell, you might consider piecing these shapes together with a lot of stops and turns at the corner seam allowances.
But if you were me, you could English foundation piece the patches. With English foundation piecing, you baste the fabric over a template, turning under the raw edge of the patch at the seam allowance/seam line. I would use a lightweight fusible interfacing for the template and baste the raw edge of the seam allowance around that. Then whipstitch the patches together and remove the original basting but leave the “template” in place.
The English foundation piecing may sound like it could try your patience, but I find it to be quite the opposite since all the seam allowances are tamed. The stitching of the patches together can be done by hand or by machine, with an invisible whip stitch (“invisible” either by kind of stitch or by using invisible thread). There is a stitch on some machines that offers a zig in one direction followed by a stitch or two and then a zag in the other direction, so you can catch both patches. Keep the stitches small, and the construction will be firm.
Yet another way would be to fuse the pieces to a background and zigzag over the raw edges. This would be the easiest way, but the choice for the method of construction would depend on personal preference.
06-18-2008
9:14 am
Wow! That is too cool! Great job, Andrea! )
)
06-18-2008
3:28 pm
Oh Barb! That’s sneaky but great using the fusible interfacing. I’ll have to remember that one.
Thanks for the tips!
06-24-2008
5:09 pm
too cool. We had to do some of those in college and they are so much fun to do. You know, the block you drew, when you turn it the opposite way, it looks like a little alien or a girl in pigtails with something on top of her head too. =)
06-26-2008
10:35 am
If you want speed and ease, why don’t you piece it as the squares and half-square triangles on which the design is based?
I teach tessellation in my online classes for Quilt University, and I include tutorials for several methods of sewing tessellated and highly irregular pieced shapes, but I do not teach my students to work with so many small seam lines and angles. This is a very complicated tessellation for a single block, if that’s what you have in mind.
You’re right, though, the trick to tessellation is to remove the mathematics from it. Doing it in this intuitive manner makes tessellation very easy!
06-26-2008
11:49 am
Its mostly squares and half square triangles so thats an easy way to piece it. ……….. Barb
06-28-2008
11:04 am
Interesting information. I saw a pattern that is tessalating Christmas trees where one tree stands upright and the next one is upside down. When finished, the upside down trees appear to be shadows of the upright trees. This is done with the values of the colors used, mostly greens. However, each tree is 8″ high and I want to do this in a smaller quilt. The pattern is for a bed size qult and I want to do a smaller wall hanging, per haps 40×40. Any suggestion on how to reduce the tessalating trees?
06-30-2008
1:44 pm
I would recreate the Tessellating Trees pattern exactly as you found it. (It will be a custom set quilt, no matter what.)
Then just either shrink the quilt size (thus, making the blocks smaller than 8″) *OR* delete off trees from the sides to make it smaller in width & height… or both.
07-06-2008
3:39 pm
Great lesson. Check out Jinny Beyers book: Designing tessellations : the secrets of interlocking patterns.