


This adorable scrappy toddler tumbler quilt is made with a Tumbler block. In this lesson, we will discover how to create a One Patch quilt and how to make a Custom Patch. We will use the custom patch to create the same size 5 inch tumbler die that goes with my Sizzix Fabi fabric cutter, If you don’t have a die cut machine, you can print the template instead. Lets create!
Scrappy Toddler Tumbler Quilt
Size: 40″ x 40″
Skill Builders:
- Working with one patch designs
- Creating a custom patch
On to the design!
- Open EQ8.
- Let’s name the Project. The project name appears at the top left of the EQ8 Window. Right now the project says Untitled – EQ8.
- On the left side toolbar, click the New project button.

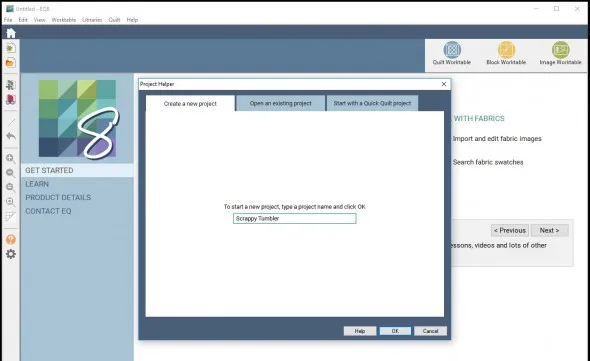
- On the Create a new project tab, type in the project name field Scrappy Tumbler.
- Click OK. The box will close. Notice the project name Untitled has been replaced with Scrappy Tumbler.
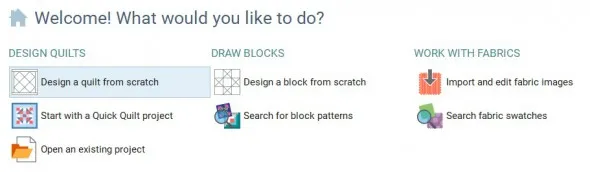
- Under DESIGN QUILTS, select Design a quilt from scratch.

- Under the NEW QUILT tab, scroll through the ribbon options and select the One Patch layout.


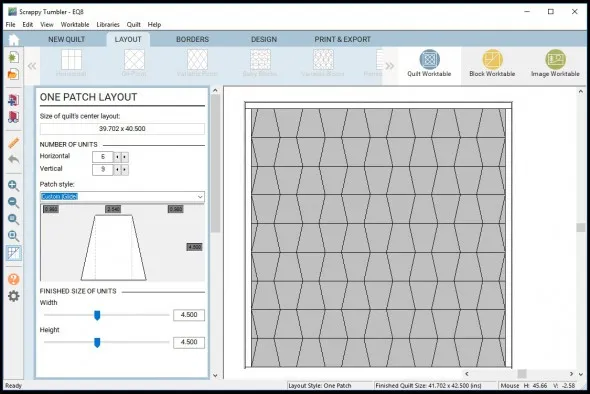
- Go to the LAYOUT tab.
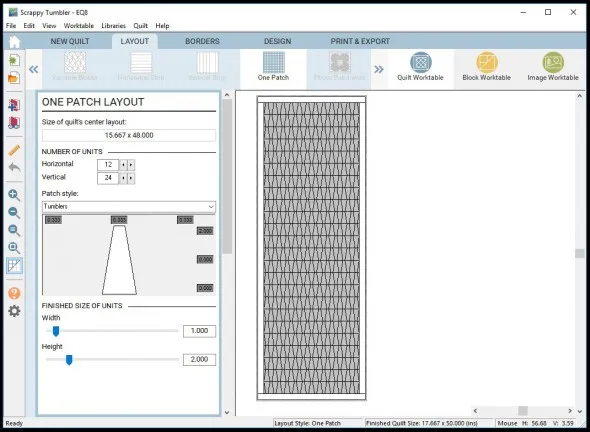
- Under the Patch style, select Tumblers.
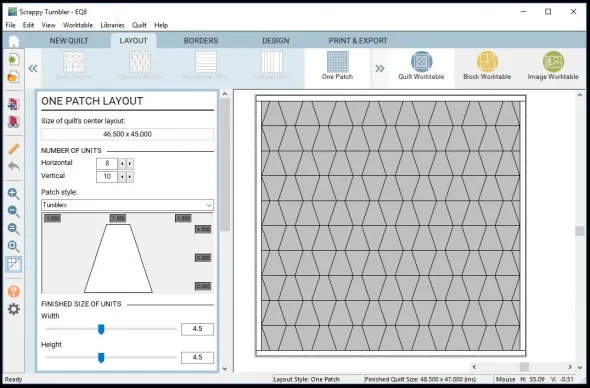
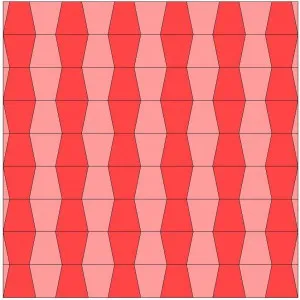
- The unfinished size of the Tumbler from my Sizzix Tumbler Die is 5″ x 5″, so the finished size would be 4 1/2″ x 4 1/2″ allowing for the 1/4″ seam allowances on each side. Under finished size of Units, enter a Width of 4.5 and a Height of 4. 5 into the entry fields or by using the slider bars. Since we are making a toddler quilt, lets adjust the number of units down until they measure about 45″ square. In this case change the units to 8 Horizontal and 10 Vertical.
- This looks pretty good except the shape of the tumbler is too narrow. The finished top of the tumbler only measures 1 1/2″” and the finished top of the tumbler for my Sizzix die is 2 1/2″ across. In order to make the tumbler shape match the size of the Sizzix tumbler diecut shape, we will have to create a custom patch.
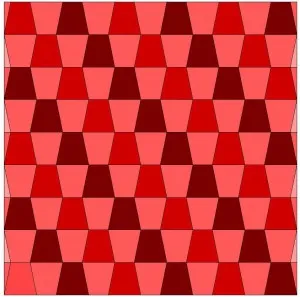
Note: Custom patches allow you to change their shape. They have light gray “glides”, which run horizontally or vertically from the patch corners. You can pull on the glides in the One Patch Layout palette to change the shape. - Under Patch Style, select Custom (Glide). You will find it at the bottom of the list.
- Again we need to enter the finished size of the Tumbler from the Sizzix Die which is 4 1/2″ x 4 1/2″. Under finished size of Units, enter a Width of 4.5 and a Height of 4.5 into the entry fields or by using the slider bars.
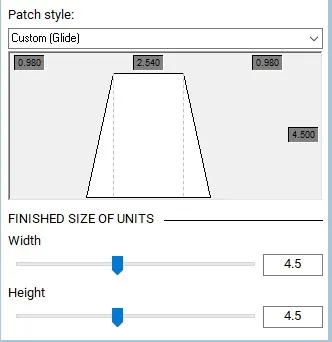
- Hover over the right dotted light gray line and you will see two bars with arrows appear. Click, hold and glide the line to the right watching the size of the space on the top right. Get it as close to 1″ as you can.
- Now hover over the left dotted light gray line and you will see two bars with arrows appear. Click, hold and glide the line to the left watching the size of the space on the top left. Get it as close to 1″ as you can. The center should measure as close to 2 1/2″ as you can get. With those numbers, you pretty much have the one patch matching the finished measurements of the actual Sizzix Tumbler die.
- Now take a look at the Size of the Quilts Center layout and adjust the NUMBER OF UNITS until it measures about 40″ x 40″. In this case, enter 6 horizontal units and 9 Vertical units.

- Select the Borders tab to display the Borders Palette.
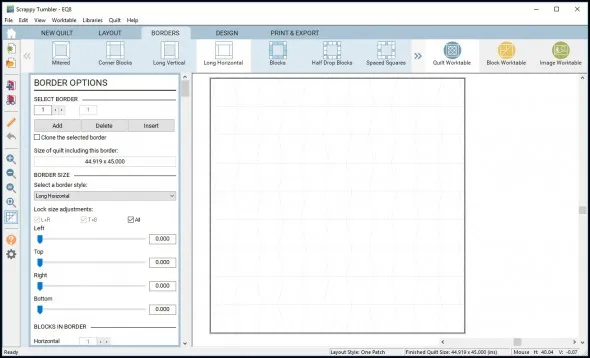
- Under Lock size adjustments, select all and move the borders to zero.

- Select the Design tab
Under Block tools on the ribbon bar, you are not allowed to drop blocks into a one patch design. Let’s remove the default blocks. Right click on any block, select Clear all unused blocks. You will be prompted ” Are you sure you want to remove all unused blocks and their colorings?”. Click yes and since we have not saved any blocks into any quilts, the blocks will all be cleared.
- Select Fabric Tools on the ribbon bar.
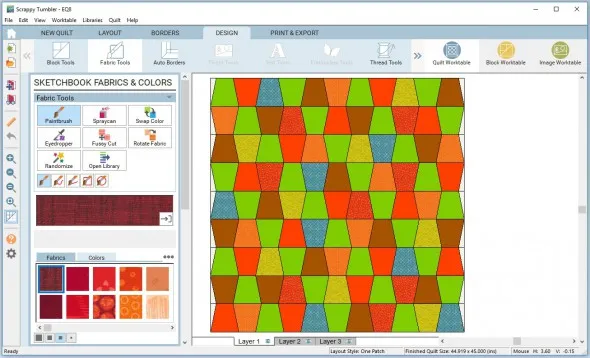
- Select Paintbrush on the Sketchbook Fabrics & Colors palette. Click on a fabric or solid color and then click on the patches in your quilt to update them. I chose a scrappy design.
Design Variations
Now that you have your design, here are Tips and Help Articles to help you get ready to sew up your design.
How to print fabric yardage estimates
If you don’t have a fabric cutting die, you can print out a template for the tumbler block. Get the instructions below.
Ready to Quilt?
Now that you have designed this with EQ8, why not stitch up your own scrappy toddler tumbler quilt? You can find a DETAILED TUTORIAL for this quilt on my Lori Miller Designs blog.
Questions or Feedback?
Please share your ideas, questions and feedback in the comments. Thanks!
Lori J. Miller lives in Troy, Michigan, where she designs, stitches and sews quilts and quilty things. She loves experimenting with fun colors and designs to make playful and clever products for the modern stitcher. Sewing since age 11, Lori has deep roots in sewing and quilting traditions that add a unique dimension to her designs. She loves designing using Electric Quilt 8, Electric Quilt Mini and EQ Stitch. You can follow her quilting adventures on her blog at lorimillerdesigns.com or on instagram @lorimillerdesigns


02-15-2018
2:05 pm
Thank you! I was wanting to do a quilt with equilateral triangles and hadn’t figured out how (I’m a newbie to EQ).
02-15-2018
4:14 pm
Yes, try looking at the Thousand Pyramids, then move to the custom glide to make them equilateral in size. The One Patch can be very versatile.
02-15-2018
4:19 pm
Thank you so much! Did not know about step 19. It will make a huge difference!
02-15-2018
9:30 pm
Sharon, Not sure if you mean clearing out unused blocks or that you cant drop blocks into a one patch, but I always think it is a good thing to learn something new!
02-15-2018
9:08 pm
I enjoyed doing this exercise. Easy to follow your instructions. Gives me confidence and motivation to use the program. I am a 5, 6, and 7 user, but do not use it a lot. I would like to be more creative with this program. Looking forward to more. Thank you.
02-15-2018
9:28 pm
Terry, So glad it was helpful for you. I think there is always something new to learn with this program, it is so comprehensive.
02-16-2018
9:48 am
Is there a way to flip or adjust the direction of every other row of tumblers? I’d like to have the tumblers in a stacked layout, so that the tumblers in a column all have the wider end in the same direction? Would I have to draw that as a block?
02-17-2018
10:34 am
Cat,
Within the one block quilt, take a look at Trapezoid (H) for horizontal, That might be what you are describing. Take a look!
02-17-2018
2:16 pm
So intimidating to begin using EQ8. Hoping to view all lessons you can provide, Lori. Thanks for this.
02-17-2018
3:42 pm
Rejeanne, Just take it one step at a time. There is a lot of free and great online help from electricquilt.com including the free lesson of the week, design and discover and free projects. There are other teachers, like Kari Schell, you can follow as well. There is a for purchase a book of beginning lessons for EQ8 or you may even consider attending Electric Quilt Academy coming up in April in Ohio. Just keep practicing!
02-26-2018
2:07 pm
I would like to use an Apple Core patch, but can’t find it in EQ, and so far have had no success drawing it, even with arcs in Polydraw (circle base). Almost had it, but when trying to turn the two side arcs around to face the opposite way, it warped the top and bottom arcs.
03-05-2018
7:59 pm
Heidi, I have not tried to draw an apple core block, but I did find these instructions from 2008 in an old forum about Electric Quilt that I think would be worth trying in EQ8. Some of the steps may have changed but I think the general idea could be followed. I have added to my to do list to try as well.
https://doyoueq.com/forum/viewtopic.php?f=14&t=158
Let me know how it turns out.
Thanks, Lori
08-01-2018
1:25 pm
When you do a scrap quilt, do you color each patch individually or is there a faster way?
02-25-2019
9:46 pm
I know this post is a year old, but it was very timely for me. I was looking for a way to make a tumbler pattern for my Accuquilt dies. It had been a lot of fun playing with the fabric. Thank you! Also, thanks for the reminder about using the ctrl key.
03-07-2019
9:57 am
Andrea, These tutorials are here to use, so glad you found it helpful.