Those pesky jump stitches! Not all embroidery machines automatically trim jump stitches. The newer models of machines can be set to trim jumps over a certain length. But, older model embroidery machines do not always trim jump stitches for you. All machines will cut and tie off the threads when going from one color to another. Did you know that EQStitch can help you to trim those stitches even for an older model machine?
Consider text designs. You most often stitch all the text with one color thread. That means a jump stitch from letter to letter. Often the jump stitches can be small and hard to get hold of to trim later. Digitizing effectively can help with that.
Open your EQStitch program.![]()
Click on the stitch work table icon.![]()
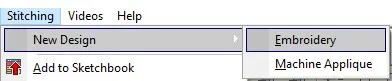
Click on STITCHING>New Design>embroidery.
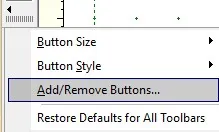
On the embroidery work table tool bar, click and hold the little black button at the bottom of the toolbar to get the fly out menu.
Click on ‘add/remove buttons’.
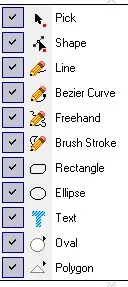
Place a checkmark in front of all the tools to add them to the toolbar.
Click anywhere in a white space on the screen to close the selection box.
Click on the text tool![]() to select it.
to select it.
Move the cursor over to the drawing board area and click/hold/drag/release a text box onto the worktable.
On the text properties bar at the top of the screen, use the drop down arrow and select any font you wish to use. Set the approximate size to be about 10.00 mm.
![]()
Move the cursor to the inside of the text box and double click to see the flashing cursor.
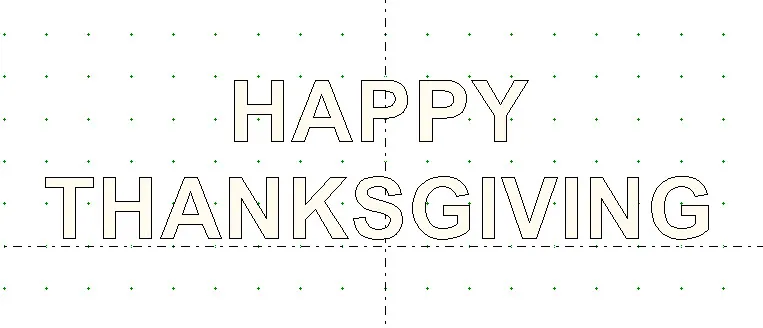
Now type the words ‘HAPPY THANKSGIVING’.
Add the text design to the sketchbook![]() . By adding the design to the sketchbook it converts the text to patches that can be filled with stitches.
. By adding the design to the sketchbook it converts the text to patches that can be filled with stitches.
Click on the stitch tab a the bottom of the screen.
Click on the ‘set edge stitch’ tool![]() on the toolbar at the right.
on the toolbar at the right.
On the properties bar at the top of the screen click on the red ‘X’.

Move the cursor over to each of the letters and click once on each one to remove the edge stitches leaving only the fill stitches.

Click on the ‘set thread tool’ ![]() on the toolbar at the right.
on the toolbar at the right.
Click on any color of your choice and color every other letter by clicking on it.
Select a different color and color every other letter.
NOTE: You may need to click on the refresh tool![]() as you color the objects to see all the text clearly.
as you color the objects to see all the text clearly.

Add the colored design to the sketchbook.![]()
Click on STITCHING>Export Stitching File
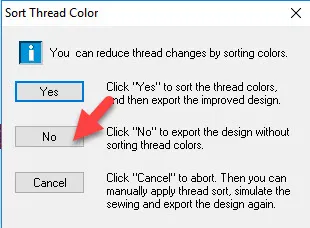
In the pop up box, use the drop down menu to choose your file type for your machine and select where on the computer you want to save your file. (You could choose to write directly to your USB stick). Click on the word ‘save’ in the box.

The program will ask if you want to sort the color threads to reduce thread changes. Select ‘NO’ for this option.
Now the design will stitch each letter and tie off and clip the thread at the end of each letter. You can always choose to use the same thread color for all the letters at the machine, but it is programmed into the designs’ digitizing properties to clip the thread after each letter.
Voila!! Jump threads handled for any type of machine with digitizing!


11-19-2017
3:57 pm
Thank you, this is a great option. At least I can trim as I go on my older machine, because it does not have a tread cutter. Very helpful!
12-07-2017
2:10 pm
Thank you for this very useful tip! It’s especially useful to know what the default (built-in) options are for any application.
I have another, general question on EQStitch now that EQ8 is released to the public. I understand EQStitch will be offered as a stand-alone software package going forward. What does that mean to all of us who currently own EQStitch as an add-on module to EQ7? Will we still receive updates to our version? Unless we will be getting substantial new features when the stand-alone version is released, I sincerely hope we won’t be charged extra because EQStitch has made a change in their marketing plans. I look forward to your response, Yvonne
12-07-2017
6:01 pm
Gayle–I have not been informed by the EQ company about any stand alone EQStitch program. As far as I know, it is still an add-on for EQ7. I have both the EQStitch/7 and EQ8 on my computer. I flip back and forth between the programs depending on if I want to use digitizing along with quilt designing. I have not been informed of any updates for EQStitch at this time. If you were told this was happening, I would suggest you contact the EQ company directly and get their response.
Yvonne