Getting Started
Print off these instructions from your internet browser by clicking FILE > Print. Follow each step of this lesson to begin making your “EQuinox” Mystery Quilt.
Download the Project
- Download the EQuinox project for EQ6 or EQ5.
- Open EQ5 or EQ6.
- Click the Open an Existing Project tab (it appears immediately when you open EQ6 or EQ5).
- Click on the EQuinox project, to select it.
- Click OK. The Sketchbook opens. The Quilts section shows “No items (quilts) to display.”
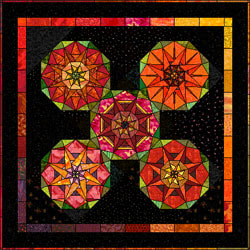
- Click the Blocks section, displaying the Sun block. This sun will become the center block in your EQuinox quilt.
- Click Close (or the X) to close the Sketchbook.
Create the Quilt Layout
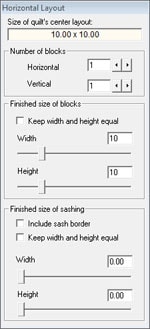
- On the menu bar at the top of your screen, click WORKTABLE > Work on Quilt.
- On the menu bar, click QUILT > New Quilt > Horizontal. A horizontal quilt layout appears.
- Click the Layout tab.
- In Number of Blocks, click the arrows beside Horizontal and Vertical
so each box says: 1 - In Size of blocks, click, hold, and drag the Width and Height slider bars to make the block 10.00 x 10.00 (25.4cm x 25.4cm).
- In Sashing, click, hold, and drag the Width and Height slider bars to make the sashing 0.00 (no sashing).
Skip the Borders tab
Right now, don’t worry about whether or not you have a border on your quilt or what style it is.
Set the Block into the Quilt Center
- Click the Layer 1 tab.
- Click on the Set Block
 (Set tool in EQ5) tool.In EQ5, if the quilt block does not show in color, use the 3rd or 4th arrow key beneath the blocks in the palette, to display the block in color.
- Click in your quilt center to set the Sun block.
- Click the Add to Sketchbook button
 (Save in Sketchbook button in EQ5).

Your EQuinox project is now saved on the hard drive. Your Mystery quilt is just beginning. The sun will be the center of your quilt. If you’d like to recolor the block on your quilt, you may do it at any time. Designer Fran Gonzalez suggests sunny colors.
Add Fabrics to Your Project
- On the menu bar, click LIBRARIES > Fabric Library.
- In the list on the left, open up any styles you see until fabrics appear on the right.
- For each fabric you want to add to your project, click to select the fabric swatch and click the Add to Sketchbook button
 (Copy in EQ5) in the bottom-right corner of the library window.
Be sure to save any new coloring by clicking Add to Sketchbook ![]() (Save in Sketchbook in EQ5. If necessary to see your saved coloring in the Sketchbook, click the arrow buttons beneath the block.)
(Save in Sketchbook in EQ5. If necessary to see your saved coloring in the Sketchbook, click the arrow buttons beneath the block.)
EQuinox color and fabric tips
If you are sewing along with us during the lessons, remember EQuinox is a scrap quilt. It uses a large variety of colors and values. The Sun is the quilt’s center block. Use sunny colors when sewing this block.
To print out a copy of the block, click the Select tool ![]() .
.
Click on the block in the quilt to select it.
From the menu bar, choose FILE > Print > Foundation Pattern.
Click the Options tab.
Be sure “size from quilt” is checked.
Be sure “separate units” is checked.
Be sure “print seam allowance” is checked.
Uncheck “print as many as fit”.
Click the Preview button.
Click the Move button at the top of your screen.
Drag any sections off the page break so they fit nicely on the page.
Click Print at the top of your screen.
Sew 1 Sun block.
(If you’re having trouble moving the sections so they fit nicely, try this PDF instead.
When printing patterns from the PDF, set Page Scaling on the print screen to None.
Barb Vlack writes with tips for sewing the Sun block:
You will want to print this Sun Block foundation pattern from the quilt worktable so you can get it to size, according to the Mystery directions.
Under Options for Foundation Piecing, check: Print Numbering; Separate units; and Grayscale. You may opt to print the block name. Do NOT check “Print as many as fit.” You do not need to mirror this block. Print the pattern WITH seam allowances.
In Preview, you will need to move some of the units so they do not overlap each other. Click Move, then drag the unit to a new position.
For piecing the arcs, you would piece along the straight lines for the triangles. Do not try to piece a curve with the paper still in place along the seam line. Instead, piece the arc as one unit. Remove the paper at least along the seam line before seaming. Seam the arc with another unit as you would piece for curves, easing one to fit perfectly with the other.
You COULD print the foundation WITHOUT the seam allowance so you don’t have to trim it away before seaming units. Just be sure to remember to include the seam allowance when you trim the unit after piecing.
There are several units in this block that are single patches. The arcs cannot be sewn with the foundation technique because of the curved seaming. Some quilters like to use freezer paper for iron-on templates. These would work well with the curves for the foundation units. Sew along the edge of the freezer paper template that you can use for a guide. Remove the template/freezer paper after sewing the seam. Press.
- On the menu bar, click FILE > Exit.