I just had a light bulb moment.
Maybe (probably) I’m not the first person to think of this, but I’m so pleased with the results that I want to share it anyway. If you’re like me, you spend as much time on EQ7 as you do actually sewing quilts, maybe even more. After a while, we’ve accumulated so many EQ projects that it’s hard to find anything anymore. While I was reading an Electric Quilt message board, someone posed this very problem, and a possible solution occurred to me. I jumped right over to EQ to see if it worked and – joy! – it does.
A little backup information:
You don’t have to open EQ7 and then open the project.
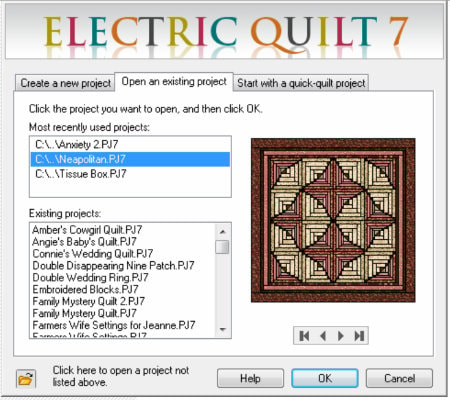
You can navigate to the folder that the projects are stored in and double click the project to open it. Also, you don’t have to keep all of your projects in a giant list within the PJ7 folder. If you like, you can create sub folders to organize your files. This means your projects won’t be listed under Existing Projects when you open EQ7, but you can still find them by clicking the folder to open a project not listed. Besides, I have a better way of doing it!
Windows 7 looks different from the older version of Microsoft Windows, but in this case especially, it works in your favor. My screen shots are in Windows 7 and the instructions are for Windows 7. I’ll try to include notes about Windows XP for those who are still using that operating system.
First, let’s talk about navigating through the folders and files in Microsoft. At the bottom left of your screen is a folder icon. If you hover over it for a moment, it tells you it’s called Windows Explorer. (In XP you can double click on My Computer or right click on the Start button at the bottom left and choose Windows Explorer.)

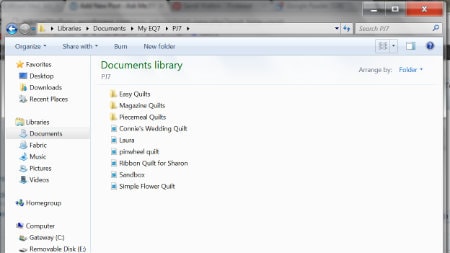
Click this icon and it takes you to the Libraries folder. Double click on Documents to open that folder, and then My EQ7 to open that folder, and finally double click on PJ7 to open that folder. (In XP, you’ll go to My Documents, then My EQ7, then PJ7.)
Depending on how you have the folder set to view, you may see a list of documents…
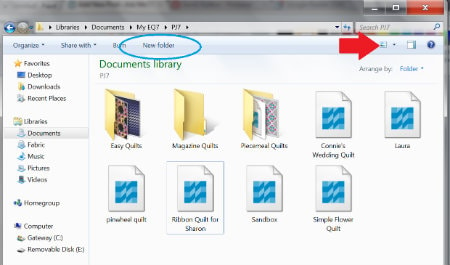
Or you may see icons that all look the same…
Or you may see some combination of the two. Click the View button indicated by the red arrow and select Large Icons. (In XP you will select Thumbnails or Tiles, I think.) Although all of the icons look the same right now, it will make sense later. By the way – if you haven’t set up subfolders yet, you won’t see the additional folders like my screen shots show. Creating subfolders is the first step in organizing your projects. You may decide that this step isn’t necessary. For me, however, I like to keep the magazine and book projects separate from the ones that I designed myself. I also have a whole group of easy quilts that I created for my aunt’s charitable group. The easiest way to keep these organized is to move them into folders. Just remember: Anything that isn’t in the main PJ7 folder will not be seen in the EQ Existing Files window (first image above).
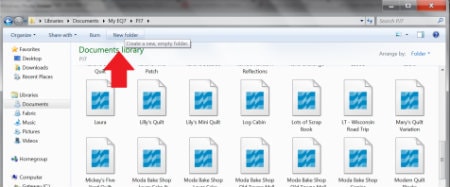
First, while in the PJ7 window, click New Folder at the top center of your screen. (In XP you can right click in an empty space and select New then New Folder.)
A new folder will appear and you can type in the name of your folder. Repeat for each folder you want to add. You can even create folders inside of folders if you’d like. Once your folders are created, you can move the EQ7 files into the appropriate folder. If you don’t know what folder it belongs in, you can move it later, too. To move a file into a folder, you can click, hold and drag the file until the cursor is over the folder, then let go. The file will appear in the folder. This can be a problem if you accidentally “drop” the file while dragging – it could end up somewhere you don’t want. Another option is to right click on the file, select “Cut”, open the folder, and right click and select “Paste”. You can move multiple files at the same time by holding the Ctrl button down and clicking on each file, then moving them as described above.
Okay, time for the part that has me all giddy!
Open one of the PJ7 files right from the folder by double clicking on it. The file will open in EQ7, ready for you to recolor or edit. Look through your quilts and choose the best representative of that file. Click Edit to open that quilt for editing.
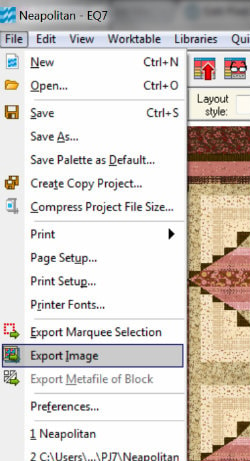
Export an image of that quilt. At the top left, click File and select Export Image.
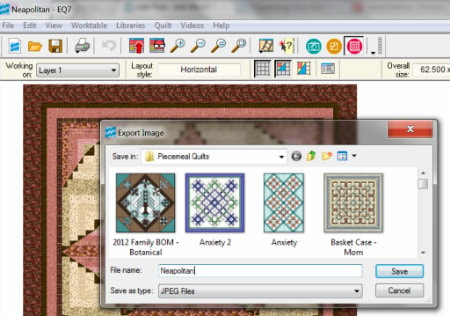
A window will open that looks like this:
Save your image in the same folder where your file is located! Type the first few letter of your EQ7 file name, which you can see at the very top left of the screen. As you type, the file name will come up – click once on it and it will appear in the file name box with “.PJ7″ at the end of it. Use the backspace button to remove the “.PJ7″ part of the name. If you forget to do this you will lose your project file, so this is very important! If you accidentally try to save it with the .PJ7 extension it will ask you if you want to replace the existing file – say NO! Once you’ve removed the .PJ7, click Save. Another window will pop up:
Make sure the Keep Aspect Ratio box is checked, then change the width from 8.000 to 2.000. The height will automatically change also. You’re just creating a thumbnail, so there’s no need to have a large file. Next, make sure the Outline Patches and Outline Blocks are UNchecked. Because the image will be quite small, you don’t want every piece outlined. You’ll have a better idea of what the quilt will look like without these. Click OK and the image will be saved.
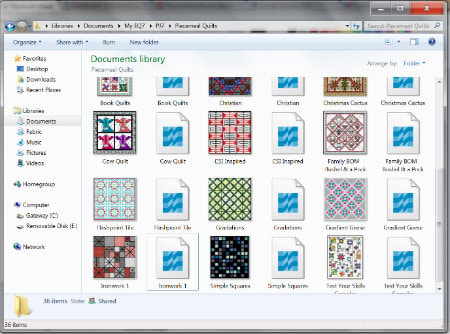
That’s it! Now when you go into the PJ7 folder or your subfolders, you’ll see an image of the quilt followed by the EQ7 project file of the same name, like this:
To make it even easier to see the files and images together, drag the edge of your folder so the icons in it are shown in rows of even numbers – 2, 4 or 6 icons in a row. That way you’ll see a column of images, followed by a column of project files, followed by another column of images and another column of project files. See how the folder below looks a little cleaner than the folder above?
You may think that you have too many project files to do this, but it goes surprisingly quickly once you get the hang of it. If the file doesn’t contain a lot of quilt variations, it takes me 30 – 60 seconds per file. It gave me the opportunity to delete some files that I started but never really developed, or now look at and don’t care to keep. It also reminded me of some quilt ideas that I really love, and need to dig out again!
If you’re really into organization, you could even take it a step farther and print the thumbnails with titles of all of your projects. (Thanks, Jeanne of Grey Cat Quilts, for suggesting this!) To do this, select all of the files – images AND projects – by clicking on one then pressing the Ctrl button and A at the same time. The Print button appears at the top center of the screen.
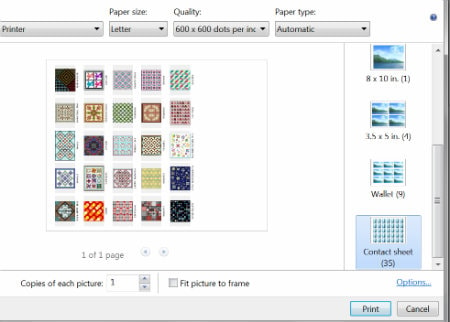
Click Print, and a new window comes up. On the right side, scroll to the bottom and select “Contact Sheet.” In the center bottom, uncheck the Fit Picture to Frame box.
Click Print, and you’ll have a sheet that shows thumbnails of all of your images with the name underneath. Even though you selected the project files, you can’t print them this way so it just skips over them. The only thing the Contact Sheet doesn’t do is put the folder name at the top, so if you sorted your projects into multiple folders, you should write that at the top of the sheet.
Staying organize will make your life easier! Hope this tutotial helps you.

