Fonts are not just letters and numbers. Fonts can also be represented as designs. You can use TTF (True Type Fonts) in EQ8 to create unique designs using the text tool. I use free fronts from the Da Font website. https://www.dafont.com/ Selecting only the TTF format of fonts, I download them to my Font Folder on my computer. EQ8 can read the TTF files using the text tool to create the designs I want. Dingbats are a type of font that is an image. I use dingbats to create pictures I can use in EQ8. Download the TTF of your choice and install it in the Fonts folder on your computer. NOTE: Install the fonts before you open EQ8. If you install the fonts after EQ8 is already open, it may not pick up the new font in the computer font folder. Open your EQ8 program and create a new
EQ8
January 2022 Lessons with Yvonne–Playing with Fonts
Posted 01-16-2022 by Yvonne | Posted in: EQ8 EQ8 Lessons with Yvonne Favorite Posts
Did you recently get EQ8? Welcome to the EQ family! Or maybe you just want to sharpen your EQ8 skills? You came to the right place! We’ve put together a list of resources to help you get started with your new software. A great place to start is built right into your EQ8 software. When you open EQ8 you’ll see the Home screen. Under the big EQ8 logo on the left, click LEARN. Reference Manual and Quick Start Guide On the Learn screen, you’ll see links to our EQ8 learning resources. The Reference Manual and Quick Start Guide are available as PDFs. You can download them by clicking the appropriate links. These downloads can also be found here: EQ8 Documentation The Quick Start Guide has a beginner lesson starting on page 15. It’s a great way to become familiar with EQ8′s tools and controls, plus you’ll design this fun quilt
EQ8 Lessons with Yvonne-Simple and Beautiful
Posted 11-21-2021 by Yvonne | Posted in: EQ8 EQ8 Lessons with Yvonne Favorite Posts
My experience with teaching quilting and machine embroidery over the years is that the simplest projects are liked the best by the students. When I present a challenging lesson or a lesson with lots of steps to create amazing designs, I often don’t get people excited about the whole process. When I give them something incredibly simple and quick to create, they O0h and Ahh over it for months afterward. I like to be challenged to learn more, do better, get more creative, and try things I would normally never do. I don’t care to repeat the same process more than once because I get easily bored. The more I have to work to get the results I want, the more I am learning during the process. That does not mean that I can’t appreciate quick and easy projects. Open your EQ8 and name a new project called ‘Precuts and
Label Those Quilts!
Posted 11-20-2021 by Jenny | Posted in: EQ8 Just Because
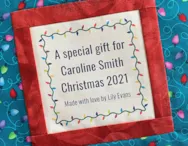
Do you plan to gift some quilts to family and friends this holiday season? Don’t forget to put a label on the quilt before you wrap it up! It’s important to document your quilts for future generations. And you worked hard on that quilt! You should “sign” your work, just like any other artist. Did you know you can design your own personalized labels in EQ8? Print the labels on EQ Printables Inkjet Fabric Sheets and you’ll have the perfect label for quilt. Create Your Own Quilt Label in EQ8 Below is a simple option that won’t use much ink, but still has a holiday flair! Download the free Lightbulb Border project from DoYouEQ.com. If you are given the option to open or save, choose to save the project. Most browsers will save the project file to the Downloads folder. Open the project file (Lightbulbs.PJ8) in EQ8. View the Project
EQ8 Lessons with Yvonne-QUICK COLORING FOR MAXIMUM EFFECT
Posted 09-19-2021 by Yvonne | Posted in: EQ8 EQ8 Lessons with Yvonne Favorite Posts
Our quilts are often about color. Sometimes it is the design itself that is the focus, but the eye sees color before it sees patterns. I love designs that have a bit of a dimensional look and are quickly created with color. Launch your EQ8 project to start. On the opening screen, click on the little piece of paper with the green starburst on it on the upper left side of the screen. This is the new project icon. In the project sketchbook, name your project ‘Quick Coloring for Maximum Effect’. Click on the quilt worktable icon on the upper right side of the screen. Choose NEW QUILT>One Patch from the ribbon at the top of the screen. The default for the program is to open to the Hexagon one patch layout. Click on the Layout tab at the top of the screen. In the drop-down menu, select the rectangle
Make a Puzzle Using Your EQ Quilt Designs
Posted 09-16-2021 by Jenny | Posted in: EQ8 More for EQers
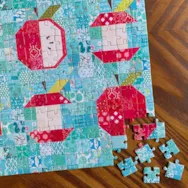
Quilters and puzzle enthusiasts have a lot in common—they both like to fit little pieces together! Why not combine both interests and make a puzzle from your favorite EQ quilt design? Puzzles are great for gift-giving (or just something fun to make for yourself!). Export an image of your finished quilt design in EQ8 and turn it into a puzzle using your favorite photo service. I used one of our free project downloads for this puzzle. Click here to download the Outstanding Orchard project for EQ8. First, check out the puzzle options available at your favorite photo site. There are lots of different photo services available online, and many of them offer a product for turning a photo into a puzzle. I choose the 10” x 14” 252-piece puzzle available on the Snapfish site. Most of the photo puzzles I found were in a rectangular format. Since the original quilt
EQ8 Lessons with Yvonne-Create Your Quilt Stencil to Match Your Block
Posted 07-18-2021 by Yvonne | Posted in: EQ8 EQ8 Lessons with Yvonne Favorite Posts
Once you create a block and quilt layout, the next step is to quilt the layout. Sometimes you have no idea what would look good for a quilting stitch. EQ8 can help us decide how to quilt a design by matching a block layout pattern with a quilt stencil. EQ has loads of stencils built into the library but they may not match exactly what you have designed for a quilt block. You can use your block drawing as a start for creating the stencil. Open your EQ8 by double-clicking onto the logo on the desktop. When the program opens name a new project file “PRACTICE STENCILS”. Click on the block worktable icon and select NEW BLOCK>Pieced>EasyDraw for the block worktable. On the properties bar for the block worktable, use the default size of 6 x 6 inches and snaps at 12 x 12. Click on the grid tool to


