Welcome to Design and Sew Lesson 1. I look forward to hearing from all of you here on the blog page. The lessons will be posted on the blog page the first and fourth Sunday of each month. The dates of the lessons will be January 26, February 9, February 23, March 8, and March 22, 2020.
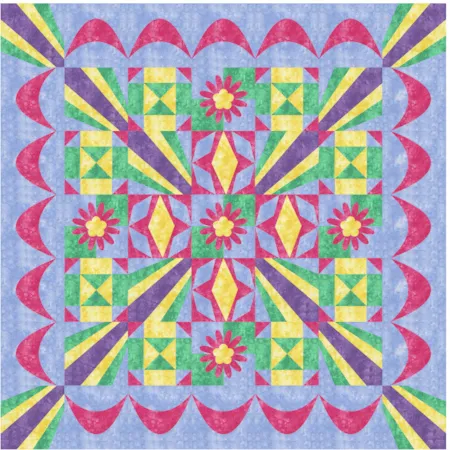
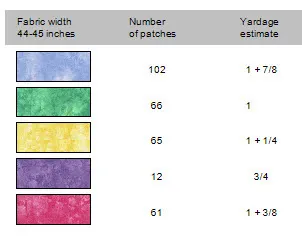
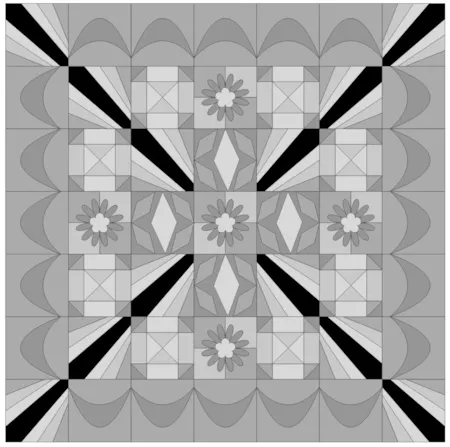
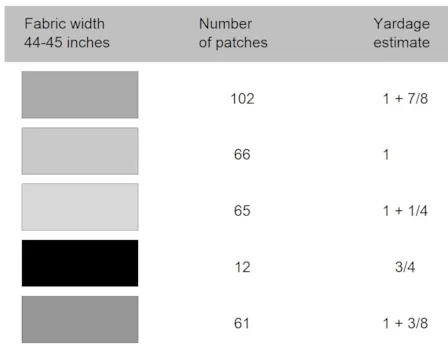
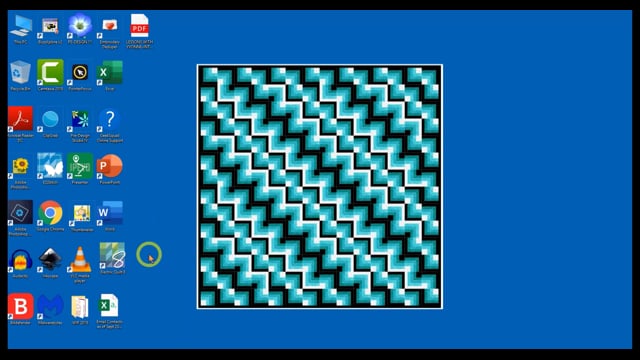
We will be constructing the quilt shown below. Lessons will have information on the layout, block design, printing the lesson, printing the block pattern, printing the fabric requirements and more. Below is an image of the quilt we will be constructing. You may choose to do the same colors as I have or you can substitute your own colors. I have shown the quilt and the amount of fabric yardage you need in both full color and in grayscale. If you choose to make this quilt layout as presented, the over all size will be 56 inches by 56 inches.
At the end of the lesson there will be a video clip covering the content of that lesson. If you learn better by watching a video, this will be a good aid for you. The video can be found at the bottom of the blog post. You may choose to watch the video first and then go back and work along with the written instructions after. This may help to give you a clearer picture of what will be happening during this lesson.
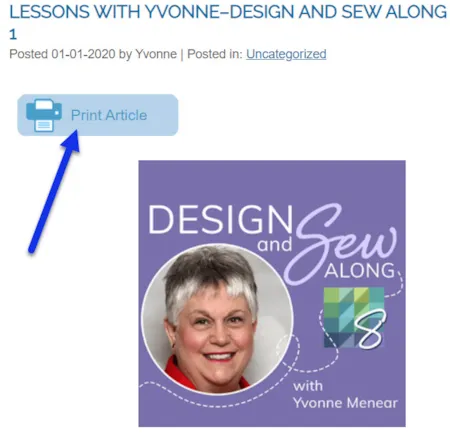
You can also print the written lesson from the blog page to have on hand as you work though the design construction. At the top of the blog post, you will find the print function for the lesson. If you want to download it to the computer rather than print it, just click on the print option and when your printer selection box opens, select to save as a PDF to the computer rather than physically printing the lesson. The choice is yours. (Watch the video at the end of this blog to see how I do this on my computer.)
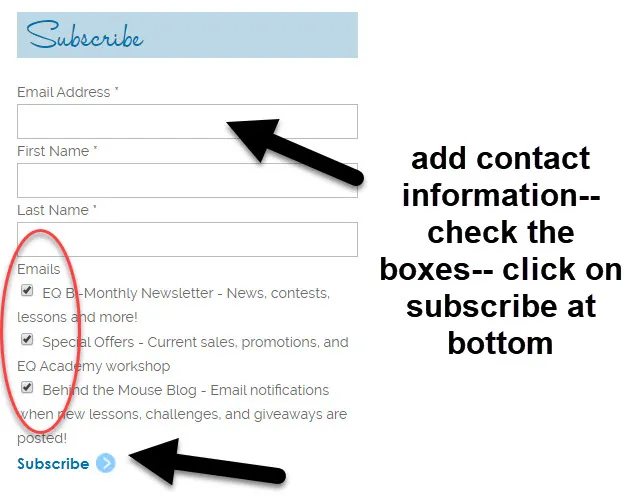
Also on the EQ website blog page, scroll down to see the ‘subscribe’ section on the right side of the screen. Fill in your contact information and place a check mark in each of the boxes. Click on ‘subscribe’ at the bottom of the box info. This will now send you by email when a new posting will appear on the blog page.
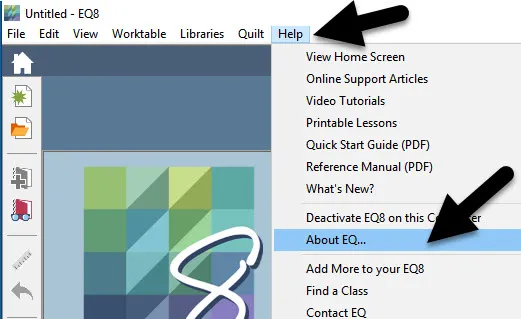
Before we start this lesson series, open your EQ8 program and then click on ‘help’ >’about’. The main screen will open with the version of the software that you have on your computer.
I have a PC and at the time of writing this lesson the screen shows the most up to date version for PC which is 1.1.0.2. The current version of EQ8 for Mac is 3.2.0.1 at the time of writing this lesson. If you don’t have the current version, please visit the EQ website www.electriquilt.com and download the most current version for your computer. (The video at the end of the lesson on the blog page will show you how to navigate the Electric Quilt website to download the current version of the program.)

Let’s begin by preparing our Electric Quilt 8 program for our new DESIGN AND SEW series. Just like you gather your tools in your sewing room to create a new project, you will also prepare your program for our project.
Double click on the EQ8 icon on the desktop ![]() to launch the program.
to launch the program.
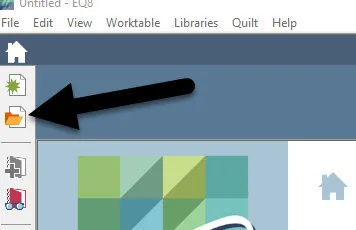
The first thing we will do is name our project folder. All the class lessons will use this one folder for the completion of the project. On the opening page, click on the ‘new project’ icon ![]() on the upper left side of the opening screen.
on the upper left side of the opening screen.
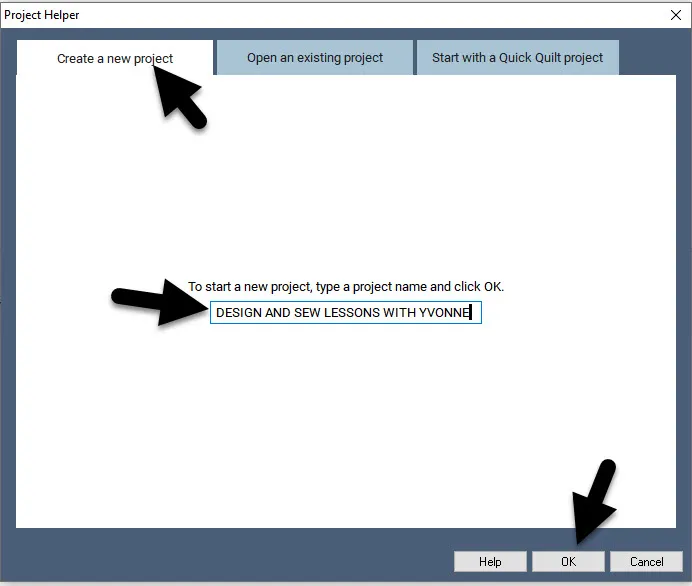
Name your project DESIGN AND SEW LESSONS WITH YVONNE. Be sure to click the OK in the bottom of the box to give the name to your project.
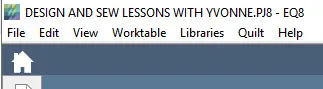
The name of the project can be confirmed at the top of your screen. The name will change from ‘untitled’ to the new name we have chosen.
Each time you open your EQ8 and select this project you should confirm you see the project name at the top of the screen. We need to keep all our lessons in this one project folder.
You may have been using your program to design other projects. You may have changed the preset properties of the program for those other designs you were creating. EQ8 remembers your previous settings. Therefore, to ensure that everyone is starting fresh with this project, we will change the settings for this DESIGN AND SEW LESSONS WITH YVONNE. Once we set the new properties they will stay this way for the entire lessons needed to create this quilt.
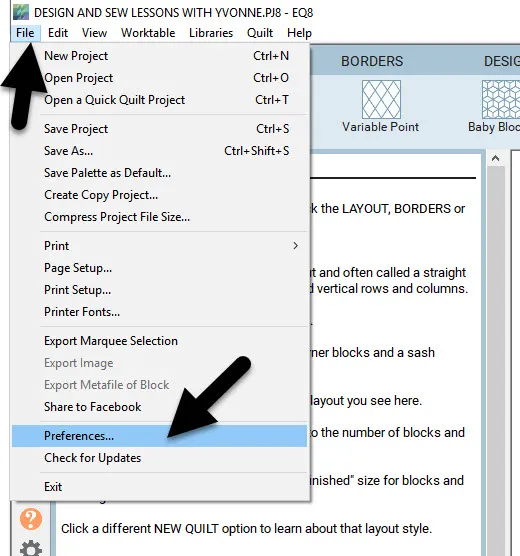
On the main page of the program, click on FILE>Preferences.
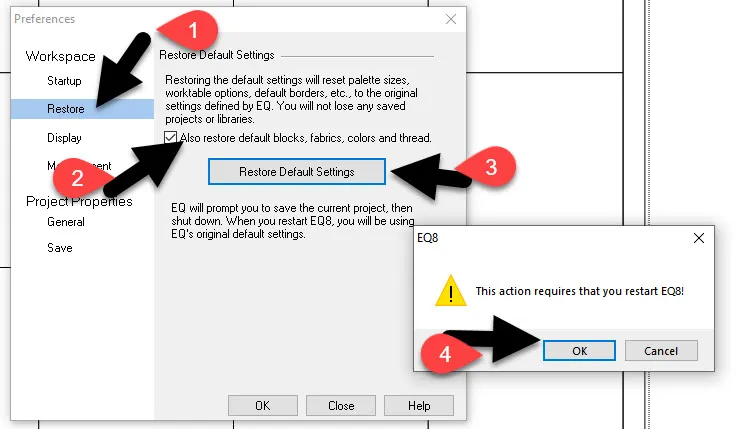
In the pop up preferences box, click on the word ‘restore’ on the left side of the box. Place a check mark in the center box next to ‘restore default blocks….’ and then click on the ‘restore default settings’ in the center of the box. You will get another small box telling you the program will close and you will need to restart it. Click on the OK in the bottom of the box. Your program will close in order to set the new default program preferences. Now we are all starting from exactly the same place with our DESIGN AND SEW LESSONS WITH YVONNE project file.
Re-open your EQ8 from the desktop launch icon.
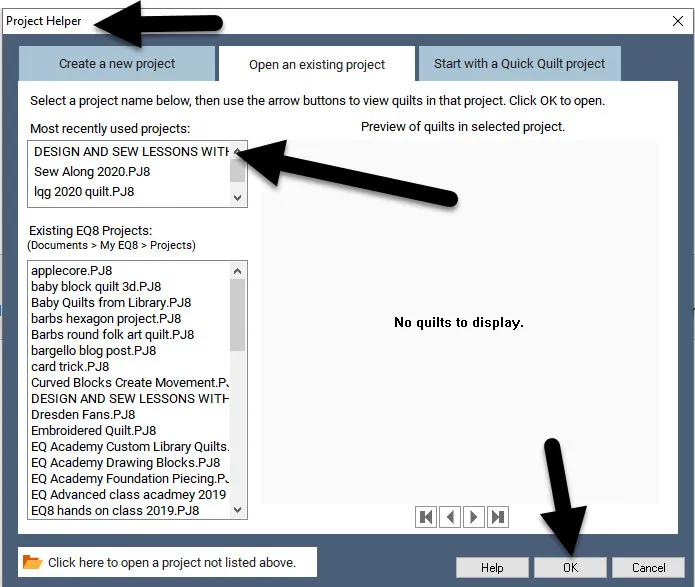
Once the program is launched click on the ‘open project folder’ icon![]() on the left side of the screen.
on the left side of the screen.
In the project helper screen, click on the DESIGN AND SEW LESSONS WITH YVONNE project name and then click on the OK at the bottom of the box. Your named project will open ready for use.
The sketchbook will open and you can select what you want to work on in the project. As we have not created anything yet, just close the box for now.
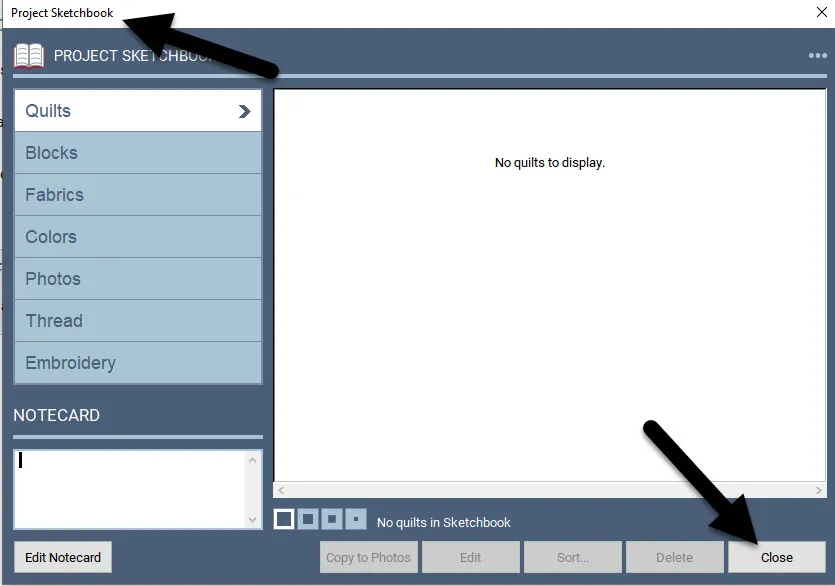
NOTE: I use the ‘close’ option at the bottom of the box. You could use the little ‘X’ in the upper right corner of the box, but you may accidentally close the program instead of closing the box if you click on the ‘X’ at the top of the screen instead on in the box. Just for safety, I usually use the ‘close’ in the bottom of the box.
Now that you have opened the existing project, you should see the name of the project at the top of the screen. If you don’t see the name, go back and open the folder icon and make sure you click on the project title to select the correct folder.
EQ8 has some standard complimentary blocks in the sketchbook for us to use. We will not be using these so we can delete them to clean up the sketchbook. Click on the ‘view sketchbook’ icon![]() on the far left side of the screen.
on the far left side of the screen.
In the sketchbook screen, click on the blocks heading to see the built in blocks. In the upper right corner of the screen click on the three little dots to get more options. Select the ‘clear all unused blocks’ option and confirm that ‘yes’ you really want to do that.
![]()
Repeat this process by clicking on the motifs tab and the stencils tab and clearing all the blocks under each tab. When you have finished deleting the blocks from all three tabs (blocks, motif, and stencil tabs), be sure to click on the ‘close’ at the bottom of the box.
![]()
Don’t worry about removing these blocks. When you create a new project and set the program preferences back to the default settings all the built in blocks in the sketchbook will return.
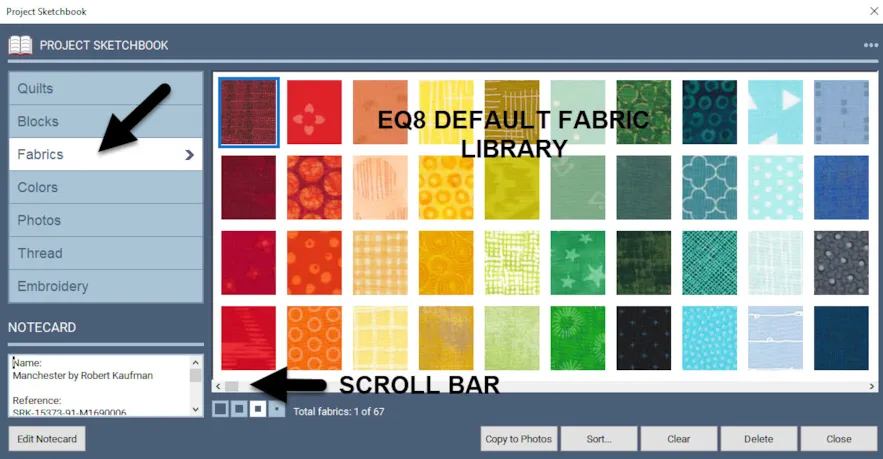
The default fabric library is still in the project sketchbook. I want to add some more fabrics to the sketchbook. The Electric Quilt website has many fabric collections we can download and install into our fabric library to use.
The default fabrics can be found in the sketchbook![]() under the fabrics heading at the left side of the project sketchbook box.
under the fabrics heading at the left side of the project sketchbook box.
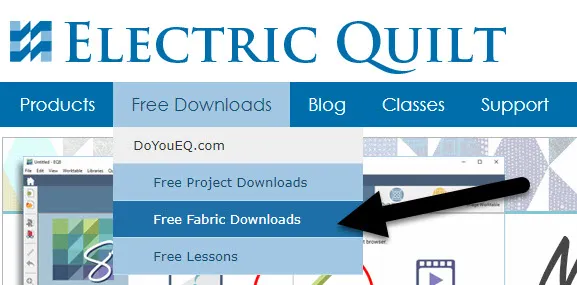
On your computer, navigate to the Electric Quilt website. (www.electricquilt.com). On the opening screen, navigate to FREE DOWNLOADS>Free Fabric Downloads.
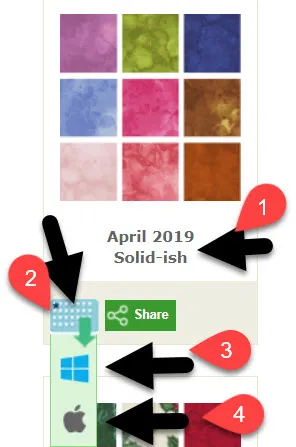
Scroll down the page to see all the recent fabric downloads. I used the April 2019 ‘Solidish’ fabric palette for my quilt blocks. Click on the download icon and choose either PC or MAC to download for your specific computer.
On my computer I get a .exe file download in the lower left corner. Your computer may be slightly different as to where the .exe file appears on your screen. Click on the file to open the installation.
![]()
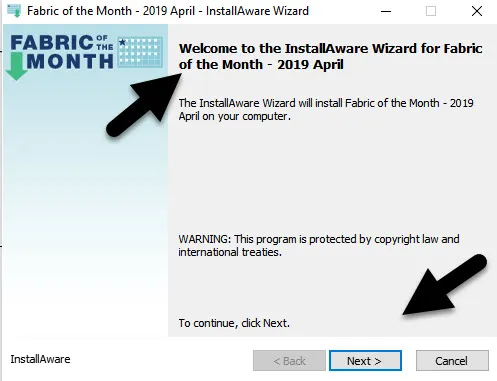
The install wizard pop up box will appear. Just click along on the wizard (next to finish) and allow the program to install your fabrics.
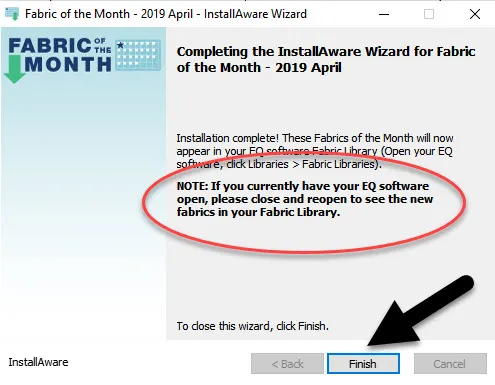
NOTE: You may need to restart your program project in order to see the fabrics installed in the fabrics library.
Click on LIBRARIES>Fabric Library at the top of the screen.
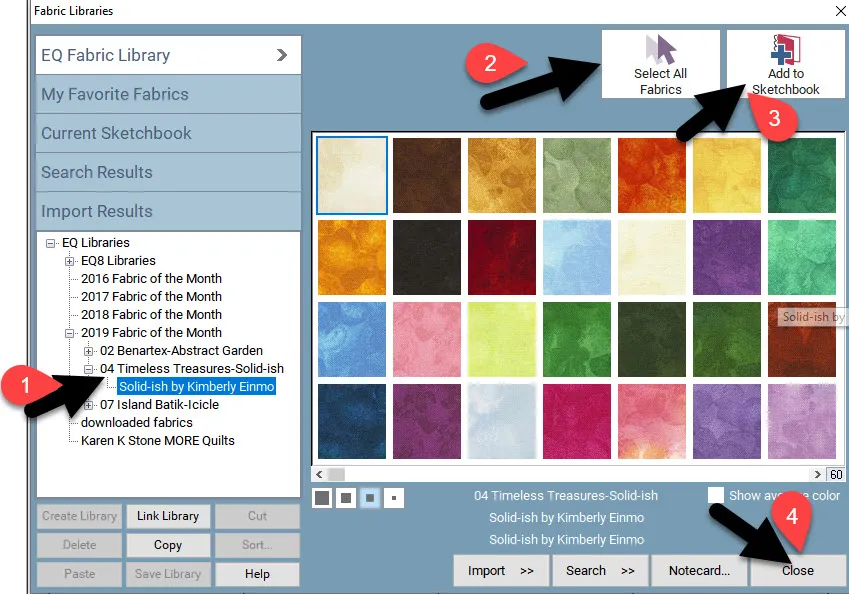
In the pop up fabric library box, scroll down on the side and locate the Solidsh fabrics we just downloaded. Once you click on the item, all the Solidish fabrics will appear in the box. Click on the ‘select all fabrics’ at the top of the box and then click on the ‘add to sketchbook’ within the box. Now all your fabrics will be added to your sketchbook ready for your use with this project. Click on the ‘close’ at the bottom of the box.
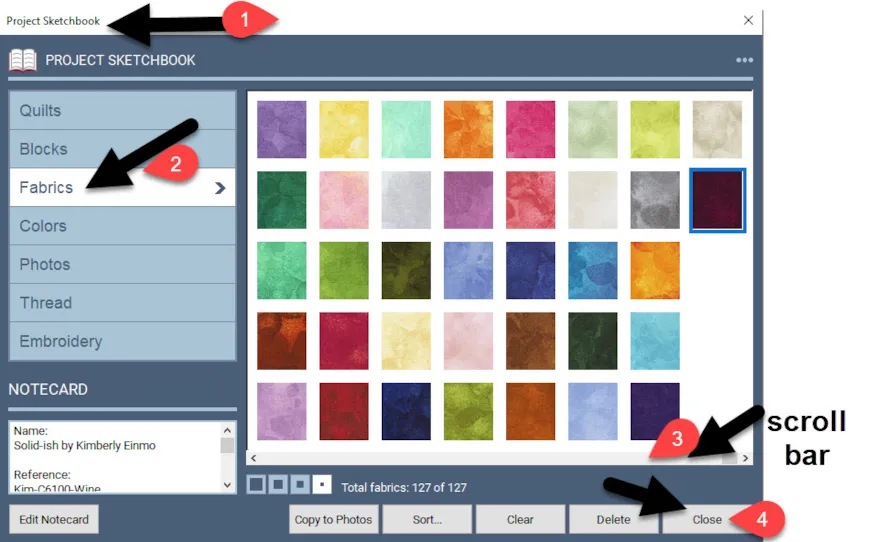
Confirm that all your fabrics are indeed in your project sketchbook. Click on the ‘view sketchbook’ icon ![]() on the left side of the screen. When the box opens, click on the ‘fabrics’ heading on the left side of the box. Using the scroll bar at the bottom of the fabrics, scroll all the way to the end to see the fabrics you downloaded in your project sketchbook. Close the box once you have confirmed that the new fabrics have been added.
on the left side of the screen. When the box opens, click on the ‘fabrics’ heading on the left side of the box. Using the scroll bar at the bottom of the fabrics, scroll all the way to the end to see the fabrics you downloaded in your project sketchbook. Close the box once you have confirmed that the new fabrics have been added.
Watch the video at the end of the lesson on the blog page at the bottom of the lesson page.
Congratulations! You have successfully prepared your project with the ‘tools’ we needed to get started.
In our next lesson we will begin to create our block designs. We will be moving along slowly with the lessons so I don’t overwhelm you with all the learning presented in each session. Be patient and work along to create each of the blocks and the quilt layout along with the pattern printing for each step.
If you have any questions, please post them in the comment section of the blog page on the EQ website. I will not do individual email requests. Everyone needs to see the questions and answers as they may have the same questions.
If you are making comments with a language that is not English please use a translator to post the question. If you post in your own language, it takes me extra time to translate and answer in English in the comments.
Remember, the lessons appear on the EQ blog page on the second and fourth Sunday of each month.
Watch a Video Lesson!
Click play to watch the video for this lesson.
Want to download the video to watch later? Click an option below:


01-26-2020
11:11 am
I’m really going to enjoy this set of lessons. It’s a great start in designing Judy Niemeyer Style quilts. Baby steps toward the totally.complicated and I really appreciate this opportunity.
01-26-2020
11:52 am
I agree!!!
01-26-2020
11:42 am
Wow, this is a great demonstration. I don’t have the Electric Quilt software yet and wasn’t sure I wanted it before watching this demonstration. I’m looking forward the the lessons and plan to make the purchase. Thanks for doing these lessons.
01-26-2020
12:09 pm
Nancy–You will be happy with the purchase of EQ8. I plan with my program every day. It is quite addicting and I can do anything I dream up and make it become a reality!
01-26-2020
1:20 pm
Nancy, I used this software when it was version 5 – and this version is so much easier. I was self-taught on 5, but decided to join this class learn about all the tools from start to finish. I highly recommend v.8 and all I have done with it so far is draw a layout of an existing quilt, which I found so easy to do with just the HELP feature in the software.
01-26-2020
11:48 am
Yvonne, thank you for the lesson. Everything is very clear . I liked the function to clear sketchbook of blocks and motifs. I haven’t used this feature before. Easily added fabrics from the library.
01-26-2020
12:08 pm
Hello Irina–I am glad to hear you learned about the clear sketchbook function. It is my hope for this class series is that even people who are somewhat all ready familiar with the program will still be able to pick up little tips/hints that they hand not discovered so far.
01-26-2020
12:12 pm
I was completely intimidated by the program. After this lesson, I now thank I will be able to learn it. Great teaching.
01-26-2020
12:14 pm
Sheila–Thanks so much! I love teaching others how to use the program. I am sure you will get very comfortable with the program as you work along in the lessons.
01-26-2020
12:37 pm
Love online classes and your class is very easy to follow. Your video is fantastic. I am hearing impaired, but your speech is very easy to understand (yes, my volume is set at the highest mark)
01-26-2020
1:06 pm
Thanks so much! I’m new to EQ8 and loving it. This will be a great series to follow and learn more about the program. Looking forward to next lesson!!
01-26-2020
1:35 pm
Thanks for running the tutorial I have had EQ since 7. I have used it but recently I have not done a lot with it so I am going to get a good refresher watching these tutorials!
01-26-2020
3:22 pm
So excited about this Yvonne that I’m setting aside other ongoing projects so I can concentrate on this. Thank you for all you do.
01-26-2020
8:32 pm
Thanks, Yvonne. I have worked my way through the EQ8 Lessons for Beginners book, but am really looking forward to learning from an expert. My only problem was that, when I tried to download the fabrics, McAfee warned me that it might be risky. I backed off. Can I follow your lessons and just use the fabrics I already have?
01-26-2020
8:49 pm
Irene–You can indeed use any fabrics you choose. I can assure you the fabric downloads from the EQ website are safe.
01-26-2020
10:29 pm
Thanks, Yvonne. I am very glad to start this project with you.
01-26-2020
11:54 pm
Thanks Yvonne! I´m going to enjoy EEQ8 lessons. I worked my way through the manual, since I use EQ for about 12 years. Although I`m surprised every time what else to discover.
01-27-2020
4:01 am
Thank you! So easy to follow along and understand. I have designed a few quilts already in EQ8 but very simple ones, this is going to be a wonderful learning tool so I can progress further! Looking forward to the next lesson and EQ8 is all set up for this project.
01-27-2020
8:17 am
I am at a loss right now. I upgraded my computer to Windows 10 because of discontinuing of Windows 7 and will have to notify tech support my computer is not letting me open my EQ8. I will have to get things fixed before I can continue to sew along. I enjoy your lessons.
01-27-2020
10:54 am
Karla–Yes contact tech support. They are very friendly and will be able to help you.
01-27-2020
10:23 am
Thanks Yvonne! I enjoyed the first lesson. Do I wait and buy the fabric after the second lesson? Will your second lesson specify the exact color names?
01-27-2020
10:52 am
Susie-Great question. First, you do not need to actually sew the design at all. If you wish to sew along, I purposely have two weeks between classes so you have time to sew the blocks as we go. The fabrics I used are actual fabrics designed by Kim Ennimo called Solidish. My local stores do not carry it so I purchased tone on tone prints that look similar to that line of fabrics. You can choose to use whatever you wish. You can sew along each lesson or wait until the lessons are complete and create the entire quilt then.
01-27-2020
12:47 pm
I love my EQ8 will be happy to get back into it
01-27-2020
5:06 pm
Thank you so much. I have been totally scared of the program since I bought it but I am sure, with your direction, I’ll get the hang of it. I keep thinking I’m too old to learn new stuff but I’m trying. I have a lot of row x row blocks and rows that I want to put together and I’m planning to use this program. Looking forward to the next lesson.
01-27-2020
5:12 pm
Shirley–You are never to old to learn something new. However, as I age I do forget easily. Practicing new skills everyday keeps me from forgetting what I learned. I am always learning new things and that keeps me motivated.
01-29-2020
9:09 pm
Shirley–Welcome. You will learn so much about the program as we progress through the lessons. For this first set of lessons we are not addressing row quilts, but we certainly can cover that is future lessons as we go along. Keep watching the blog page for new courses as they come up.
01-28-2020
1:32 pm
looking forward to classes. Thank you
01-29-2020
12:49 pm
Thank you Yvonne, I’ve learned new functions that I would never have use left on my own. I even updated my EQ8 to the newer version. Your written instruction is quite clear that I was able follow it entirely:)
01-29-2020
4:35 pm
I have just started quilting two years ago when I retired and on a real learning curve. I find I want to design my own quilts. I fell into EQ8 by accident. I am ecstatic to start using it. I eventually found your blog and and thrilled at your instruction. I feel more confident with my decision to work with EQ8 after this one lesson and know I have support, and education to become the master of my own designs that are in my mind to become a reality. Thank you so…. much. Enjoying my retirement just stepped up to a new level. LOL I have shared the information with my fellow quilters and they have become interested in EQ8 from my excitment.
01-29-2020
9:07 pm
Tammara–Welcome. You will learn so much following the steps in the blog lessons. Thanks for sharing your discovery of EQ and your excitement about the program with others. The best way to stay on top of the program is working with others who also have the program. You can challenge and support each other while working together with the EQ8 program. I am glad you are joining us here.
02-01-2020
8:04 am
This is so helpful and the timing is perfect. I don’t remember how many EQs I have upraded but it is several but I never really got grounded in it. I determined this year to learn this program. I stumbled through one project myself and did ok but I can see that this step by step tutorial is going to mean a lot to getting me grounded in the program. Thank you.
02-01-2020
8:24 am
I have EQ8 but haven’t used it in a while. I would like to do this project. My problem is I have a new computer that doesn’t have a CD drive . How can I get EQ installed on it?
02-01-2020
9:59 am
Sandra–Contact tech support at the EQ company and they will be able to help you with installation.
02-01-2020
9:10 am
Thanks for these lessons, Yvonne! When we reset the default for a new project will we be able to go into old projects and continue to work on them with the preferences that we set, or do we lose the settings on old projects?
02-01-2020
9:58 am
Cathy–Each project remembers the preferences you set and will be the same each time you open that project. If you are starting a brand new project, then you can set the preferences back to the defaults in the program when you name that brand new project.
02-03-2020
8:46 am
Cathy, EQ Preferences ARE applied to ALL project you open up, preferences are *not saved with only the project you’re in* when you reset them.
02-03-2020
1:46 pm
Karen–I am not sure I am understanding what you are saying about preferences. There are default preferences for all projects in EQ8. If we change any of the default settings in a given project, it only applies to that project. When you open a new project, the program remembers what the settings were when you were last using the EQ program. The new project will have the default EQ preferences along with anything you set on the last project you worked on. EXAMPLE– If I change my block size to 12 inches and I open a new project, the new block drawing board will have a 12 inch block on the page. I need to change it back to the EQ8 default settings. When I make changes, it does not change all the projects I have previously set with different preferences for that project. Those settings stay the same. Perhaps that is what you are saying but I am miss reading it. Thanks for sharing your idea on preferences.
02-01-2020
5:11 pm
Thank you for the instructions with getting started with EQ8.
I have been a big fan of the EQ from way back. As a quilt instructor, EQ is very helpful with planning class quilt projects. Hoping to learn to use the program more efficiently.
My question is – How do I rename a project file?
Looking forward to the next lesson Thank You
Missy
02-01-2020
8:09 pm
Missy-rename a project by locating the project folder on hard drive. C drive>documents>my Eq8>projects. Locate the project you want to rename and right click>rename project.
02-01-2020
8:09 pm
Missy-rename a project by locating the project folder on hard drive. C drive>documents>my Eq8>projects. Locate the project you want to rename and right click>rename project.
02-01-2020
8:36 pm
Hi Yvonne I have been downloading the free downloads but they have not gone into my programme, Can you please tell me how I have double clicked after it goes into my downloads followed the proms but they have not gone into the program. I have the 8 series.
Thank you
Clare Vallance
New Zealand
02-01-2020
8:39 pm
Clare-can you give me some more information? What is it you are downloading?
02-02-2020
2:45 am
I started using EQ back in 1999, I am not sure if it was version 1 or 2, and have updated every time a new version came out. The first few years I got around in the program pretty well, but I found it in EQ7. I designed a lot of quilts in it, imported and scanned fabrics. I loved it and them came EQ8 “easier, more intuitive,” screech, I hit a brick wall. I am having a hard time wrapping my head around it. Hopefully, this class will clear the roadblock. You are so easy to understand and follow. Thank you.
02-05-2020
8:23 pm
You can contact the office, they have the information on file. I was thinking back and thought I started with version 2 but it was really version 3
02-05-2020
8:28 pm
I also hit a stumbling block with 8. I think it is set up easier, but my years with version 3-7 was easy for me, and I’m struggling with version 8 and rarely use it, preferring version 7.
02-05-2020
3:04 pm
Thank you for the lessons. I am new to EQ and look forward to getting acquainted with the program.
02-10-2020
11:21 pm
Learning EQ is on my list of goals for 2020. I just finished Lesson #1. Your class is a step-by-step initiation that will help me to my goal. Thank you!
02-11-2020
8:04 am
Thank you for having both written and visual instructions. I have had EQ8 for awhile, but not taken the time to learn it. One of my goals for 2020 is to design my own quilts.
02-11-2020
8:06 pm
Thank you for offering this fun series of lessons. EQ is the best!!!!
02-13-2020
9:30 am
Design and sew paper pieced block.jpg
Thanks for this very clear lesson
02-15-2020
11:34 am
Yvonne,
nice lesson but per usual I could not get the fabrics to download.
I think it has been since EQ 5 that I have been successful with the free monthly downloads. I got to the wizard and finish buttons but there is nothing when I go to Fabric library. your instructions are so clear I was really hoping I could finally do it.
02-15-2020
1:23 pm
Sally–I sent you a private email to see if I could help you with the steps to find downloaded fabric libraries. Email me back and we can have a discussion about your issue with downloads. Yvonne
02-16-2020
9:42 am
I just happen to be looking around on the EQ site and found you. Looks fun so why not ty
02-16-2020
9:50 am
Helen, on the right side of the screen you can sign up for newsletters and blogs and the company will notify you when something new is being posted. That is the easiest way to keep up with what is happening. Start the Design and Sew Along lesson with the introduction and then follow the numbered lessons. There will be five numbered lessons in all for this first set of designs.
03-14-2020
8:45 am
If I want to save the video, what is the prefered option?
I have had all versions of eQ, but never really got into using any of them. Decided I would not get any new ones then I won version eight. I have an eight year old great granddaughter that quilts and is a whizz on the computer. I thought she would like to play with it so I had a friend install it on my new computer. Do not have Seven on this computer.
03-14-2020
9:17 am
Granny Shirley the video choice depends on your computer screen resolution. Choose the video that is the size of your screen for the best results for your viewing.
03-18-2020
1:19 am
Hello! With the extra time happening during the coronavirus pandemic, I am finding the time to finally start these lessons. I bought EQ8 the first week of February! This first lesson was very easy so it looks like EQ8 was a good purchase for me! Tomorrow, I’ll move onto Lesson 2!!
03-24-2020
3:14 pm
Heidi–Yes this virus is keeping us all at home working with our machines and our software programs. Glad you could join us!
05-07-2020
11:58 pm
I have finished this lesson one. I think I may download some more fabrics to practice. I found the browser I use makes a difference. I normally do firefox but it is in edge that the download happens as you describe it. Perhaps tomorrow I can move faster with the lessons. I was getting interruptions today. Thank you.
05-08-2020
12:10 am
Anne- you are doing great. There is no rush. The lessons will stay on the blog indefinitely.
09-07-2020
12:48 pm
Thanks for a great lesson
09-07-2020
12:59 pm
Melissa–You are very welcome. I hope you enjoy the classes.
02-19-2021
6:56 am
Hi, I’ve just bought EQ8 today, I really glad to sew along with you. First I design to join in latest sew along 3 but I change my mind to start at this first sew along. After I finished the first lesson, I’m glad that I made the right choice. I’m novice in quilting software. You’re the fantastic teacher. Oh, I forgot to tell you that I’ve live in Thailand and thank you for you lesson.
02-19-2021
6:59 am
Sasithorn- welcome to the world of EQ. I hope you enjoy all the lessons as you work along learning EQ8.