

Getting Started
Print off these instructions from your internet browser by clicking FILE > Print. Follow each step of this lesson to begin making your “EQuinox” Mystery Quilt.
In this lesson, we’ll learn how to bring blocks from other projects into the current project we’re working on. We are going to download a project.
Download the Lesson7.PJ5 or .PJ6 Project File
Tip: All browsers work differently. Some work great on the first try. Some download files to the depths of you computer, while others don’t give you an option to save a file. If you have trouble downloading, try right-clicking the link instead and choosing Save File As or Save Target As or Save Link As.
- Follow the directions according to which version of EQ you are using:
EQ6 Instructions:
EQ6 lets you import into your current project from other closed projects on your computer.
- Download the Lesson7.PJ6 project for EQ6. Save it to your Desktop.
- Open EQ6 (EQ5).
- Click the Open an Existing Project tab (it appears immediately when you open EQ6).
- Click on EQuinox.PJ6 and click OK to open it.
- Close the Sketchbook.
- Click LIBRARIES > Block Library.
- Click the Import… button near the bottom of the window.
- In the Look In: box at the top, click the drop-down arrow to browse to your Desktop.
- Click on the Lesson7.PJ6 project.
- Click Add to Sketchbook two times to add the 2 new blocks to your current project.
EQ5 Instructions:
In EQ5, you must save items in the User Library in order to access them from other projects.
- Download the Lesson7.PJ5 project for EQ5.
- You can choose Open. (If your only option is to save it, find the file after downloading and double-click to open it.)
- Click the X to close the Sketchbook.
- On the menu bar, click LIBRARIES > Add Blocks.
- Click the + sign by User Libraries.
- Click the + sign by the first Library book. Style pages appear.
- Find an empty style.
- Click once on the selected style name so it turns into arenaming box. (If this doesn’t work, click, then pause, and click again on the name.)
- Type: EQuinox
- If you press ENTER, click “Yes” and “OK” at the next two message boxes.

- Click the Copy button two times, to copy the two new blocks from your Sketchbook into the Current Library Style.
- Click the Save Library button. A message saying, “Your blocks have been saved in the library!” will appear.
- Click OK.
- Click the Close button.
- Click FILE > Open.
- Click on EQuinox.PJ5 in the list.
- Click OK.
- Click the X to close the Sketchbook.
- Click LIBRARIES > Block Library in the menu.
- Click User Libraries in the list.
- Click the + sign to open the Library that has your EQuinox style in it.
- Click on EQuinox. The two blocks you saved will appear.
- Click the Copy button twice. This will put the new blocks in your current project.
- Click Close to put the library away.
Edit the Quilt Layout
- Click the View Sketchbook button.
- Click the Quilts section to find your mystery quilt layout.
- Scroll beneath the quilts to find the last quilt (with the umbrellas, snowmen, sailboats, etc. you set in Lesson 6).
- Click the Edit button. Your quilt appears on the Quilt worktable.

Create Border Eight
- Click the Borders tab.
- Click the Add button. It adds a border.
- Under Select a border style, click the down arrow to display choices.
- Click Mitered (at the top of the list).
- In the sizing area, lock your borders so they will all move together by putting a check next to the “All” box.
- Drag the slider bar for Left (or click directly on the slider bar) to make the border 1.00 (2.54cm x 2.54cm). Since you have the “All” box checked, all border sides should change at once as you drag, so they are all now 1.00.
Create Border Nine
- Click the Add button. It adds a border.
- Under Select a border style, click the down arrow to display choices.
- Click Tile Squares. This border style does the math for you and always creates square blocks. Your only option is to set the number of blocks in the border.
- Use the arrows to change the number of blocks in the border. Change Horizontal and Vertical both to 7 in each box. If you count the squares, you’ll have 9 across, but rememember, the corner squares don’t count. This border will automatically be sized 8.00 inches (20.32cm x 20.32cm) for you.
- Click the Layer 1 tab.

Set and Rotate Half-Square Triangles
- Click on the Set Block tool
 (Set tool in EQ5). The Sketchbook Blocks palette (Blocks palette in EQ5) appears.
 - Click on the Half-Square Triangle block in the palette. It does not matter which coloring is showing.
- Holding down the CTRL key, click on a corner block space in the outer border.
- Click the Rotate Block tool
 (Rotate tool in EQ5).
 - Click on the top-right, then click on the bottom-left Half-Square Triangle block in the border. (You should notice the seam lines for your Half-Square Triangles line up with the mitered borers all the way to the center block.) Your quilt should look something like this now:

Get Other Blocks from the Library
- Click LIBRARIES > Block Library on the top menu bar.
- In EQ Libraries, scroll down and click the “1 Classic Pieced” category.
- Scroll down and click the “Classics” style.
- Find the very last block titled “Monkey Wrench“. Click the block, to select it.

- Click the Add to Sketchbook button (Copy button in EQ5) to put this Monkey Wrench block in your Sketchbook.
- Scroll down and click the “Pictures” style.
- Find the block titled “Maple Leaf” (12th block in EQ5, 13th block in EQ6). Click the block, to select it.

- Click the Add to Sketchbook button (Copy button in EQ5) to put this Maple Leaf block in your Sketchbook.
- In EQ Libraries, scroll down and click the “2 Contemporary Pieced” category.
- Scroll down and click the “Houses” style. We’re going to use 2 blocks from this style.
OPTIONAL:
Tip for EQ6 Users – Did you know you can add more than one block at a time to your Sketchbook?
In step 32, try clicking on the Lighthouse, then CTRL+clicking on the Wisconsin Cabin.
Then click Add to Sketchbook as mentioned in step 33. Both will add at the same time and you can skip to step 36.
Try this same method, click the first, then CTRL+click the second, in step 37. Click Add to Sketchbook and you can skip to step 41 and close the library.
- Find the block titled “Lighthouse” (10th block in EQ5, 15th block in EQ6). Click the block, to select it.
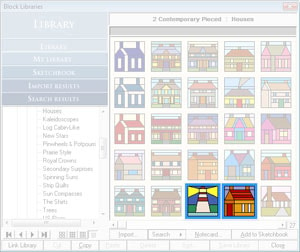
- Click the Add to Sketchbook button (Copy button in EQ5) to put this Lighthouse block in your Sketchbook.
- Still in the “Houses” style, find the block titled “Wisconsin Cabin” (5th block from the end in EQ5, 8th block from the end in EQ6). Click the block, to select it.
- Click the Add to Sketchbook button (Copy button in EQ5) to put this Wisconsin Cabin block in your Sketchbook.
- Scroll down and click the “Trees” style. We’re going to use 2 blocks from this style.
- Find the block titled “Pinwheel Pine” (5th block in EQ5, 7th block in EQ6). Click the block, to select it.
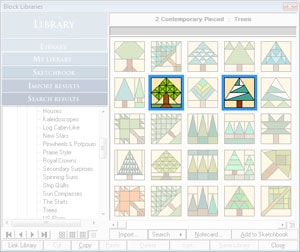
- Click the Add to Sketchbook button (Copy button in EQ5) to put this Pinwheel Pine block in your Sketchbook.
- Find the block titled “Evergreen” (16th block from the end in EQ5, 15th block from the end in EQ6). Click the block, to select it.
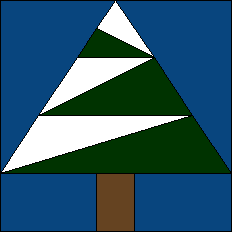
- Click the Add to Sketchbook button (Copy button in EQ5) to put this Evergreen block in your Sketchbook. We will modify this block to make a new pine tree.
- Click Close to put the library away.
Modify the Evergreen Block
- Click the View Sketchbook
 button. The Sketchbook appears.
 - Click on the Blocks section.
- Click the Evergreen block and click the Edit button. The block will be edited down to the EasyDraw worktable.
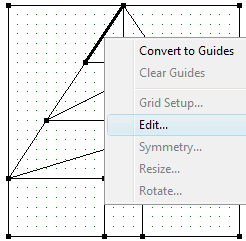
NOTE: If you turned on the Precision Bar in EQ6:
![]()
or turned on and added the Advanced Drawing Features in EQ5:
![]()
please make sure you have the correct snapping options turned on.
Snap to Grid ON, Snap to Node ON, Snap to Drawing OFF
These are the default settings for EasyDraw. If you don’t see these buttons on your screen, then you’re still okay.
- Click the Shape
 tool (Edit tool in EQ5).
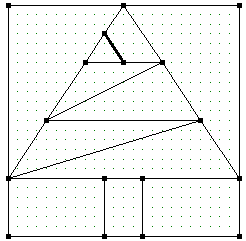
 - At the top point of the tree are 3 lines. Click on the left line. It will turn bold to show it is selected.

- Right-click the line and choose Edit or click BLOCK > Edit on the menu bar. This will bring up the Edit toolbox.
- Click the Half button on the toolbox that appeared. A node (black dot) will be placed in the middle of the line.
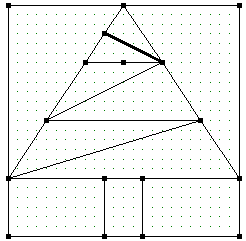
- Now click on the center line (of the top 3 lines) to select it.
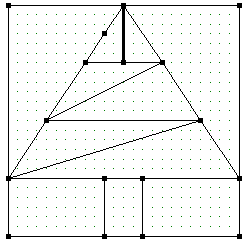
- Grab the top node and drag and drop it on the node/dot we created.
- Click in the middle of this line again (to make sure the node isn’t selected, but that the line is).
- Grab the other node and drag and drop it to meet the end of the right line (of the top 3 lines).
- Click the Add to Sketchbook
 button (Save in Sketchbook in EQ5) to save the new drawing.
 - Click the Color tab, color your pine tree and click Add to Sketchbook button (Save in Sketchbook in EQ5) to save the coloring.
Set Blocks in the Quilt
- Click WORKTABLE > Work on Quilt on the top menu bar.
- Click on the Set Block tool (Set tool in EQ5). The Sketchbook Blocks palette (Blocks palette in EQ5) appears.
- In the palette, find and click on the Tiptoe Tulip you downloaded and added to this project.
- Hold down the ALT key on your keyboard as you click in an empty space in the top border.
- Click the Lighthouse in the palette and ALT+click it in the left border.
- Click your new pine tree in the palette and ALT+click it in the right border.
- Click the Pinwheel Pine in the palette and ALT+click it in the bottom border.
- You can release the ALT key. Your quilt should look something like this now:

- Click the No Vacancy (Birdhouse) in the palette and click it in between every other flower in the top border.
- Click the Monkey Wrench in the palette and click it in between every other lighthouse in the left border.
- Click the Wisconsin Cabin in the palette and click it in between every other new pine tree in the right border.
- Click the Maple Leaf in the palette and click it in between every other pinwheel pine in the bottom border. Your quilt should look something like this now:

Rotate Blocks in the Quilt
- Click the Rotate Block tool (Rotate tool in EQ5).
- Hold down the ALT key and click on the top border two times to rotate the flowers and birdhouses together.
- ALT+click the right border three times to rotate the pines and cabins.
- ALT+click the left border one time to rotate the wrenches and lighthouses. Your quilt should look something like this now:

Color the Quilt
- Click on the Paintbrush
 tool.
tool. - Color the quilt.
- If you would like to use a fabric or color already used in the quilt, click the Eyedropper
 tool. Click on the fabric/color in the quilt. The color will be sucked up and you’ll automatically be switched to the Paintbrush and able to start clicking in that color.
 - Click Add to Sketchbook button (Save in Sketchbook in EQ5) to save this quilt.

EQuinox color and fabric tips
If you are sewing along with us during the lessons, remember EQuinox is a scrap quilt. It uses a large variety of colors and values. The Sun is the quilt’s center block.
For the borders around the Sun, think in terms of sun rays, slightly varying the colors and values in each border strip to reflect seasonal color and light changes:
- Top Border = Spring
- Right Border = Winter
- Bottom Border = Fall
- Left Border = Summer
We recommend printing Templates for all blocks. (Some may work with Foundation Piecing.)
Click the Select tool ![]() .
.
Click on a block in the border to select it.
From the menu bar, choose FILE > Print > Templates.
Be sure you put a check in “size from quilt”.
- On the menu bar, click FILE > Exit.