Getting Started
Print off these instructions from your internet browser by clicking FILE > Print. Follow each step of this lesson to begin making your “EQuinox” Mystery Quilt.
") Open the EQuinox.PJ5 or .PJ6 File
Open the EQuinox.PJ5 or .PJ6 File
- Open EQ6 (EQ5).
- Click the Open an Existing Project tab (it appears immediately when you open EQ6 or EQ5).Or
On the menu bar, click FILE > Open. - Click on EQuinox.PJ6 (or EQuinox.PJ5 in EQ5).
- Click OK. The Sketchbook opens.
Edit the Quilt Layout
- Click the Quilts section to find your mystery quilt layout. Go to the last quilt in the Sketchbook.
- Click the Edit button. Your quilt appears on the Quilt worktable.
Create Border Four
- Click the Borders tab.
- Click the Add button. It adds a border.
- Under Select a border style, click the down arrow to display choices.
- Click Mitered (at the top of the list).
- In the sizing area, lock your borders so they will all move together by putting a check next to the “All” box.
- Drag the slider bar for Left (or click directly on the slider bar) to make the border 1.75 (4.45cm x 4.45cm). Since you have the “All” box checked, all border sides should change at once as you drag, so they are all now 1.75.
Create Border Five
- Click the Add button. It adds a border.
- Under Select a border style, click the down arrow to display choices.
- Click Tile On Point Corners.
- Use the arrows to change the number of blocks in the border. Change Horizontal to 5.
- Click the Layer 1 tab. Now we’ll draw one block and get three others to put into your outer border.

Get Four Blocks from the Library
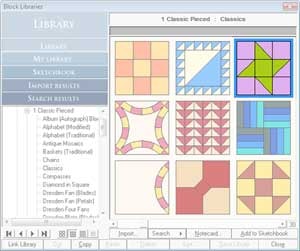
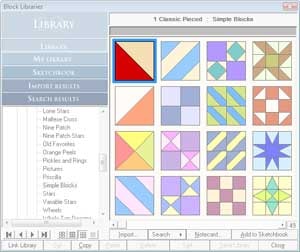
- Click LIBRARIES > Block Library on the top menu bar.
- In EQ Libraries, scroll down and click the “3 Foundation Pieced” (“3 Paper Piecing” in EQ5) category.
- Scroll down and click the “Flying Geese” style.
- Find the 8th block titled “Flying Geese 7” or “Flying Geese VII“. Click the block, to select it.

- Click the Add to Sketchbook button (Copy button in EQ5) to put this Flying Geese 7 block in your Sketchbook. (We will modify this block to make a new block.)
- In the libraries list, scroll up to find and click on the “1 Classic Pieced” category.
- Scroll down and click the “Classics” style.
- Find the 10th block titled “Friendship Star” and click the block, to select it.
- Click the Add to Sketchbook button (Copy button in EQ5) to put this Friendship Star block in your Sketchbook.
- Still under 1 Classic Pieced, scroll down and click the “Four Patch” style.
- Find the 4th block from the end titled “Dutchman’s Puzzle” and click the block, to select it.
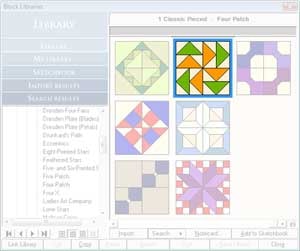
- Click the Add to Sketchbook button (Copy button in EQ5) to put this Dutchman’s Puzzle block in your Sketchbook.
- Still under 1 Classic Pieced, scroll down and click the “Pictures” style.
- Find the 15th block titled “Butterfly” and click the block, to select it.
(To find the block faster, we changed our view to show 16 blocks at a time instead of 9. )
)
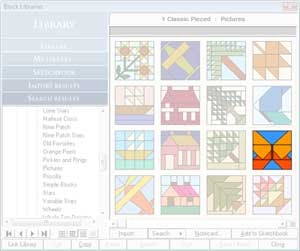
- Click the Add to Sketchbook button (Copy button in EQ5) to put this Butterfly block in your Sketchbook.
- Still under 1 Classic Pieced, scroll down and click the “Simple Blocks” style.
- Click the 1st block, to select it.
- Click the Add to Sketchbook button (Copy button in EQ5) to put this Half-Square Triangle block in your Sketchbook.
- Click the Close button to put away the Library.
Turn the Flying Geese 7 Block into a Mallard Block
- Click the View Sketchbook
 button. The Sketchbook appears.
 - Click on the Blocks section.
- Click the Flying Geese 7 block and click the Edit button.
- Change your Graph Paper according to whether you are in EQ5 or EQ6:
EQ6 Instructions:
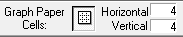
- In the Precision Bar, change the Graph Paper Cells Horizontaland Vertical to 4. You can change a number by double-clicking it and typing over it.
- Make sure Hide/Show Graph Paper is turned on (looks pressed in).
EQ5 Instructions:
- Click BLOCK > Drawing Board Setup on the menu bar.
- On the Graph Paper tab, change the Number of DivisionsHorizontal and Vertical both to 4.
- Still on the Graph Paper tab, click the down arrow next to Styleand make sure it is set to Graph paper lines.
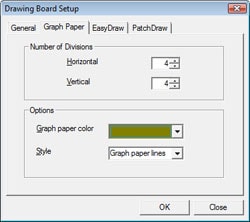
- Click OK.
- Click the Line
 tool and draw 4 lines (shown in red) over the graph paper to complete the squares.

- Click the Add to Sketchbook
 button (Save in Sketchbook in EQ5) to save the block.
 - Click the Color tab at the bottom of your screen.
- Using the Paintbrush tool
 , recolor the block in black and white and grays (from the Solids/Colors tab) as pictured as below:
")
- Click the Add to Sketchbook button (Save in Sketchbook in EQ5) to save the coloring.
Recolor the Other Blocks
- Click the View Sketchbook button. One at a time, click on the block, then click on the Edit button. This will send the block down to the Worktable. (Note: You do not need to color the half-square triangle block.)
- Click on the Color tab. Color the block using black, white and grays, roughly as shown. Then click the Add to Sketchbook button (Save in Sketchbook in EQ5). (Make sure you get steps 46 and 47 for all 3 blocks.)


Name the Blocks
- Click the View Sketchbook button to open the Sketchbook.
- Click the Blocks section to see the blocks. The Butterfly block is already named.
- Click on the block you drew in this lesson (the modified Flying Geese 7 block).
- To name the block, click on the Notecard button. The notecard for this block appears.
- Beside the word Name, type the name: Mallards.
- Click the close (X) button at the notecard’s top-right.
- To rename the Friendship Star block, click on the block.
- Click on the Notecard button. The notecard for this block appears.
- Beside Name, double-click the word Friendship and type Winter, so the new name is: Winter Star.
- Click the close (X) button at the notecard’s top-right.
- To rename the Dutchman’s Puzzle block, click on the block.
- Click on the Notecard button. The notecard for this block appears.
- Beside Name, erase Dutchman’s Puzzle, so it is blank. (Use your Backspace or Delete key.)
- Type the new name: Seagulls.
- Click the close (X) button at the notecard’s top-right.
- Click Close (or the X) to close the Sketchbook.
Set Blocks into Your Quilt
- On the menu bar at the top of your screen, click WORKTABLE > Work on Quilt.
- Click on the Set Block tool
 (Set tool in EQ5). The Sketchbook Blocks palette (Blocks palette in EQ5) appears.
 - Click on the Seagulls block in the palette.
- Be sure the grayscale version you colored is the one you see in the palette. If not, use the colorway arrows
 so you see your grayscale coloring.
 - Holding down the ALT key on your keyboard, click on an empty block space inside the left border. Five blocks inside your left border will be filled with Seagulls.
- Click on the Mallards block in the palette. Be sure the grayscale version is showing. (If not, use hte colorway arrows.)
- Holding down the ALT key, click on an empty block space inside the bottom border to set five Mallardsblocks.
- Click on the Winter Star block in the palette. Be sure the grayscale version is showing.
- Holding down the ALT key, click on an empty block space inside the right border to set five Winter Starblocks.
- Click on the Butterfly block in the palette. Be sure the grayscale version is showing.
- Holding down the ALT key, click on an empty block space inside the top border to set five Butterfly blocks.

- Click on the Half-Square Triangle block in the palette. Be sure the grayscale version is showing.
- Holding down the CTRL key, click on a corner block space in the border.
Rotate Blocks in the Quilt
- Click the Rotate Block tool
 (Rotate tool in EQ5).
 - Click on every other Butterfly block in the border, to make some fly one way, and others fly another.
- Click on the top-right, then click on the bottom-left Half-Square Triangle block in the border. (You should notice the seam lines for your Half-Square Triangles line up with the mitered borers all the way to the center block.)
- Click on the Flip Block tool
 (Flip tool in EQ5).
 - Click on every other Winter Star block to flip the stars one way and another.
- Click the Add to Sketchbook button (Save in Sketchbook in EQ5) to save this grayscale version of your quilt.

Color the Borders
- Click on the Paintbrush
 tool.
tool. - Color your mitered quilt border. Then color the outside border.
- Click the Add to Sketchbook button (Save in Sketchbook in EQ5) to save your quilt coloring.
EQuinox color and fabric tips
If you are sewing along with us during the lessons, remember EQuinox is a scrap quilt. It uses a large variety of colors and values. The Sun is the quilt’s center block.
For the borders around the Sun, think in terms of sun rays, slightly varying the colors and values in each border strip to reflect seasonal color and light changes:
- Top Border = Spring
- Right Border = Winter
- Bottom Border = Fall
- Left Border = Summer
For the inner Mitered border, cut 1 strip for each season that is 2.25″ x 29.50″. Sew to quilt center and miter using your preferred technique.
To print out a copy of a Filtered Sun or Filtered Sun Corners block, click the Select tool ![]() .
.
Click on a block in the border to select it.
From the menu bar, choose FILE > Print > Templates or Rotary Cutting or Foundation Pattern.
Be sure you put a check in “size from quilt”. (It’s on the Options tab for Foundation Patterns.)
If you’d like to strip-piece the Filtered Sun blocks sew 2″ strips together for each of your 4 color patterns. When the blocks are finished, they will measure 3.00″.
You’ll need 5 Butterfly blocks, 5 Winter Star blocks, 5 Mallard blocks, 5 Seagulls blocks and 4 unique Half-Square Triangle Corners.

For the setting triangles you’ll need 8 side setting triangles for each season and 4 corner setting triangles for each season. These would be most accurate if you cut from template printouts.
EQ6 users can select the colored setting triangle and just click FILE > Print > Templates.
EQ5 users have an extra step or two. EQ5 users need to set the Half-Square Triangle in the spaces marked in red below and set a Four X block in the spaces marked in yellow. You can Copy the Four X block from 1 Classic Pieced > Simple Blocks. Then ALT+Rotate the Half-Square Triangles in the borders so you don’t see the seam. This will give you an accurate printout when you print templates.

- On the menu bar, click FILE > Exit.