Skylights Episode 02: Table for One
Print this Page
Getting Started
Before you start Lesson 2 make sure that you have completed Lesson 1.
Print off these instructions from your internet browser by clicking FILE > Print.
Open your Mystery Project
- Double-click the EQ6 (EQ5) icon on your Windows Desktop.
- Select the Open an existing project tab.
- Click your mystery file. When this file is selected it is highlighted and a preview of the layout that you created in Lesson 1 is showing.
- Click OK. The Project Sketchbook containing your Mystery Project layout is now showing.
- Click Close (x) to close the Project Sketchbook.
Set up Snap Grid
- To create a block you must be on the Block worktable. Click the Work on Block button or on the menu bar click WORKTABLE > Work on Block (EQ5). You are now on the Block worktable.
- On the menu bar click BLOCK > New Block > EasyDraw Block.
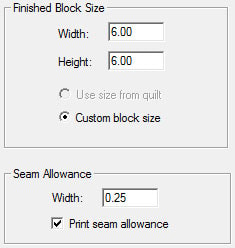
- On the menu bar, click BLOCK > Drawing Board Setup > Block Size (General tab in EQ5). Beside Width(Horizontal in EQ5) double-click the existing number and type 6. Repeat this step for Height (Vertical in EQ5) until it is also 6.
- (EQ6 only) Click Snap Grid on the side.
- Beside Horizontal grid points (Horizontal divisions in EQ5) click the arrows until the number is 12. Repeat this step for Vertical grid points (Vertical divisions in EQ5) until it is also 12.
- (EQ6 only) To make it easier to draw precisely you will want to make sure that snapping is activated. While still in Drawing Board Setup click Snapping. Make sure there is a check in the box beside Snap to grid. If there is not, click on the box and a check will appear.
- Click OK.
Make a 4-patch Block
- Click the Grid tool. On the menu bar, click BLOCK > Grid Tool Setup (Grid Setup in EQ5). The Grid Setup box appears and allows you to adjust the number of columns and rows that the grid will contain.
- In the Grid Setup box click the arrows beside Columns until the number of columns is 2. Follow this same step with Rows so the number of rows is also 2.
- Place the crosshairs of the mouse cursor over the top-left corner of the block outline. Click, hold and drag the crosshairs diagonally to the bottom-right corner of the block outline. You will see two solid lines that make your block into a 4-patch. If you don’t see a complete 4-patch, click EDIT>Undo, and drag again from top-left to bottom- right corners. (These are permanent lines that will appear when you click on the Color tab.)
Add graph paper to your block
- On the menu bar, click BLOCK > Drawing Board Setup > Graph Paper. You will now see the Graph Paper Options.
- To make the graph paper appear on the Block worktable you need to click the box beside Show graph paper so that a check appears (EQ6 only). If you would like, you can also change the color of the graph paper.
- Under Number of Graph Paper Divisions click the arrows beside Number of cells wide (Horizontal in EQ5) until number of cells is 6. Follow the same step for Number of cells high (Vertical in EQ5) so that it is also 6. Under OPTIONS > Style, choose Graph paper lines (EQ5 only).
- Click OK. You will now see the block divided up by dotted lines in the color you selected. There should be five lines dividing the block from top to bottom and five lines dividing the block from side to side. These lines are used to guide you as you draw and will not show up when you click the Color tab.
Draw the Block
- Click the Line tool and use the numbered block below each step to complete each patch of the block.
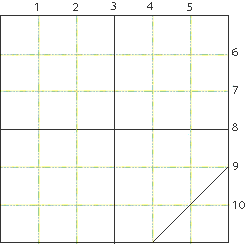
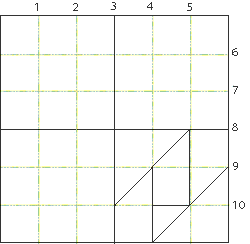
- You will begin to draw in the bottom-right patch. Draw a diagonal line that begin where line 4 intersects the bottom of the block and ends where line 9 intersects the right side of the block.
- Draw another diagonal line that begins where line 3 and line 10 intersect and ends where line 5 and line 8 intersect.
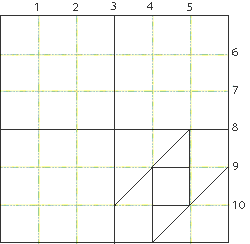
- Draw a vertical line that begins where line 4 intersects the bottom of the block and ends where line 4 and line 9 intersect.
- Draw another vertical line that begins where line 5 and line 10 intersect and ends where line 5 and line 8 intersect.
- Draw a horizontal line that begins where line 4 and line 10 intersect and ends where line 5 and line 10 intersect.
- Draw another horizontal line that begins where line 4 and line 9 intersect and ends where line 5 and line 9 intersect. Your patch is now complete.
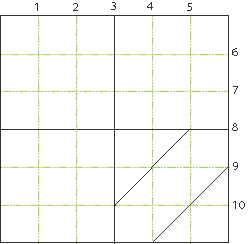
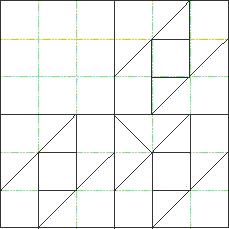
- Now that you have completed the first patch you will need to draw the same six lines in the top-right patch and the bottom-left patch. After these lines are drawn your block should look like the following example:
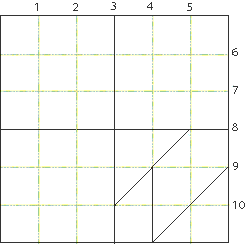
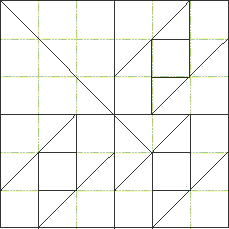
- The final step in drawing your block is to add a diagonal line that starts at the top-left corner of the block and ends where line 4 and line 9 intersect. Your block is now complete and should look like the following example:
- Turn off the graph paper by going to the menu bar and clicking BLOCK > Drawing Board Setup > Graph Paper. Click the box beside Show graph paper
so the check disappears. (EQ6) Click the down arrow beside Style and choose Blank (EQ5).
- Click OK.
Color the Block
- Click the Color tab at the bottom of the screen. Your block will appear and be ready for color. (Note: If any lines disappear, it is because they are not drawn
completely point to point so they will not snap to the grid. Click the EasyDraw tab, click the Edit tool, click the nodes of the “Problem lines” or redraw using the Line tool.)
- On the Fabrics palette click the Colors tab (Solids in EQ5). This is where you will get the solid colors for your block.
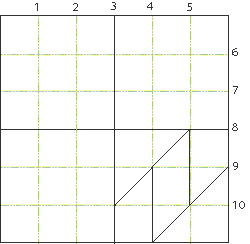
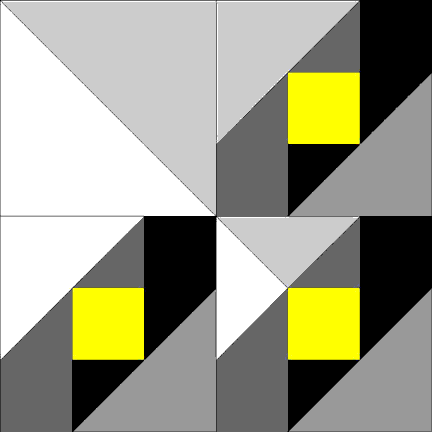
- Scroll through the colors until you find the colors that you need. Click the color and then click on the area of the block that needs to be this color. The example below shows where each of the colors need to be used in the block.
|
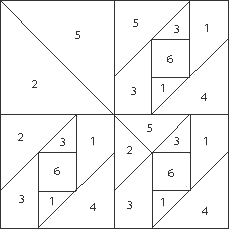 |
1. Black2. White3. Dark-Medium Gray4. Medium Gray5. Light-Medium Gray
6. Yellow |
- Continue coloring your block until it is complete. When your block is complete it should look like the following:
Save and Name your Block
- When you are done coloring your block add it to the Sketchbook by clicking the Add to Sketchbook button (Save in Sketchbook in EQ5).
- Click the View Sketchbook button.
- Click the Blocks section. (For EQ5, click the arrow pointing right, beneath the block, to display the block in color).
- Click the Notecard button at the bottom of the Sketchbook. A blank notecard appears. Beside Name type:Garret Windows (var.). Your block is a variation of the Garret Windows block. The traditional Garret Windows has identical designs in each patch.
- Click the X in the top-right corner of the notecard to close it. You will notice that your block now displays its name.
 Click Close (x in EQ5) to close the Sketchbook. Click the Save button.
Print Your New Block
- On the menu bar, click FILE > Print > Templates, Foundation Pattern or Rotary Cutting. (Choose your favorite.)
- You need to print this block so the finished size is 6.00 x 6.00.
- Print the block.
- Exit EQ6 (EQ5) by clicking FILE >Exit.
You have now completed your first block of the Mystery Quilt.
Sew one Garret Windows block according to your printout.
Colors: think of apartment houses (reds, greys, blacks, tans, or dark greens).
Tune in next month to do the next lesson.