 In this lesson we will draw and color a block called Christmas Tree. This block is in the EQ5 and EQ6 Block Libraries if you’re feeling lazy. But drawing the block will give you more EasyDraw drawing practice.
Getting Started
Before you start Lesson 10 make sure that you have completed Lessons 1-9. If you have not completed these previous lessons return to the Skylights Mystery Quilt lesson list and complete them all before you begin Lesson 10. Make sure, if you’re a beginner with our programs, that you have worked through the beginning Workbook lessons, especially the EasyDraw lessons, in the “EQ5 Getting Started” book or the “EQ6 User Manual” before trying these mystery lessons. Print off these instructions from your internet browser by clicking FILE > Print.
Open your Mystery Project
- Double-click the EQ6 (EQ5) icon on your Windows Desktop.
- Click the Open an Existing Project tab in the Project Helper.
- Choose your Mystery Project file which should be saved as mystery.PJ6 (or mystery.PJ5). When this file is selected it is highlighted.
- Click OK. The Sketchbook containing your Mystery Project is now showing.
- Click Close (x in EQ5) to close the Sketchbook.
Set up Snap Grid
- To create a block you must be on the Block worktable. On the menu bar, click WORKTABLE > Work on Block.
- To start a new block click BLOCK > New Block > EasyDraw Block on the menu bar.
- On the menu bar, click BLOCK > Drawing Board Setup > Block Size (General tab in EQ5). Make sure block size is 6 x 6. If it is not, double-click the existing number for Width (Horizontal in EQ5) and type 6. Repeat this step for Height (Vertical in EQ5) until it is also 6.
- Click Snap Grid (only EQ6). Beside Horizontal grid points (Horizontal Divisions in EQ5) click the arrows until the number of points is 24. Repeat this step for Vertical grid points (Vertical Divisions in EQ5) until it is also 24.
- (EQ6 only) To make it easier to draw precisely you will want to make sure that snapping is activated. While still in Drawing Board Setup click Snapping (under EasyDraw). Make sure there is a check in the boxes besideSnap to grid and Snap to nodes of drawing. If there is not, simply click on the box and a check will appear.
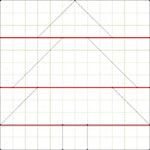
- Click Graph Paper on the side (EQ6) or on the top (EQ5). Click the box beside “Show graph paper” (EQ6) or click the down arrow under “Options” beside “Style” and choose “Graph paper lines” (EQ5). Make the number of graph paper divisions 12 for both number boxes.
- Click OK. You will now see graph paper lines across your block to help you draw. These lines will not appear in your final block drawing.
Draw the Block
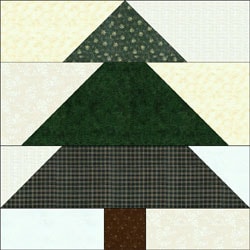
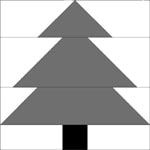
 This is the block you’re drawing.
|
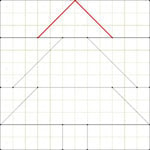
 Step 13 |
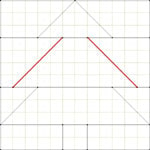
 Step 14 |
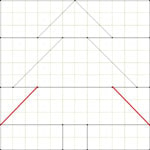
 Step 15 |
 Step 16 |
|
 Step 17 |
||
Color the Block
 Click the Color tab at the bottom of the screen. Your block will appear and be ready for color. (Note: If any lines disappear, it is because they are not drawn completely point to point so they do not snap to the grid. Click the EasyDraw tab, click the Edit tool, click the nodes of the “Problem lines” or redraw using the Linetool.)
- On the Fabrics palette click the Colors tab (Solids in EQ5). This is where you will get the solid colors for your block. Scroll through the colors until you find the colors that you need.
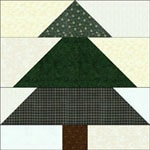
- Color your block with dark gray, black, and white, so it looks like this:
- Click the color and then click on the area of the block that needs to be this color.
Save and Name Your Block
- When you are done coloring your block, click the Add to Sketchbook button (Save in Sketchbook in EQ5).
- Click the View Sketchbook button.
- Click the Blocks section.
- Click your newly colored Christmas Tree block. (It is unnamed.) (For EQ5, click the arrow pointing right, beneath the block, to display the block in color).
- Click the Notecard button at the bottom of the Sketchbook. A blank notecard appears. Beside Name type:Christmas Tree.
- Click the X in the top-right corner of the notecard to close it. You will notice that your second block now displays its name.
- Click Close (x in EQ5) to close the Sketchbook.
- Click the Save button.
- Exit EQ6 (EQ5) by clicking FILE > Exit.
Note: If you are sewing this block you will sew one block. For fabric, think of tree colors with light sky behind.