Inspired by the antique quilt below, learn how to design your own Dream Catcher quilt in EQ7!
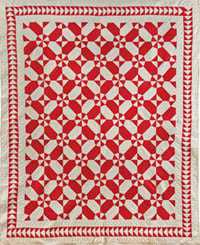 |
| Courtesy American Folk Art Museum, New York. #76 Daisies Quilt; Artist unidentified; United States 1890-1930. Collection of Joanna S. Rose. Photo by Gavin Ashworth. |
DESIGNING A DREAM CATCHER
- In EQ7 start a new project. Name it: Dream Catcher
PREPARE TO DRAW THE BLOCK
- Click WORKTABLE > Work on Block.
- Click BLOCK > New Block > EasyDraw.
- Click VIEW > Precision Bar, to make sure you have the Precision Bar showing above your drawing worktable.
- On the Precision Bar, set these settings:

Block Width: 6.00
Block Height: 6.00
Snaps Horizontal: 24 (Since your block is 6″, 24 snaps lets you start and stop a line at each 1/4″. 6 x 4 = 24)
Snaps Vertical: 24
Graph Paper: OFF
Snapping Options:
Snap to Grid – ON
Snap to Node – ON
Snap to Line – OFF
DRAW THE BLOCK
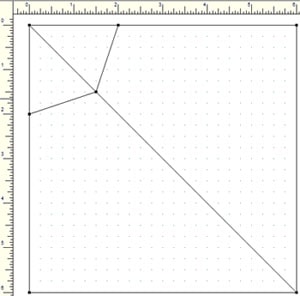
Draw 7 lines, as follows:
- Draw a diagonal line from top-left to bottom-right corner.
- Draw a line from 2″ down on left edge to 1 ½” on diagonal line.
- Draw a line from that same spot on the diagonal line up to 2″ on top.
Your block will look like this:
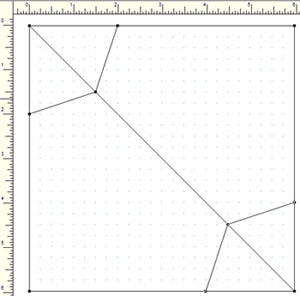
- Draw a line from 4″ from the bottom edge up to 4 ½” on the diagonal.
- Draw a line from that same spot on the diagonal line up to 4″ on the right edge.
Your block will look like this:
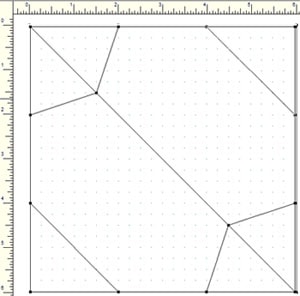
- Draw a line across the top-right corner from 4″ on the top ruler to 2″ on the side ruler.
- Draw the last line across the bottom-left corner from 4″ on the left ruler, to 2″ on the bottom ruler.
Your finished block should look like this:
COLOR THE BLOCK
What makes this block so versatile is asymmetry:
– Asymmetrical design, making the block form new designs when you rotate
– Asymmetrical coloring, which adds to the fun
- Click the Color tab (bottom of screen).
- Color your block.
- Click Add to Sketchbook.
DESIGN QUILTS
- Click WORKTABLE > Work on Quilt.
- Click QUILT > New Quilt > Horizontal.
- Click the Layout tab (bottom of screen).
- Make the following settings:
Number of Blocks: Hor 8, Ver 8
Finished size of blocks: 6.00″
Sashing: 0.00
- Click the Layer 1 tab.
- Click the Set Block tool.
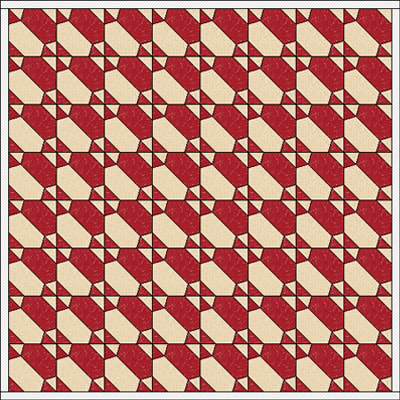
- Hold down your keyboard CTRL key as you click [CTRL+click] on your quilt layout to set the block into all block spaces. The design will just be so-so. Nothing special.
USING THE SYMMETRY TOOL
Because this block’s design AND coloring are asymmetrical (meaning the block is not the same on all 4 sides) it is PERFECT for rotating, since if you rotate asymmetric blocks different amounts they form new secondary designs in the quilt.
Let’s jazz up the design — using the Symmetry Tool. (The Symmetry tool (page 88 – EQ7 User Manual) automates flipping and rotation on all blocks simultaneously.)
- Click the Symmetry tool.
Note: For the best effects using this the Symmetry tool, use:
The Symmetry tool is capable of producing 16 variations of the quilt design by flipping and rotating the blocks. Clicking 17 times displays the original setting again. |
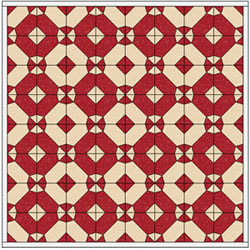
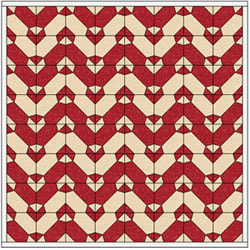
- CTRL+click on the quilt. We’re liking the first design you see. CTRL+click repeatedly and see a new design each time you click.
You may find other combinations you like – like this:
- Click Add to Sketchbook each time you see a design you like, to save the quilt.


