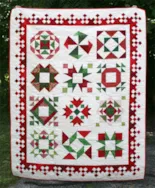
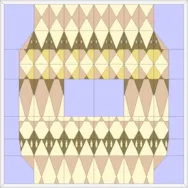
If you’ve ever called our office, chances are you’ve heard Linda’s friendly voice on the other end of the line. Linda has worked at EQ for several years, but at the time of this original blog post (2014), she had just recently designed her first quilt in EQ software! Linda thought she was just sharing her quilt with those of us in the office, but we all loved it so much we wanted to share it on the blog too! Linda designed the quilt to use with a Block of the Month program she did. She followed this tutorial (written for EQ7, but similar steps work for EQ8!) on the blog to import photos of her finished blocks and design a quilt around them. Here’s her EQ design: It’s called “Merry Mike-mas” — a gift for her husband, Mike. Look at this cute label that Christine, another EQ employee, designed
Uncategorized
EQ Linda’s Christmas BOM Quilt
Posted 12-06-2018 by Sara | Posted in: Downloads EQ8 From Our Users Uncategorized
By Hand Challenge – Winners Announced!
Posted 12-03-2018 by Christine | Posted in: Uncategorized
We had SO many amazing entries for this challenge, it was very difficult to narrow it to just three. (See all entries on the original post here.) Thanks to everyone for participating! Watch for more design challenges in 2019! Grand Prize Winner: Darlene Cunningham Darlene wins all the Benartex fabric needed to make her quilt top plus one copy of each of the EQ8 books! Amy’s Honorable Mention: Patti Wabitsch Patti wins all the Benartex fabric needed to make her quilt top! EQ’s Honorable Mention: Serena Toppins Serena wins all the Benartex fabric needed to make her quilt top! Again, you can see all the entries in the original blog post. Thanks again to all participants! If you’re looking for something else to keep you designing, check out this month’s Design & Discover lesson!
Nancy Mahoney Quilt Pictures
Posted 07-12-2017 by Electric Quilt | Posted in: EQ Artists Photographing Quilts Uncategorized
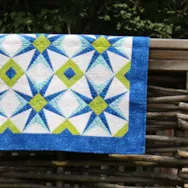
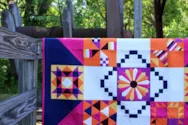
This past week we were lucky enough to be able to photograph a handful of Nancy Mahoney’s quilts. Her work is absolutely stunning and it was fun to find places that helped to show that. Take a look at some of the pictures we took! True Colors - Nancy Mahoney 2013 Crooked Path – Nancy Mahoney 2014 Split Star – Nancy Mahoney 2015 Gum Drops – Nancy Mahoney 2013 Infinity – Nancy Mahoney 2014 It’s really neat to see all that Nancy has been doing with EQ7! It has been so much fun to take quilts out that I have seen on the covers of her books and in magazines. It is surreal to see all of these quilts in person. Check out more of Nancy’s work on her website! Look for more of her photos in upcoming social media posts!
Photographing AnneMarie Chany’s Quilts
Posted 07-05-2017 by Electric Quilt | Posted in: Photographing Quilts Uncategorized
Quilting and Photography are two of my greatest loves, and recently I have been able to put them together. One of our EQ Artists, AnneMarie Chany, brought us a few quilts to photograph. Moccasin by AnneMarie Chany – Gen X Quilters The first quilt, Moccasin, she called her “Fourth Child” when she dropped it off. Her design is phenomenal with quilting just as stunning. Read more about her creation process for this quilt. We decided to go to the Wood County, OH Historical Society to take picture’s AnneMarie’s quilts. The structure that the quilt is hung on is an Oil Derrick, which was used to mine natural gas in the late 1800’s. We waited until the exact second that the wind died down to shoot this photo. Wind only stops for seconds at a time most days in windy Bowling Green, OH. Alternate views of Moccasin Purple Bonfire by AnneMarie Chany –
Using Architecture as Inspiration
Posted 06-21-2017 by Electric Quilt | Posted in: Uncategorized
Quilting is an art, and all art stems from inspiration. Architecture is a great source of inspiration even for quilters. Tanya Munro of QuilTen, in Moscow, Russia, created an incredible quilt based on a building facade in Bruges, Belgium. The Bruges Façade Screen was created to fit on an existing residential building. The project team led by Ryan Golenberg designed this around the lace that is made in the area. You can see more of his work at http://www.iwamotoscott.com/ Tanyo Munro took the simple, yet stunning, pixelated version of Bruges’s complex lace, and created a foundation pieced quilt design with EQ5. Check out more of her work at https://www.instagram.com/quil.ten/ Want to create a quilt based on architecture? Let’s work through a quilt based on a building that I really enjoy, The Guangzhou Circle. Find an image of the structure you like, with the perspective you want to capture in your
Quick Tip Tuesday! Strip Layout with 60 Degree Diamonds
Posted 04-11-2017 by Heidi | Posted in: Quick Tip Tuesday Uncategorized
The formula below works for diamond borders as well as strips in strip quilts. Click QUILT > New Quilt > Vertical Strip (or Horizontal strip). Click the Layout tab, then click the Add or Delete button until you have the number of strips you want. Under Select strip style: select from the following: Diamonds or Half Drop Diamonds. Under Number of blocks along length: choose the number of diamonds you want along the strip. Under Strip size:follow the formula below to arrive at the width.Divide strip length by number of blocks along length. Divide this result by 1.7320508. (This is the square root of 3). This gives you the strip width. Multiply by 2 to account for the extra diamond across the strip width (for Double Diamonds and Half Drop Diamonds borders only). For example: Strip length: 70” Number of blocks along length: 10 70” divided by 10 = 7
Quick Tip Tuesday! Applique Letters on Top of the Quilt
Posted 02-07-2017 by Heidi | Posted in: Quick Tip Tuesday Uncategorized
Click Worktable > Work on Quilt. Click Add/Remove Buttons . Click Set Applique Text if it is unchecked. Click Layer 2. Click the Paintbrush tool. Select a fabric or color for your text. Click the Set Applique Text tool. Choose the font, style and size in the Applique Text box. (This can be changed later.) Hold down your keyboard SHIFT key, then click and drag a box on the quilt. Type your message. Click the Adjust tool. Click the message you just typed. Drag the text by the center to move it. Drag the text by a corner to resize it. Click Add to Sketchbook .We are here to help! If you have questions about this, or anything else please contact tech support.


