Add interest to text shapes by using stitches and shadows. Text fonts stitch best if they are block style capital letters. Fonts that have thin and thick areas are more difficult to stitch and still look good. Bold, block letters have more space to them to add decorative stitches.
Open your EQStitch program.![]()
Add the tools to the toolbar by clicking on the arrow at the bottom of the toolbar and then on the words add/remove buttons.
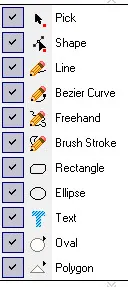
Place a checkmark in front of the tools and then close the selection box by clicking on a white space on the page.
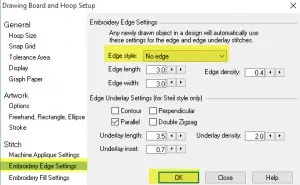
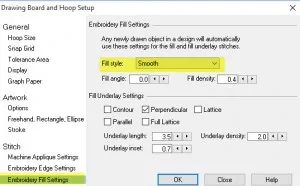
Click on the drawing board options box![]() and set the embroidery fill to ‘smooth’ and the embroidery edge stitch to be ‘no edge’ setting.
and set the embroidery fill to ‘smooth’ and the embroidery edge stitch to be ‘no edge’ setting.
Select the text tool ![]() from the toolbar. Move the cursor over to the artwork area and click/hold/drag/release a text box on the page.
from the toolbar. Move the cursor over to the artwork area and click/hold/drag/release a text box on the page.
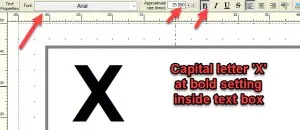
Double click inside the box to see the flashing cursor. Type the Capital Letter ‘X’ from one of the block style fonts. Make sure you set the properties to be a ‘B’ bold setting.
Add the letter to the sketchbook ![]() to automatically create a patch to fill with stitches.
to automatically create a patch to fill with stitches.
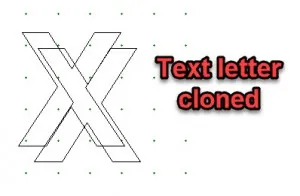
Click on the letter ‘X’ with the pick tool![]() . Once it is selected, click on the ‘clone selected objects’ icon
. Once it is selected, click on the ‘clone selected objects’ icon![]() on the property bar to make a copy of the text.
on the property bar to make a copy of the text.
The copy will appear slightly lower and to the right of the first letter typed.
Click on the stitch tab at the bottom of the screen.
Click on the set fill stitch icon ![]() and select a textured fill for the first ‘X’ and a smooth fill for the cloned copy ‘X’. Click on the set thread tool
and select a textured fill for the first ‘X’ and a smooth fill for the cloned copy ‘X’. Click on the set thread tool ![]() to select a light color for the textured ‘X’ and the color black for the cloned ‘X’. Remember, a light colored thread shows the textured stitches better than the darker colored threads.
to select a light color for the textured ‘X’ and the color black for the cloned ‘X’. Remember, a light colored thread shows the textured stitches better than the darker colored threads.
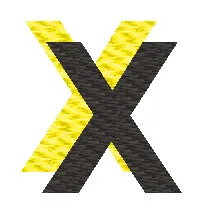
The black ‘X’ is meant to be the shadow of the top text letter so it needs to be moved behind the first letter.
Click on the move up/down tool ![]() on the toolbar and move the black ‘X’ to the back of the first letter.
on the toolbar and move the black ‘X’ to the back of the first letter.

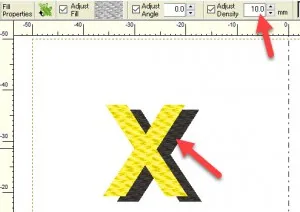
Click on the set fill stitch icon![]() on the toolbar and then set the properties to be a density of 10mm . (This is a less dense fill, reduced stitches) Move the cursor over to the black colored ‘X’ and click once to set the less dense fill to the shadow ‘X’ only.
on the toolbar and then set the properties to be a density of 10mm . (This is a less dense fill, reduced stitches) Move the cursor over to the black colored ‘X’ and click once to set the less dense fill to the shadow ‘X’ only.
Click on the set fill underlay tool ![]() to select it. Uncheck all the underlay options and then click on the black ‘X’ to set the property of no underlay stitches.
to select it. Uncheck all the underlay options and then click on the black ‘X’ to set the property of no underlay stitches.
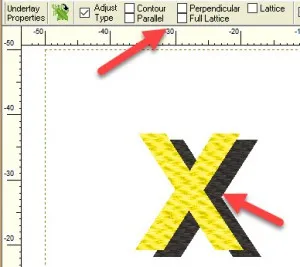
By reducing the bulk of the background ‘X’ fill and underlay stitches, the top stitches that are decorative will lay down more nicely when stitching. Texture and shadow really make any text you use show up more significantly.


